

I’m back with another sewing make, which is a little more challenging on the old sewing skills. See how to make a DIY bustier dress that is 1950s-inspired in today’s post!
I have been working on the sewing machine again and have another project I’d like to share with you. A DIY bustier dress to be in fact. This style of dress has been all the rage recently, and I wanted to get in on the bustier action and see if I could pull off making one. Well, as it turns out I was able to succeed in making the dress and I am here to show you the process so that you can make your own! What’s better is it is a bit 1950s inspiration and has that great vintage look to it (I think so anyway).
Now, it is not an easy task, but still a bit easier than making DIY Jeans. I would say this is an intermediate sewing skill set, however, an ambitious beginner would probably be able to master it as well. This project also required the use of my most recent sewing accessory, DIY Sewing Ham, to help press out the curved seams.

DIY Bustier Dress – Pattern and Fabric
For an upcoming friend’s wedding, I knew that I wanted to make my own dress for it, with a DIY bustier dress being the option. Now, I find drafting patterns difficult and haven’t mastered the skill as of yet, so I went off in the search of a pattern.
I found this gem of a pattern by Chikafrik patterns on Etsy and knew it was the one for this dress. Price-wise I thought this was a steal and at the time of writing the pattern is actually on sale. Now, there is one thing I have to criticise for the pattern and that is the instructions. If you are new to sewing, then the instructions do not fully provide a step-by-step and you do need to do some figuring out. But, that is why you practice on the fabric you don’t intend to use before getting into your sewing make.
I would also recommend making a toile so that you can ascertain which size you need to make the cups and bodice part of the dress in. I adapted two of the sizes to make sure they fit me right (although the fitting could still have been better).
Fabric
Now that we have the sewing pattern, it was time to choose the fabric. With the fabric, I sort of went against the recommendations of the fabric type for this make, but luckily the gamble paid off.
I wanted a turquoise or Tiffany’s blue type of under colour with a tulle overlay to give it a fancy edge. I saw this beautiful make by CrescentShay and took this as inspiration for my dress. She has a tutorial over on her YouTube too.
So for the under-fabric, I found this beautiful turquoise/mint crepe-backed satin by Pound Fabrics. These are my go-to for cheap but good-quality fabric. Most of my makes have been fabric by pound fabrics. Unfortunately, this colour is out of stock at the time of writing, but there are plenty of other colours available!
For the over fabric, I found this beautiful green cherry flower print tulle on Etsy. This fabric lifts the under one and gives it that beautiful flower print to it. To note, this is sold by the yard rather than metres, so take that into account when ordering. It didn’t take too long to arrive, about a week or two from overseas.

So now that we have the pattern and fabric choices, it is time to get making the DIY bustier dress!
DIY Bustier Dress – What You Need:
Here is what you need to construct your DIY bustier dress/ What I used to make mine.
Please note some items in this post are affiliate links and will be marked with an asterisk(*).
- Bustier dress pattern
- Chosen fabric
- Sewing tracing paper*
- Sewing scissors*
- Sewing Machine
- Erasable fabric marker*
- 40cm invisible zipper*
- 5cm wide Satin Ribbon*
Step 1 – Prepare pattern and Fabric
The pattern I am using is a PDF pattern, which means you can print and assemble it from home. You can also send it to be printed on a larger piece of paper (A0), however, it is easy enough to assemble at home. Follow the instructions on which pages line up with each other, and then cut the pattern pieces out. Now you want to make sure that you have taken your measurements so that you know which size to make the dress in.
I used sewing tracing paper to trace the sizes I needed as I used two sizes for the bodice pieces.
Once the pattern pieces are ready, then it is time to pin them to the chosen material and cut these out. This dress comprises of lots of different pattern pieces, so it is good to have bits of paper with which part it is, pinning them to the pieces so you can keep track. You will need to cut out x2 of all the under-colour fabric (satin) as this will be the main dress as well as the lining. Then you want to cut x1 of everything in the tulle fabric for the overlay.

Attach overlay fabric
Before we can begin constructing the dress, it is ideal to combine the underlay fabric and overlay fabric together to make it easier. To do this, change the stitch length to the largest possible and we will baste stitch the overlay to the underlay.
Ideally, you want to baste stitch the tulle along the top of each underlay piece, but you may need to stitch down the sides as well. Make sure the overlay lines up across the edges, as I found on some that weren’t fully aligned it has pulled later on in the make. Around the cup area is where I noticed it most, making it curl at the edges, so keep this in mind.
Once the overlay is attached we can move on to the next step.

Step 2 – Construct the Bodice
The first thing to construct is the cups and bodice part of the dress. Firstly, attach the three bodice pieces using a 1cm seam allowance. Press the seams open and flat after sewing to set the seams. Follow this by sewing the two back panels together, taking note of which edges join the bodice and which are for the zipper. Again, press the seams. You can also zig-zag stitch the edges to finish them.
Then it is time to connect the two to give the base of the bodice shape. You will notice there are curves where the cups are to sit.


After completing the bodice, it is time to construct the cups. Now, this is where you have to take note of which piece is which for them to go together successfully. There are two lower cup pieces and one upper cup piece, and these all need sewing together to form the cup. Once sewn iron the seams flat…this is where the sewing ham comes in very handy!


Then attach the cups to the bodice piece, again finishing the seams and pressing the seams flat.
Repeat the above for the lining – I advise sewing the lining at the same time so that the steps are fresh in your mind. It also saves time later on when you need to attach the two.
Once the bodice pieces are sewn, we can move on to constructing the skirt.

Step 3 – Construct the Skirt
Now the good thing about this pattern is you can have two types of skirt, a gathered skirt or a pleated skirt. Now, I am going for the gathered option as I prefer the look, so will show you the process of this way.
On both the skirt piece, you want to change your stitch length to the longest and sew two rows of gathering stitches. With this, you want to do this in stages so that you have several bits to be able to gather. So, leave a long tail of thread on either end and sew your two rows between 10cm – 20cm long approximately.
Once the gathering stitches are complete, the skirt can then be pinned to the front of the bodice piece. Gather the threads so that the skirt then matches the size of the bodice. Make sure the back openings alight with the back of the bodice.

Sew the two together where pinned, making sure that there are no gaps so that all is connected and in place. Trim any loose threads when finished and if wanted you can remove the gathering threads. Finish the seam and press the seam flat.
Repeat for the lining pieces and set them aside.

Step 4 – Attaching the Zip
Now comes the fun part of adding in the zipper so that the dress is wearable! This can be a bit daunting, but once you get the hang of adding in zips you will be flying.
Line one side of the zip with one edge of the back opening, making sure the zip is facing the right side down. The edge of the zipper should line up with the edge of the fabric. Use a zipper foot and sew into place, after pinning. Repeat with the opposite side and the zipper should then be attached.
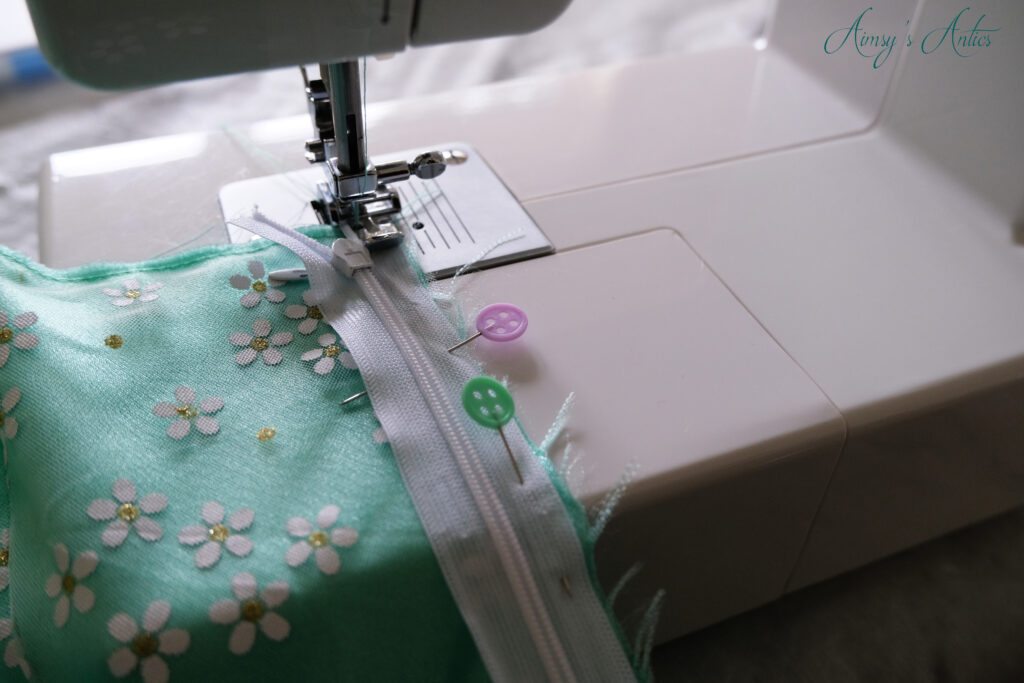

Take this slow, making sure to pin it into place. When sewing in the zipper, you can move the actual zip open and closed to help with getting the stitching as close to the teeth of the zip as possible.
Once the zip is in place, you can then continue the seam down to connect the lower part of the skirt. This can be a little tricky, but with a bit of patience, you will have a seam.
Press all of the seams sewn to set them.
Now the pattern calls for the dress to be hemmed at this point, which I missed. However, I would recommend hemming at this point, because it is a bit more difficult in the end.
Step 5 – Create Straps
This DIY bustier dress is designed to have tie ribbon straps, although you can sew set-in straps if you desire. I am doing the tie straps as I think it looks really pretty.
Cut the ribbon to the size indicated in the pattern. For added strength, I am turning these into tie-able straps rather than just having the plain ribbon. So fold the ribbon in half lengthways, right sides touching and sew a seam along the open edge. Use a safety pin and turn them right side out.
Using a hand sewing needle, complete an invisible stitch to close both openings to create the ends of the straps. Repeat on all four pieces of ribbon.


Once complete, press to lay them as flat as possible.
Then pin it into place on the front and back of the outer dress piece. Baste into place. These will be sandwiched between the outer of the dress and the lining, which we will move on to now.

Step 6 – Attach Lining
If you followed my advice of doing the lining alongside the outer dress, then you should be ready to attach the lining to the dress.
Place the lining and dress together, right sides touching. Make sure the ribbon straps are inside of this. Line up the raw edges and pin them in place. Then sew a 1cm seam along the top edge of the bustier dress, connecting the lining and outer dress.

Before turning the right side out, cut the corners and turn them right side out. Press and then top stitch to keep the lining and dress in place and stop it rolling out. Make sure the lining is inside at this point, we will be topstitching on the right side of the material. Press again, making sure the lining is inside the dress.

Attaching the lining to the zip
Then it is time to attach the lining to the zip. This bit sounds daunting but it is relatively straightforward and just like putting the initial zip in.
Turn the lining to the outside, and keeping the right sides touching, line up the raw edges with the edges of the zip. Sew along the already stitched part of the zip, using the zipper foot to sew the lining to the zip. Repeat for the opposite side. Turn it back the right way and fingers crossed the lining and zip are attached and sewn neatly. Finish with a press.
Attach Lining at the Waist
The final bit to the lining puzzle is to attach the lining and dress at the waistline. Turn the lining to the outside and make sure the right sides of the lining and dress are touching. This will look slightly weird as it is not fully inside out, you should have the inside parts of the waistline touching each other. Sew along this to connect the lining and the outer dress.

Step 7 – Hem the DIY Bustier Dress
The final step (if you hadn’t completed it earlier is to complete the hem of the dress. To do this press, the bottom raw edge to the inside by 0.5cm, and then press over again 0.5cm. Sew along the top folded edge all the way around to finish the hem.

Once the dress is hemmed, give it a final press then the DIY bustier dress is complete and ready to wear!


What do you think about this DIY bustier dress? Will you be making your own? Doesn’t it just resonate with the 1950s? Let me know in the comments below!
Now I found this dress a little difficult to wear as it is quite heavy with the fabric, meaning that it pulls downwards. However, I still wore it to the wedding and loved it in the end. Just make sure you tie the straps extra tight to stop any wardrobe malfunctions!
DIY Bustier Dress – video
Here is the video version of this post. It may be easier to follow along with some of the techniques too. Don’t forget to like the video if you have enjoyed it, and why not subscribe to my channel to keep up with all of my creative and crafty antics on YouTube.
DIY Bustier Dress – Share it!
If you have enjoyed this post, then why not share the love by sharing it or pinning it? You can also check out my Pinterest for more creative inspiration!


Have a creative project in mind, but don’t know how to plan it? I have you covered with a FREE creative project planner when you sign up for my email list. Grab yours now!

How cute is this! I love that pale green and the pretty tulle you chose as the top layer! The white tie sleeves add to the overall effect, and I am very impressed with the even gathers you got on the skirt. I would wear this in a heartbeat if it came off my sewing machine. 🙂
Aww thank you (ad sorry I am so late in replying to your comment!)
It is not the best made, but it is totally wearable and looks fab, doesn’t it?! I saw the pale green and knew it would make a wonderful dress.
Thanks for commenting 🙂
Aimsy xoxo
What a beautiful dress! You are so talented! That colour green is my favourite, it looks so friendly.
Aww thank you (Sorry I haven’t replied sooner!)
The colour is just lovely, isn’t it?!
Thanks for commenting 🙂
Aimsy xoxo
Such a lovely style!
Danielle | thereluctantblogger.co.uk
Aww thank you! I love the vintage look to it, don’t you?
Aimsy xoxo