

Do you use a lot of tin cans and want to recycle them? Well in today’s post I show you how you can recycle your tin cans with decoupage to create DIY tin can planters. A perfect upcycling project for your plants and flowers.
Recycling is so important, so what better way to do it than by transforming your rubbish into something pretty and useful? Today I am going to show you just how to do that using some old tin cans, you know the ones, baked beans, chopped tomato cans etc, turning them into DIY tin can planters.
Now, the method of choice for these is using the art of decoupage. I have previously upcycled an old sewing box with decoupage and had great results. Therefore I thought it would be a great way to add designs onto tin cans to turn them into cute little plant pots. But, what is decoupage?

What is Decoupage?
Decoupage is an art form that uses glue and thin paper, like napkins to add images onto other objects. This is an old art form, primarily for styling furniture, by adding layers of varnish to seal in the paper. By adding several layers, it helps the extra piece to blend in and become one with the item. Decoupage is a really great art design, as well as being quite relaxing to do.

So, if you would like to see how to make DIY tin can planters from old cans and decoupage, then…Let’s get crafting!
DIY Tin Can Planters
For this project, as I said, I am using decoupage. Tin cans can be recycled in different ways, such as painting on designs, or hole punching designs into the can. Decoupaging the cans is a relatively cheap way to do it and you can even make your own glue for it too. However, as these tin can planters are going to be for outside use, I am using an outside mod podge glue for them.
What you need:
To make these DIY tine can planters you will need the following items. Some items on this list are affiliate links, which are marked with an asterisk (*).
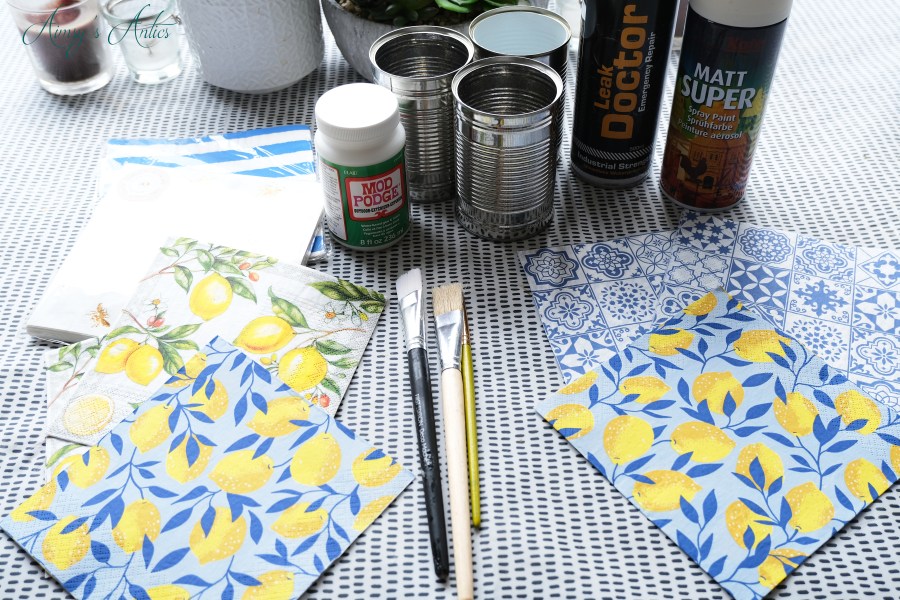
- Tin Cans (used bean, tomato, soup tins etc)
- Patterned napkins
- Sealer* – I used this one, but a regular sealer may work or primer.
- White Spray Paint*
- Outdoor Mod Podge glue*
- Decoupage brushes (short brushes)*
- Hammer*
- Nail*
- Soil/Compost
- Chosen Plant – I went with Pansies
Step 1 – Prep the Tins
Before the tin cans can be transformed, they need to be prepared. Remove any labels that are on the outside, and make sure they are clean on the inside.
If there are any bits of glue residue on the outside of the can, you can remove this easily in a few ways. Soak the can in soapy hot water and use a wire scrubbing brush the get the glue off. You can also use oil, like olive oil or vegetable oil on a paper towel. Rub this over the glue and it can help it unstick from the can.
Dry the tin cans thoroughly before moving onto the next step.

Step 2 – Create Drainage Holes
To be able to use the cans as planters, then you need to create drainage holes. This will allow any excess water to drain away from the plants, and hopefully reducing the risk of root rot.
To create the drainage holes all you need is a hammer and a decent size nail. This will help puncture a hole in the can to create drainage holes. Place the nail in the middle of the bottom of the can and tap with the hammer. This should puncture through the bottom after a few hits. Be careful when doing this, so as not to injure your hands with the hammer. The nail may move when hitting, so be mindful of this too.

Step 3 – Seal and Paint
Now, this part may not be necessary, however, I wanted to preserve the tins as much as possible. To reduce the risk of the can rusting inside, a sealer is applied. The sealer I used is a waterproof repair sealer, and it seems to be doing the job well. Spray this around the inside of the tin can, being careful not to cover the drainage holes. Leave to dry before spraying the outside with paint.

When dry, use spray paint in whatever colour you like. I opted for a white as I thought this would help blend the napkins better when adhering them to the tin. Ideally use a stain-blocking primer and then your colour. I just placed the spray paint directly onto the tin cans and found that the tin altered the white into a cream/off-white colour.
Apply a few light but even coats, allowing time to dry between until you get the colour you like.
Allow the spray paint to fully dry before moving onto the next step. I left a few days between the final layer of paint and applying the napkins.

Step 4 – Prepare Napkins
The next step is the decorative step. There are a few ways to apply the napkins to the tin cans; either covering the whole tin with the napkin or selecting parts of the pattern to the tin.
For either design, you want to remove the top layer of the napkin (patterned piece) from the rest of the layers. The napkins I used were 2-ply napkins, but some come 3-ply. Gently separate them, making sure not to tear the napkin when doing so.
For applying the napkin the whole way around the tin can, measure how much of the napkin you need. Do this by wrapping it around the tin, and marking with your fingernail the bottom edge. Then use a small paintbrush with a little water on it and draw a line where you have marked. Gently pull the napkin and it should begin tearing where the watermark is. Doing it this way help to reduce the napkin ripping in the wrong place and gives a cleaner rip. You can use scissors, but having the slightly jagged edge of the napkin is actually better to blend onto the tin can. See the video below for the technique!
To achieve the look of parts of the napkin, repeat the same process with the paintbrush and water. This time just draw around the design you want and remove it from the napkin piece. This can then be positioned wherever you like on the tin. I loved this look, as it looks like the pattern has eroded from the tin, giving it a really nice vintage look.
Once you have all of your pieces it is time to adhere them to the tin cans.

Step 5 – Adhere the Napkins
Now it is time to adhere the napkins to the cans using Mod Podge glue. This is like PVA glue. You can make your own Mod Podge by adding water to PVA glue (I think), however as these tins will come in contact with water, then we need to use the outdoor version of Mod Podge.
Place a small layer of Mod Podge straight onto the tin can. Place this on for the full length of the tin, but not the whole way around, you want to work in stages. Take the selected napkin (wrapping around the tin) and place it where the glue has been applied. Smooth it out and remove any bubbles. Be careful as the napkin will be even more delicate now that it is touching the glue. Then, add more glue to the in and press down the napkin until it has come back around. If you have any napkin overlapping, use the water trick to remove the excess.
If you are applying individual pieces of the napkin, repeat the same process, however only applying the glue initially where you are placing the piece of napkin.

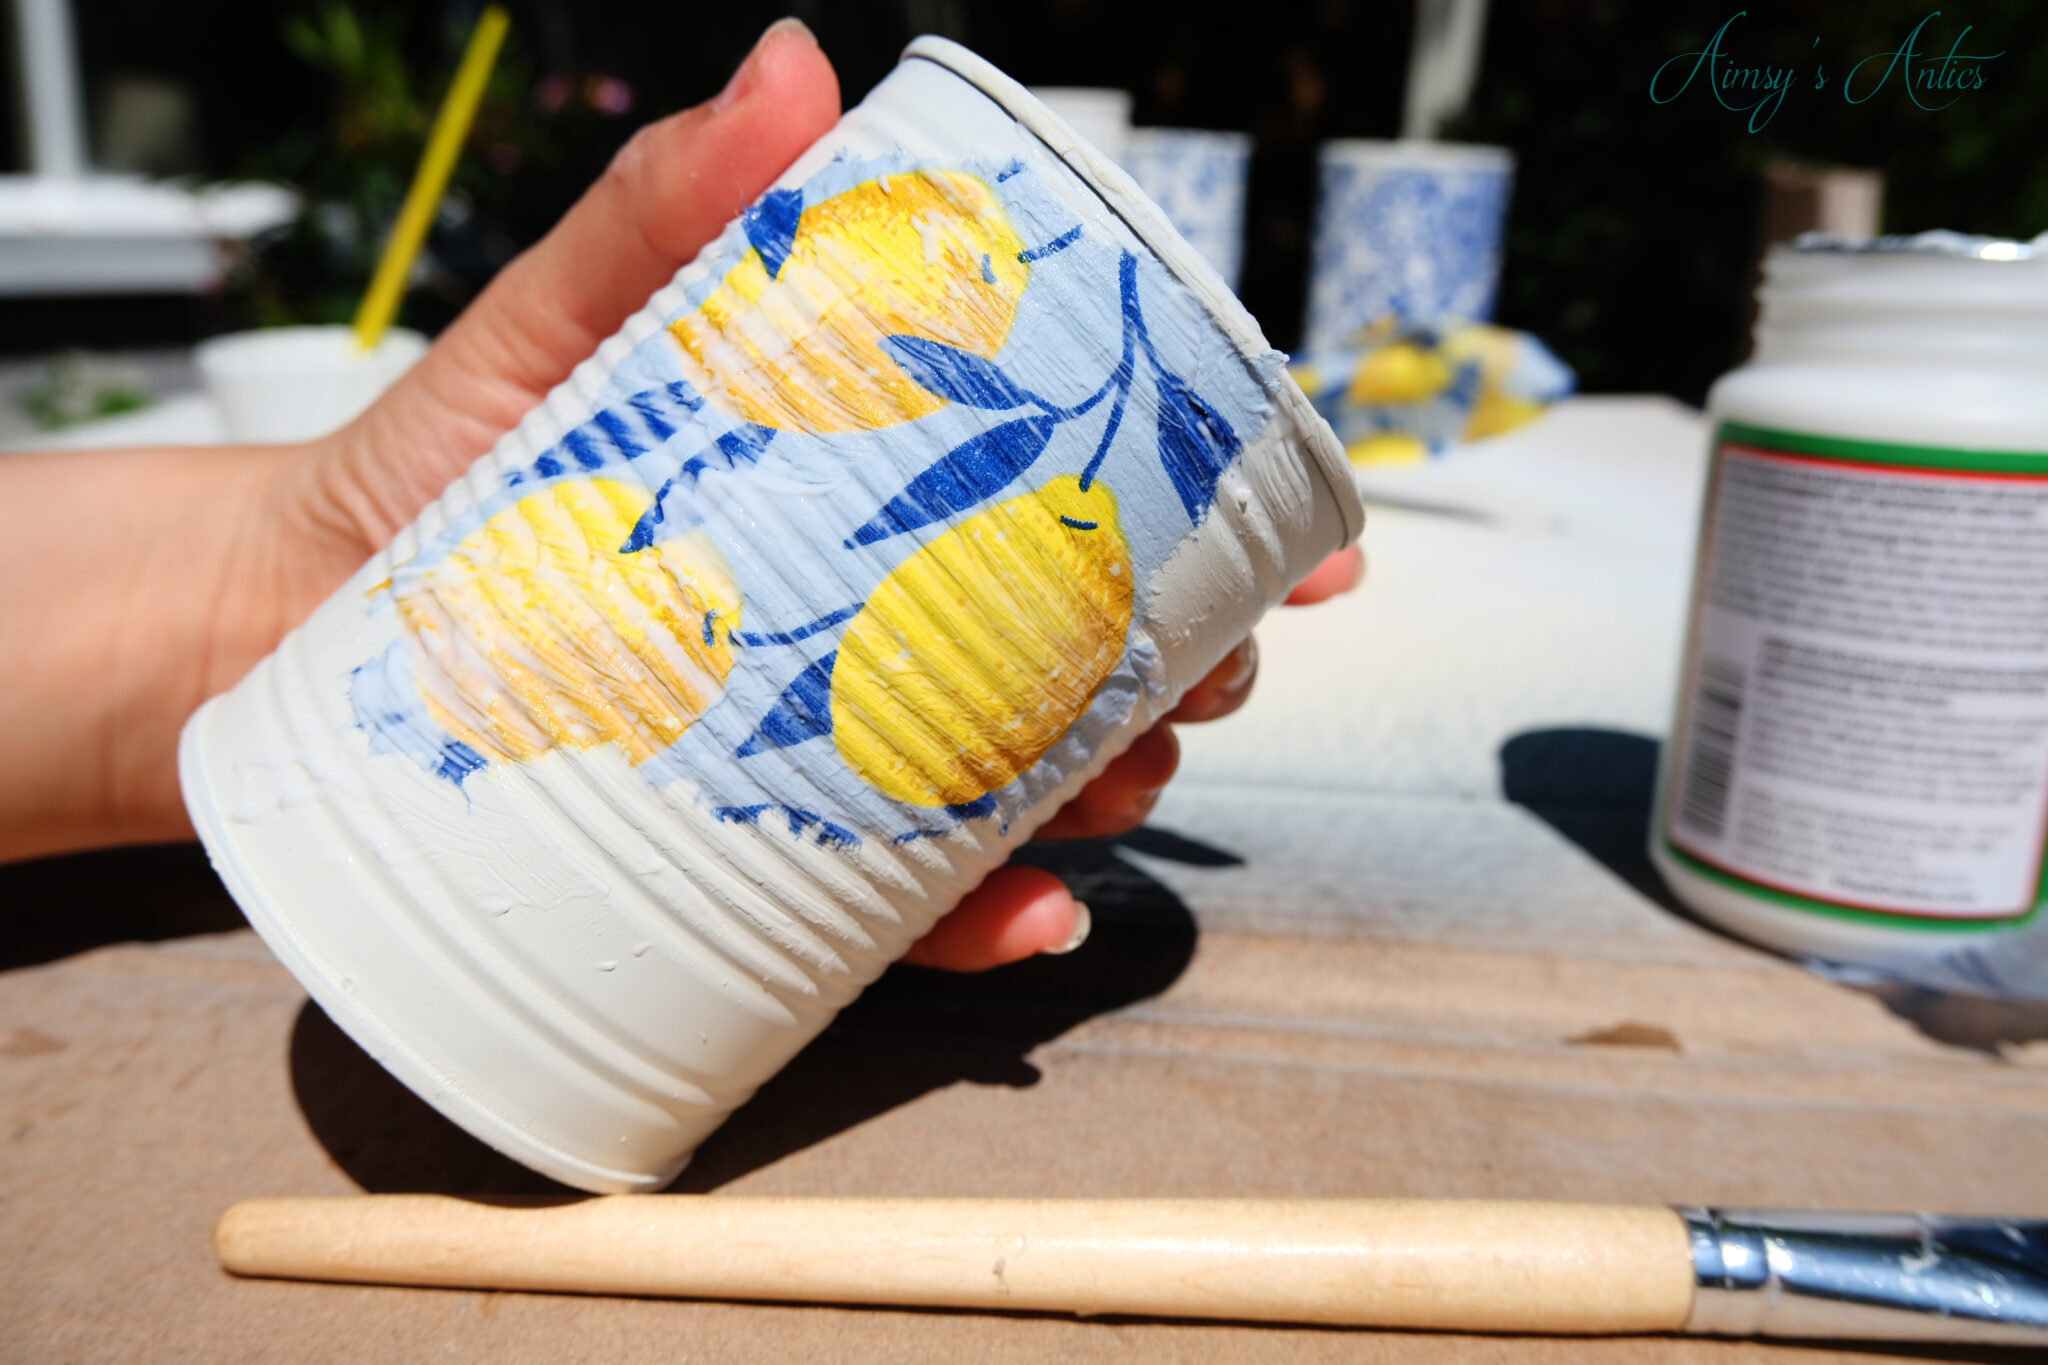
When all of the napkin or napkin pieces has been applied, it is then time to apply a thin layer of glue over the top. This will help seal the napkin into the tin. Ideally, you want to wait until the glue underneath has dried before adding the glue on top. Again, the napkin will be very delicate and pliable, so be careful not to rip it. If it does rip, it will add to the rustic look though! Wait for this layer to dry before adding another. I think I applied about 3-4 layers of the glue.
Allow to dry and harden.

Step 6 – Add Plants to the DIY Tin Can Planters
Once the DIY tin can planters are dry and the glue is hard, plants can be added. You want to choose plants that are quite small in nature, as the tin cans are small and will be detrimental to root growth to larger plants. I opted to place a single Pansy as these are smaller flowers.
Place your chosen compost into the DIY tin can planter, filling this until about 3/4 full. Dampen the soil with water slightly. Then take the flower, loosening the roosts slightly if compacted and place it into the tin can. Add more compost to cover the roots, bringing it up close to the top of the tin can. I did mine until just under the lip of the can, as I didn’t want soil pouring out when watering.
Then give the flower a good watering to help it settle into the tin can and the DIY tin can planters are complete and ready to display. As the glue use is for outdoor use, these can be placed outside, or onto your windowsill for a colourful display.


What do you think of these DIY tin can planters? Have you recycled your rubbish into something useful and pretty before? Let me know in the comments!
DIY Tin Can Planters – Video
Here is the video version of how to make these DIY tin can planters. Don’t forget to give the video a thumbs up if you have enjoyed it, and Subscribe to my channel to keep up with my creative antics over on Youtube!
DIY Tin Can Planters – Share it!
If you have enjoyed this post, then why not share the love or pin it for later! Don’t forget to check out my Pinterest too, for more creative inspiration.
Have a creative project in mind, but don’t know how to plan it? I have you covered with a FREE creative project planner when you sign up to my email list. Grab yours now!


Love this! The next time I use a tin can, I’ll use it for this 🙂 x
Glad you like it. It’s a great way to have something useful and recycle at the same time, isn’t it? Would love to see yours if you do give it a go!
Thanks for commenting 🙂
Aimsy xoxo
Aimsy, these look so pretty! We have planted some herbs in some beer cans – they have some very nice designs and look to pretty to be thrown out! I’m going to attempt these too because they look a lot more cute!
Glad you like them! They turned out great, and are so changeable, as you can match the paper to whatever design you like!
Ooo I love the sound of using beer cans, I may have to do that one next, especially if they are cool designs.
Thanks for commenting 🙂
Aimsy xoxo
Great post! I love this idea, and planters are always so pretty to have around the house x
Glad you like it. Definitely! They are great if you only have a little space but still want some flowers/plants.
Thanks for commenting 🙂
Aimsy xoxo
I love these so much Aimsy!! I never would have thought to use napkins for decoupage. They look great! I can’t wait to make some. Thanks for sharing the tutorial!
I am so glad that you like them! You can use all sorts for decoupage, but I’ve found the napkins blend in really well to the ridges of the cans. Have fun upcycling yours, would love to see them if you do!
Thanks for commenting 🙂
Aimsy xoxo
These are so lovely! I keep having to buy more plant pots as we grow our indoor garden! But now I’m thinking maybe I can make it into a lovely craft project. I’m trying to watch less TV nowadays and spend more time being creative. We want to start a mini herb garden too so this may be the perfect side project
I’m glad you like them! Oh, it is a nightmare trying to get pots for all the plants, isn’t it?! I love that these are ideal for smaller plants, I need to do some more for my indoor plants now! Getting creative is a great way to fill your time. Would love to see how your herb garden turns out!
Thanks for commenting 🙂
Aimsy xoxo
I like decoupage, but I didn’t realise you could use it on tins! These are very cute and such a great way to recycle your old cans into something better for the environment. I love that you can use them for growing plants and improving the environment. Thank you for sharing this DIY!
I have only done a few projects with decoupage, but I am hooked now. I want to decoupage everything haha! I didn’t realise you could get different types of mod podge, but when I saw the outdoor version, I knew I needed to do something like this.
Definitely a great way of recycling as well as doing a bit of gardening.
Thanks for commenting 🙂
Aimsy xoxo
This is a creative use for tin cans indeed! I am always opening a can of coconut milk or a can of artichokes or corn, and have never had a use for them until now. As I also plant seedlings to later transplant into the garden, a neat row of tin can planters is perfect and pretty.
Thanks for sharing!
This is a project I have been meaning to do for a long time. Instead of decoupage, you could also do different designs in paint. These are perfect for the smaller plants, or like you say seedlings.
Glad you liked and thanks for commenting 🙂
Aimsy xoxo
These are adorable – I have been thinking about starting some herbs on my kitchen window and think I know what I am going to use as planters now! Thanks for sharing!
I am glad you like them. These would be perfect for herbs on the windowsill! Would love to see yours if you do give them a go!
Thanks for commenting 🙂
Aimsy xoxo
These look stunning. I love decoupage but have never thought to use napkins before.
Glad you like them! The napkins really blend well on the tins because of their thinness. It is the first time I have used these for decoupage, and I will definitely be using them again for future projects!
Thanks for commenting 🙂
Aimsy xoxo
How beautiful! I love how it turned out! Fun project!
xoxo
Lovely
http://www.mynameislovely.com
Glad you like them. They were fun to create if not just a little time-consuming haha!
Thanks for commenting 🙂
Aimsy xoxo
Wow..these are so beautiful..great job dear 🙂
Thank you! Glad you like them 🙂
Aimsy xoxo
This is such a fun way to recycle tin cans, thanks for sharing!
It’s a great way to recycle them, isn’t it? Glad you liked and thanks for commenting 🙂
Aimsy xoxo
These are so adorable, your designs are amazing! Now I definitely want to try them out and create some myself 🙂
LackaDaisy
Glad you like them. They turned out great, didn’t they? Hope you have been able to have a go at yours, I bet they turn out fabulous!
Thanks for commenting 🙂
Aimsy xoxo
What a great and creative tips! Thanks for sharing.
Infinitely Posh
Glad you liked them and thanks for commenting 🙂
Aimsy xoxo
Oh WOW! I LOVE this! They turned out great and do not look that hard. I think I may have to try this.
Allie of
http://www.allienyc.com
Glad you liked them! They are really easy to do, just a little time consuming waiting for the layers to dry.
Thanks for commenting 🙂
Aimsy xoxo
These are so charming!
Danielle | thereluctantblogger.co.uk
Glad you like them!
Aimsy xoxo
This looks amazing! I’m definitely going to give this a go! 🙂
Glad you like them. They are the perfect size for smaller plants!
Thanks for commenting 🙂
Aimsy xoxo
I love this idea so much! I’ve been wanting to start a small herb garden soon and I love that you repurposed tin cans. I’ve pinned this for later! Thanks for sharing, Aimsy x
Lynn | https://www.lynnmumbingmejia.com
Glad you like them, Lynn! These would be perfect for a small herb garden…much easier to contain and handle!
Thanks for commenting 🙂
Aimsy xoxo
What a great way to utilise old cans instead of recycling them the normal way. They look so cute and it is great way to make your planters unique and individual. Thank you for sharing.
Lauren -bournemouthgirl.com
It is such a good way to recycle them, isn’t it? You could even do the cans up and use as pen/pencil pots too. Decoupage is a great way to get a design you like to suit your decor too!
Thanks for commenting and glad you like them!
Aimsy xoxo