

I have another DIY project for you this week and one that involves organising and planning. I will show you how to make a DIY wedding checklist with a scratch-off element using Canva!
Recently my friend got engaged, and I wanted to make her something to one celebrate the engagement, but two to have something useful for planning the big day. That is where this DIY wedding checklist came in.
Now we know organising a wedding takes a lot of planning, so why not have a bit of fun doing so? We like to cross things off our lists, but what about scratching them off instead? That is where this checklist design comes in.
First, we will design the actual checklist using Canva, and then apply some magic stickers which conceal the design, allowing you to scratch away to reveal it. Think of a lottery scratch card but for planning!

DIY Wedding Checklist
As I said previously, the design for this project will take place in the online graphics programme Canva. I have previously used Canva to create a wall art piece and a DIY picture frame calendar.
I am using the free version of Canva, so everything I use is of no cost and only requires a free subscription/account. Be mindful that some elements of the programme are not free, so will incur a cost if you choose to use them within the design. You also have fewer options when designing, such as resizing objects and changing the orientation of the page. There are easy solutions around these, which I will detail in the process.
This is not a sponsored post and I do not have any affiliation with Canva. I just think it is a great online free resource to help with your design needs!
So, if you would like to see the process of making a DIY wedding checklist, complete with a scratch-away design, then let’s get crafting!
DIY Wedding Checklist – What You Need:
To make this checklist, you will need the following items. Some items on this list are affiliate links and will be marked with an asterisk (*).
- Canva
- Card*
- Printer or access to print design (e.g. sending to professional print)
- Scratch off stickers (2.5 cm)*
- Picture frame or hanging frame*

Step 1 – Create a Design on Canva
If you don’t have a Canva account, you will have to create one before you can use the online programme.
Once you are signed in, then it is time to start the design process. Open up a blank A4 document template by selecting this option. You can search for this or it may come up as an option at the top of the screen. A blank page should appear, ready to unleash your creativity.
You can create any background design that you like, just be mindful that there will be a lot of graphics used on the page, therefore you don’t want your background to detract from this, but enhance it. In my case, I chose to have elements on the two side edges rather than all over the page. I also ‘cheated’ a little by choosing a pre-set template.
On the left, there will be different tabs to enable you to add different elements to the design. One of these tabs is ‘templates’. Scroll through these and choose one which you like. As I said before, some of these are paid for, so just be mindful of which ones you choose.
I wanted a wedding style and chose one which had a eucalyptus design in varying shades of green and grey. Play about with the design to get it how you like it. I moved the eucalyptus slightly to create a wider space in the middle of the page, adjusted the margins and moved the text.

Adjust text
Once the initial base design is complete, we can then start changing up the text and adding other elements.
This template comes with text options and I liked how they looked together so decided not to change this up, apart from the layout and colour. So, I changed the text to “Things to do before we say I do”, having “I do” in a different font.
A good thing with Canva is, once you have an element with colour on the page it adds it to the colour palette. You can therefore adjust the colours to have them the same and complementary to the design. Therefore, change the text colour “I do” to compliment the rest of the design.
Top Tip: If you have a colour you would like to use, but don’t want to use a graphic that includes this colour, add it to the page to bring the colour into the palette. Then create your design by selecting your chosen colour. You can then delete the original graphic and your chosen colour will be there without the graphic. I hope that makes sense!

Step 2 – Add Elements
The design is really starting to take shape, however, we do not have any of our checklists on it just yet.
If you purchase the same stickers as me, these are 2.5cm in diameter. This then dictates how big we need to make our elements so that they can be hidden behind. This part will depend on the stickers you are using so take that into account.
Head to the ‘elements’ tab and select ‘shapes’. Select the circle shape and it will be added to the design. Change up the colour of this to suit the design; I found it is better to have a lighter background to the circle so that your graphic design stands out.
Next, reshape the circle to the same size as the stickers by dragging the circle inwards to smaller it. It is quite hard to get this exactly 2.5cm as you can’t input the exact size you want, so get it as near as possible, even if it is just under 2.5cm.
Add Enough Circles
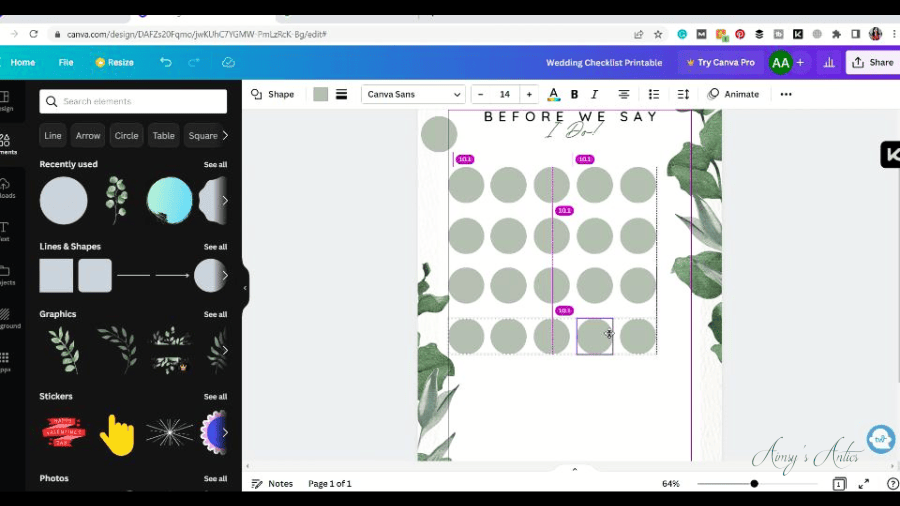
Then calculate how many items you want on the checklist. I am going with 30 items to scratch off and therefore need 30 circles. There will be 6 rows of 5 circles in my design, so play about with how you would like your layout.
Evenly space 5 circles from each other in a line. When happy they are equal, use the shift key on your keyboard and select all 5 of the circles. In the top toolbar, there should be an option to group the design. Select this to group all 5 circles together. Then copy this and paste as many rows as you require.
Again align the circle rows in equal distances before moving on to the next part of the design. You may need to alter these distances and positioning as the rest of the design takes shape. This will depend on your text size and layout.
Add Text /Headings
Above each circle, we are going to add text on the different items to check off the checklist. Select the ‘text’ tab and “a little bit of text”. Then type your different headings. Change up the font to match or compliment as well as the colour. Then resize this to fit above each circle. You may need to change the layout if it is a longer heading. Centre each heading above the circle so that it looks uniform.

After the first text is added, you can select this and copy/paste it so that the design is the same, altering the text. Here is a look at the various headings I chose, if you are needing inspiration.

Add graphics
Once all of the text is added, you can leave it as it is, but I think it looks plain so wanted to add some graphics.
Head to the ‘Graphics’ tab on the left-hand side. Then, the search bar becomes your friend for this part.
Search for graphics which represent each heading of the checklist. This part can be tricky, as a lot of the graphics come with a cost so you have to really search for the free ones. I like the ones that are like a line drawing, as often you can change the colouring of it. Select the graphic and alter the colours to match/compliment the overall design.
Resize the graphics and place them into the middle of each corresponding circle. Keep going until all circles have a graphic.
Here is a look at all the graphics I have used for my DIY wedding checklist.

Step 3 – Print and add Stickers
Once you are happy with your design, there are a few options for printing. Via Canva, you can send your design for printing; you just have to wait for it to be posted to you. You can also download it, and print at a store or send it to your preferred printers. If you have a printer at home, then you can print it off yourself. The only downside is, if you want this on a thicker card, your home printer may struggle so it all depends on how you want your design to look and what type of picture frame you chose to use.
I chose to print at home. Luckily my printer is able to print on cardstock (if it isn’t too high gsm).. This is also the quicker option as you don’t have to wait for your printable to arrive.

Add stickers
Once the ink is dry on the printable it is time to add the final element. Remove one sticker from the back and place this over one of the circles. Carefully line up so that the sticker covers the circle to hide the design. Press this into place, being careful not to catch the sticker with your nail. You want the scratch-off part to remain intact until it is time to check it off!

Then, repeat until all of the circles are covered. The DIY wedding checklist can then be placed in the frame, ready for the planning process of the big day!


What do you think of this DIY wedding checklist? Will you be making your own? This is such a unique and fun way to organise an event or countdown and can be used for so many different milestones. It also makes a great gift. What will you make for your DIY scratch-off checklist? Let me know in the comments below!
DIY Wedding Checklist – Video
Here is the video version of this post, if you find it easier to follow along this way! Don’t forget to like the video if you have enjoyed it, and why not subscribe to my channel to keep up with all of my creative and crafty antics on YouTube?
DIY Wedding Checklist – Save it!
If you have enjoyed this post, then why not share the love by sharing it or pinning it? You can also check out my Pinterest for more creative inspiration!


Have a creative project in mind, but don’t know how to plan it? I have you covered with a FREE creative project planner when you sign up to my email list. Grab yours now!

This DIY is such a great idea and can be used for so many different occasions. I love it! Thank you for sharing.
Oh definitely could be used for so many different occasions. I love how you can have craft projects that are so versatile!
Thanks for commenting 🙂
Aimsy xoxo