

We are talking all things wall art in today’s post, with how to make your own, using the online graphics programme Canva!
Today, it is time to spruce up the decor with a bit of wall art. I have previously made wall art using embroidery, which adds a lovely bit of texture to the walls. However, I fancy changing up the decor a bit and adding in something else handmade. The difference is, you probably wouldn’t realise it is handmade, as it is a digital wall art print.
We recently renovated the porch area of the house, and just wanted something to add a simple bit of decor. This is coming in the form of the art print.
To make the wall art, it is time to use a graphics editing programme, that is online. Canva! This is not a sponsored post, I just love what you can do with Canva. I use this regularly to create different designs for the blog, Instagram and Youtube.

What is Canva?
Canva is an online graphics programme, that allows you to create all kinds of graphics. This ranges from pins for Pinterest, to social media posts, and of course wall art. It is so easy to navigate around to make your own custom designs.
From using the ready-made graphics to uploading your own images, the possibilities are endless on Canva. The best bit? You can do it for absolutely FREE. Now having a free account does have drawbacks, as some of the graphic options are not available, however, you can totally make your own graphics without spending a penny.
How to Make Wall Art Using Canva:
So, to get started with making your own wall print, you are going to need the following items:
**Some items on this list are affiliate links. This means that I may earn a small amount of commission should you make a purchase through this link. This is at no extra cost to you and will be marked with an asterisk (*)**
- Computer / Laptop or even tablet
- Printer
- Paper strimmer*
- Picture frame
- Wall hooks or Command strips*
Step 1 – Open Canva & Create Base:
The first thing to do is open your browser and open up Canva (www.canva.com). If you do not have an account, then now is the time to create a free one. Canva will prompt you to either sign up or sign in.
Then, you want to navigate to the top right-hand corner where it states ‘create a design’, selecting ‘custom dimensions’. Now, this will be totally dependent on the frame size the print is going to reside in. My frame measures 15cm wide by 20cm high, so I input these dimensions in. There are a few options for the dimensions, so you want to make sure that you select the cm option when inputting these dimensions.
Then the base of the print is ready for the design.

Step 2 – Create the Design:
Now, it is time to create the design for the wall art piece. This is where you can get truly creative and create whatever design you like. As the print is going in the porchway, we want something that reflects our home. We also love music in our house, so we merged the two in this print, taking reference from the ’70s/’80’s band Madness with the song “House of Fun”. The lyrics “Welcome to the house of fun” being the words of choice on the print. Who doesn’t love a bit of ’80’s music nostalgia?
In Canva, you can choose a plethora of fonts, either from a drop-down menu after adding text or using their suggested mix of fonts. This is on the side menu ‘Text’. You will see lots of different examples of font that you can use to create your print. The font in my design is ‘Playlist Script’, which is a kind of calligraphy style font.
Choose the font you like, and alter the size of this to suit the print. The size of my text is 104 and fills around 3/4 of the page.
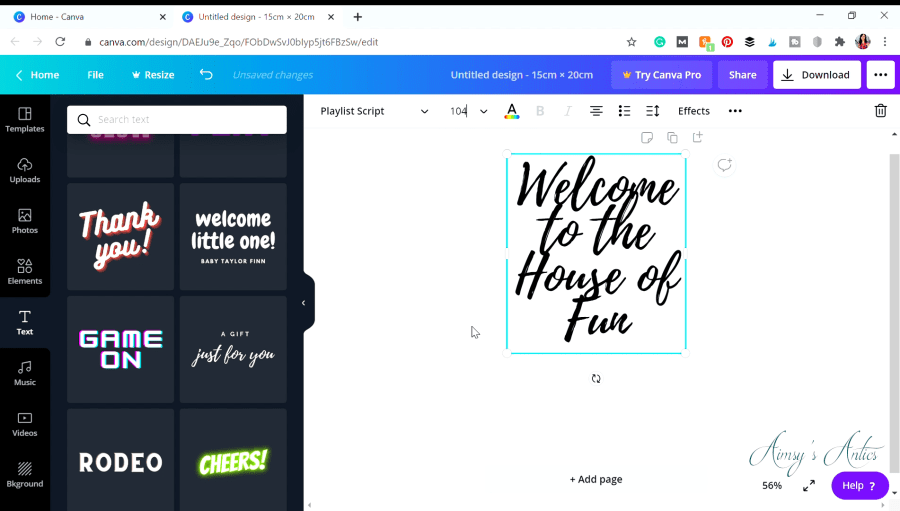
Then to finish off the design, you can add a graphic. I opted for a house in the bottom right corner, to tie it into the text. Graphics are on the left-hand toolbar ‘Elements’. There is a wide range, however a lot of these are on a paid basis, but you can edit the free versions to suit the design.

Step 3 – Print and Frame Design:
Once you are happy with your design, you can then download it to your computer. It will also save to your designs on your Canva account too.
Then it is time to print it out, either using your own printer or sending it for professional printing. We have a printer, so I just used the laser printer to print this wall art piece out.

More than likely this will print out on A4 paper, which is too large for the frame of choice. Therefore the paper has to be trimmed to size. To get an idea of the size, use the backing of the frame and mark where the edges are. Make sure that the design is lined up straight and measure it several times before cutting. You can either use scissors or a paper trimmer to trim the paper. I prefer a trimmer, as it can be very hard to cut paper straight with a pair of scissors.


Once cut, place into the frame and it is then ready to be hanged.
Step 4 – Hang Design:
Now comes the time to have your design on show. We decided to place the wall art in the porchway on the wall. However, you could always just use the frame as is and have it standing in the frame.
To hang the piece we are using command strips. These are perfect, as you don’t have to drill any holes or use picture hooks. I was worried about using these, as the walls in the porchway are painted brick. However, the picture frame hasn’t moved and has remained in place since hanging.

Make sure the wall is clean and dry, and choose where you want the wall art to hang. Then, place a command strip on either side of the frame. I like to place the piece this is to connect to the wall on top next, sticking the whole thing to the wall. I am terrible at lining things up, so this method works perfectly for me. Make sure that you have applied strong even pressure to the piece for it to adhere to the wall.
Then the wall art piece is finished and ready to be enjoyed!


Do you use Canva to design prints or graphics? What song lyrics would you use? Let me know in the comments below!
Also check out my friend Lynn’s DIY Wall Art using canva too. Hers turned out amazing, and has that Hygge vibe to it!
How to Make Wall Art Using Canva Video:
Why not check out the video version of this post? If you enjoyed the video, please do give it a like and consider subscribing to my channel. It would be great to see you over there!
How to Make Wall Art Using Canva – Pin it!
If you enjoyed the post, why not share the love by pinning it for later! Check out my Pinterest too!


Great ideas!!! I was always wondering how those “youtubers” buy so many pictures with quotes on them…. And it seems you don’t have to buy 🙂 create your own 😉
Glad you like it. The possibilities are endless with what you can create on here. You can definitely make your own quotes, so easy to do!
Thanks for commenting 🙂
Aimsy xoxo
I absolutely love Canva! I might try this later!
Love, Amie ❤
The Curvaceous Vegan
It is just amazing, isn’t it? You can create so much on there!
Thanks for commenting 🙂
Aimsy xoxo
This is a great way to make wall art! I never thought of using Canva to do that, what a brilliant idea! x
Lucy | http://www.lucymary.co.uk
I’ve made posters for work before using it and thought I bet you could make printed art as well, so did haha! Makes it more versatile, as you can switch it out so easily.
Thanks for commenting 🙂
Aimsy xoxo
Okay, so here I am being super impressed and wondering why I have not done this before? I love simple art prints and inspiring quotes and I even use Canva (mostly for pins and visual poetry), but I never once thought about designing wall art! The variety of templates and fonts make the program perfect for designing.
Thanks for the inspiration!
Oh, it is so easy to do, you will want to make lots of different prints. It is a great bit of kit for designing graphics, isn’t it? My favourite part is that it is free too (although does have some limitations). You can design and create until your heart is content!
Thanks for commenting!
Aimsy xoxo
This was so interesting, Canva can be used for s much. It’s absolutely incredible. I use it for pretty much everything I do digitally but I’ve never thought of using it for something like this before. So easy! And yours looks incredible x
Sophie
Oh absolutely, you can create all sorts on Canva! I must say it is so needed if you have a blog, sin’t it? I create pins and different graphics on there, and I love that it is free! Glad you like it!
Thanks for commenting 🙂
Aimsy xoxo
This is such a great tutorial!
Glad you like it! Hope you found it helpful 🙂
Thanks for commenting!
Aimsy xoxo
Canva is really such a useful tool, what a blessing! I also get some journaling ideas from some of their templates.
Oh isn’t it just? I love it, you can create so many different things. I hadn’t thought about journalling ideas, but what a great idea!
Thanks for commenting 🙂
Aimsy xoxo
This is great Aimsy! I use canva pretty much every day but it never occured to me to do this for wall art. What I great Christmas idea!
Glad you like it! Canva is just brilliant for all things graphic related, isn’t it? Ooo will be fab for Christmas inspiration!
Thanks for commenting 🙂
Aimsy xoxo
I loved the quote on your homemade wall art… what a wonderful invitation to anyone coming to your home!
Glad you like it, it just brightens up the porchway into the house I think. Hopefully people think our house is fun when they visit!
Thanks for commenting 🙂
Aimsy xoxo
Glad you like it, it just brightens up the porchway into the house I think. Hopefully, people think our house is fun when they visit!
Thanks for commenting 🙂
Aimsy xoxo
This a great idea! You have created a really simple but effective print! Thank you for sharing.
Lauren http://www.bournemouthgirl.com
Glad you like it. It is so simple but effective, isn’t it?
Thanks for commenting 🙂
Aimsy xoxo
Definitely! X