

I am back with another easy craft/DIY project for you today. This is one that brings in a bit of love with a heart shape, whilst also learning the skill of macrame. Keep reading to see how to make your own heart shape macrame coasters!
In light of it nearly being Valentine’s day, I thought it would be nice to have a love-themed crafting session. Combining the craft of macrame with the heart shape associated with all things love. Now, I have dabbled with macrame in the past, by making these easy macrame feathers. That is where these heart shape macrame coasters come in!

Macrame is a great way to create interesting decor pieces, with it more commonly used for wall hangings. You can purchase many different types of macrame cord, in varying thickness depending on the project. I use 3mm cord in this tutorial, however, 4mm cord will be fine to use too. The trick is not to make the coaster too thick and bumpy, as it won’t sit as flush to house your drinks (wor whatever you want to place on them).
Heart Shape Macrame Coasters
You may often find macrame coasters in the traditional round or square shape. Since it is nearing Valentine’s I thought it would be nice to change this up and attempt a heart shape. Believe it or knot (get it?!) these are relatively simple to make and is the perfect project to try if you are a beginner to macrame.
These coasters only use three basic macrame knots; the lark’s head knot, square knot and half hitch knot. Once you have mastered these knots, then you will be flying with this macrame make and many more!

So, without further ado…let’s get crafting!
Jump to the video version down below!
Macrame Coasters | What you need:
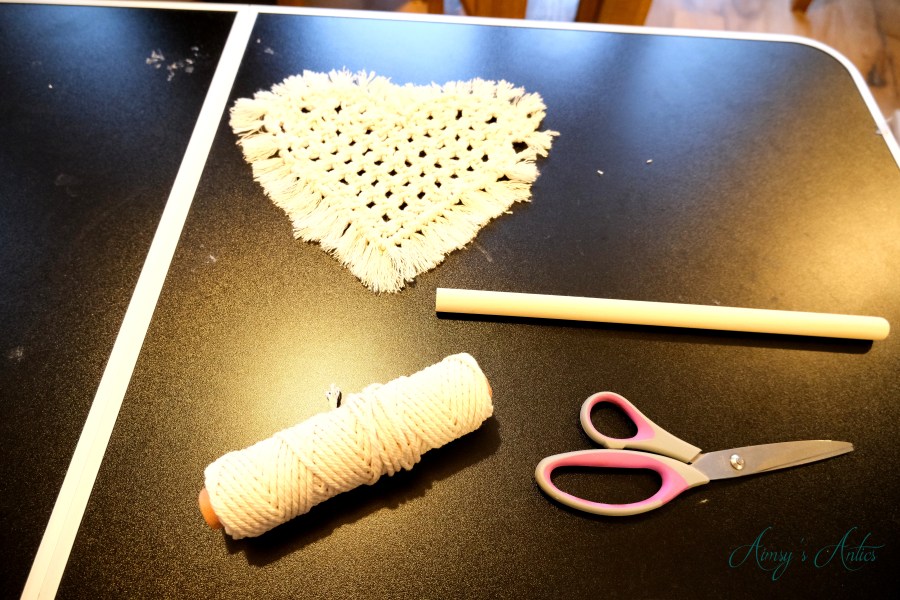
You only need a few items to make these beautiful heart shape coasters, which are listed below.
Please note some links below are affiliate links, which means I may earn a small amount of commission should you choose to purchase through them. This is at no extra cost to you.
- 3mm Macrame Cord* – I used this macrame kit
- Wooden Dowel
- Measuring tape or ruler
- Scissors
- Comb or Pet Brush*
Step 1 – Prepare the Macrame Cord
Measure out the macrame cord to the length of 120cm and cut 17 of these. This can be a little tricky to do, so you can measure it out by half and folding on itself.
Place the raw end of the cord to the end of the measuring tape, then measure up to 60cm. When you hit this mark fold the cord and bring it down to the start point of the tape, making sure it is looped at the 60cm. Then cut at the end and you should have a 120cm length of cord.
Set one macrame cord to the side for later and the main bulk of the project will be made with the remaining 16 lengths of macrame.

Step 2 – Lark’s Head knot
Now it is time to get knotting. To keep all the lengths of macrame in place and help to make the coasters, the macrame cord needs to be attached to a dowel. This will be removed later when the coasters are nearing their completion.
Use the larks head knot to attach the 16 pieces of macrame cord to the dowel. To do this, fold the cord in half so that a loop is created at the top/middle. Then place this loop behind the dowel facing downwards. Bring the trailing part of this cord down and through the loop, pulling to tighten. You should then have completed the lark’s head knot.


Step 3 – Square knots
Now, this step is broken down into rows, but all use the macrame square knot technique. I have included the video version of this tutorial below, which may be easier to follow if you are more of a visual learner.
Start by sectioning off the hanging macrame cords until you get to the four middle strands. When creating a square knot, you need to use four of the strands of macrame cord to do so.

You will be working with the two outside strands of the four to create the knot. Start by taking the outer left strand and crossing it over the two middle strands like a figure of four. Take the outer right strand and place this down over the top of the left strand, and is hanging down. Then take this left piece and bring it underneath all of the strands so that it comes out through the loop of the left strand (figure of 4). Pull the two strands that should now be crossed and stop when it is a few cms away from the dowel. You want to leave a gap to complete the fringing later.


Next, you want to reverse the steps above to complete the square knot. Take the outer right strand and cross this over the middle two strands in the figure of four shapes. Bring the outer left strand over the top, looping underneath the middle strands and through the loop of the right strand. Pull the two ends until this knot meets the first half of the square knot. Secure in place so the knot is tight and the square knot is complete.


Step 3 – Complete the rows of square knots
For the next row / second row, you want to create two square knots from the centre horizontally. Repeat for the third row, except create three square knots. Keep repeating, creating the same amount of square knots for that row until you complete the knots for the two outer strands.


All of the rows should create a diagonal pattern so that the ends of the rows all lineup. If that makes sense.
Step 4 – Create the two curves of the heart
Once all the rows are complete, it is time to add a few more to create the top part of the heart shape.
Start by splitting the cords, two at a time until you reach the middle and have equal amounts on either side.
Starting with the middle create a square knot and continue the row outwards until you reach the end. Then, create another row, but start two strands in from the middle until you get to the end. Add another row of square knots on either side, with the definition of the heart taking shape.


You can add a few more rows if you want the curve of the heart to be larger, however, you may find it difficult with the macrame cord shortening with each knot created.
Step 5 – Half Hitch Knot
When you are happy with the shape of the coaster, remove it from the wooden dowel. Cut the loops of the lark’s head knots created, as these are no longer needed.

Remember the macrame strand set aside? Well, it is time to incorporate it into the project. Turn the heart shape so the bottom point is closest to you. Place the long macrame cord on top of the edge of this, pulling it diagonally, following the shape of the heart. To make it easier, place a pin through the cord and the macrame coaster to hold it in place. This will be the holding cord.

Using one of the trailing macrame cords from the project, bring this over holding cord and down the back of it. This should create a loop with the holding cord through the middle. Then bring the end back through the loop and tighten. Repeat with the same strand and holding cord for a second time, and this creates the half hitch knot.


Keeping the holding cord taught, repeat the process with all of the hanging pieces of remaining macrame cord around the heart shape. Where there isn’t a cord to knot, but space, loop the holding cord through the loops until you reach the next hanging cord. Hope that makes sense.
Reove the pin when you come back around to the starting point.

Step 6 – Create Fringe
The last stop in the process is to create a bit of fringing, because who doesn’t love fringing? If it is totally not your bag, then you can just trim the remaining macrame cords as close as possible to the half itch knots created.
However, if you want to create the fringing, begin unwrapping all of the loose cords. The cord should split down into several strands.
Then with a comb or bet brush, begin combing these out, which will create the fluffier fringe look.

Trim the fringing down to whatever size you prefer around the edge of the heart. You may find that some macrame cords were very short, and in this case, to keep it all uniform, I would suggest trimming everything down to the shortest size.
Then the heart shape macrame coaster is complete and ready to display and use!


What do you think of this easy macrame project? Will you be giving it a go? Let me know in the comments below!
Heart Shape Macrame Coasters Video:
Here is the video version of this project. You may find it easier to follow some of the knotting techniques here. If you have enjoyed the video, be sure to give it a thumbs up; and don’t forget to subscribe to my channel if you enjoy these crafty/DIY makes!
Macrame Coasters Pin It!
If you have enjoyed this post, why not share the love by pinning it for later?
Be sure to check out my Pinterest too!


This looks amazing though I’m not sure I’d have the patience for it. I’ve started doing embroidery recently which I have been loving so maybe I’ll have to try this too!
Tash – A Girl with a View
Glad you like them. Once you get the hang of the knots, it doesn’t take too long to complete.
Oh, embroidery is just relaxing isn’t it? and you can get great designs with it too!
Thanks for commenting 🙂
Aimsy xoxo
ooo Aimsy these are so freaking cute! I love macrame and have a big roll that needs using up, so this is a great mini project xx
Aww, glad you like them! Perfect for using up a bit of the macrame cord. I need to buy another roll now to keep my stash topped up haha!
Thanks for commenting 🙂
Aimsy xoxo
I love this and the coasters are super cute! I’ll definitely be giving this a go! Thank you for sharing.
Aww glad you like them! Would love to see your version if you do give it a go!
Thanks for commenting 🙂
Aimsy xoxo
Aimsy’s Antics
I would have never thought of this idea! Wow, it looks great! Thanks for teaching us another DIY!
xoxo Olivia | http://www.oliviaandbeauty.com
Glad you like it! Such a simple yet effective craft, isn’t it?
Thanks for commenting 🙂
Aimsy xoxo
These are lovely! I have forgotten how much I enjoyed macrame and am happy to see it’s making a comeback. Thanks for sharing!
Glad you like them. Macrame is just one of those crafts, isn’t it? Its great that it is having a comeback!
Thanks for commenting 🙂
Aimsy xoxo
These are the cutest things! I love how crafty you are and this how-to post is so helpful – thanks for sharing xx
Aww glad you like them! Happy that the post is helpful…hopefully it is easy enough to be able to follow along.
Thanks for commenting 🙂
Aimsy xoxo
These look amazing! I have always wanted to try macrame so I think this is a great first time activity! Thanks for sharing.
Aww glad you like them. Macrame can be a bit daunting at first with all the different knots, so hopefully, this is a great project to get you started. I think having something useable at the end makes it more appealing to try out!
Thanks for commenting 🙂
Aimsy xoxo
Oh they are so cute! Such a good little lockdown craft idea too!
https://www.emilyclareskinner.com
Glad you like them. Love how they turned out, and yes perfect little lockdown project!
Thanks for commenting 🙂
Aimsy xoxo
These are really pretty! I’ve always loved the look of macramé, but wasn’t sure how to get started with it. That being said, you’ve broken this down in a way that I think I could pull it off. I bet these would look great in our living room and we’re always on the search for new coasters.
Aww thank you and glad you like them. I always thought macrame was really complicated, but once you know how to do the knot, its not as difficult as it looks. Have fun learning the new skill of macrame if you do give these a go!
Aimsy xoxo
Oh my goodness these are too cute and are so perfect for Valentines Day! Thanks so much for sharing this fun DIY!
Aww, glad you like them! Hopefully, they bring a bit of Valentine’s in a subtle way!
Thanks for commenting 🙂
Aimsy xoxo
OMG! This is so adorable. I have 2 macrame pieces in my home and looking back, I wish I made it myself or at least bought it locally. I’d love to try this someday! I’ll pin it for later x
http://www.lynnmumbingmejia.com
Oh, once you get into macrame, you will be wanting to make all the projects haha! There’s just something nice about having them as decor, isn’t there? Glad you like and hope yours turn out fab if you do give them a go!
Thanks for commenting 🙂
Aimsy xoxo
These coasters are super cute and this is such a great little project! x
Lucy | http://www.lucymary.co.uk
Aww, glad you like them 🙂 Fab little project to keep you busy!
Thanks for commenting 🙂
Aimsy xoxo
Wow this looks too cute, such a wonderful idea and
not even so difficult..
Aww, glad you like them! Yeah, not too difficult once you get into it!
Thanks for commenting 🙂
Aimsy xoxo
I’ve heard so much about Macrame through Pinterest! I usually see people making little hanging baskets so it’s nice to see coasters. These look like a lot of fun to make!
There are so many project inspirations on Pinterest! I haven’t graduated to hanging baskets yet, but would love to give them a try!
Glad you liked and thanks for commenting 🙂
Aimsy xoxo
I am not very good at getting things like weaving to work for me, but it was very inspiring watching the heart take shape in your step-by-step pictures. These macrame coasters are such a great handmade gift idea too, with Valentine’s Day coming up!
Thanks so much for sharing. 🙂
Glad you like them Jaya! Getting the knots to stay where you want them can be a bit of a struggle, but sometimes there is something beautiful about them being misaligned (what I like to tell myself anyway). Glad you liked the project!
Aimsy xoxo
These are so cute ❤ I love macrame, it takes awhile but the result is great! I learned to do it on my second night at uni . Love this xx
Caroline | https://envirolineblog.com/
Glad you like them! It is just a lovely little craft, isn’t it? My goal is to make some form of deck chair in the future with macrame!
Thanks for commenting 🙂
Aimsy xoxo
These are gorgeous coasters! I think macramé is such a lovely thing and you can do so much with it. I’ve never given it a go as I’m worried I will mess it up. Maybe this weekend I should make some cute coasters too 🙂
Em x
Aww glad you like them Em! It is such a pretty craft and you can make so many different things. I was always daunted by it, but once you learn the knots, it is really therapeutic to do…any mistakes, just say that’s what the pattern was supposed to be haha!
Thanks for commenting 🙂
Aimsy xoxo
This is such an amazing DIY. I have always seen these types of crafts but always thought it was crochet, I had never heard of macrame so thank you for sharing !
It looks so much like crochet, doesn’t it? I haven’t mastered knitting or crochet, so I think Macrame is the way to go for me haha. Glad you like them!
Thanks for commenting 🙂
Aimsy xoxo
These are so pretty! And you make them look so easy, too.
Aww, glad you like them! My first macrame attempts were not as successful of this, so hopefully, it will help someone’s first macrame session a success!
Thanks for commenting 🙂
Aimsy xoxo
These are stunning! What a great home feature!x
Aww thank you…glad you like them! I love how they look on my dresser 🙂
Thanks for commenting 🙂
Aimsy xoxo
These are so pretty! I haven’t heard of macrame before but it looks like such a beautiful technique x
https://www.femaleoriginal.com
Aww thank you and glad you like them. It is a lovely technique, and brings in a few boho vibes, doesn’t it?
Thanks for commenting 🙂
Aimsy xoxo
oh wow these look so amazing, I really need to make some heart shaped coasters! Love the style
Great post
Mel | Moonlight Mel
Aww, glad you like them! The heart shape just looks lovely, doesn’t it?
Thanks for commenting 🙂
Aimsy xoxo
Ahh these are so cute – what a fun DIY this is!
https://volumesofbeauty.com/
Glad you like them! Definitely, worth the time it takes to make the knots 🙂
Thanks for commenting 🙂
Aimsy xoxo
These look so pretty. It looks like great fun to make too.
Aww thank you! They are fab to make, especially when you get the hang of the knots!
Thanks for commenting 🙂
Aimsy xoxo
These are super cute! I’d love one of these for my office, it makes a desk look super cozy! x
They’re so cute arent they? Ooo these would look lovely in your new office! Can’t wait to see how it turns out 🙂
Thanks for commenting 🙂
Aimsy xoxo
These are so lovely, Aimsy. I have to admit I don’t think I’d have the patience to make them myself but they look like the perfect beginner macrame craft – and for something useful too 🙂
Aww, thank you! Yeah, they do take a little bit of time to get going, but once you get the hang of the knots, you are flying!
Glad you like them and thanks for commenting 🙂
Aimsy xoxo
These look amazing and I like that hart shape. Never before I didn’t saw them in hart shape. Thank you so much for sharing tutorial.
New Post – https://www.exclusivebeautydiary.com/2021/02/perfumed-body-lotions.html
Glad you like them. The heart shape just gives them something extra, doesn’t it?
Thanks for commenting 🙂
Aimsy xoxo
They look amazing, and it’s a lovely technique. I’m not sure if I have the patience for this myself but the process sounds easier than I was expecting! x
Aww thanks, Sophie! They do take a bit of patience, but worth it in the end. Once you get the hang of the knots, these get quicker to complete.
Thanks for commenting 🙂
Aimsy xoxo
These are so cute! Thanks for this step-by-step tutorial.
xoxo
Lovely
http://www.mynameislovely.com
They are too cute, aren’t they? Glad you like and hopefully find it useful!
Thanks for commenting 🙂
Aimsy xoxo
Oooh I love how you made DIY coasters! Pretty cool that you made it with basic macrame knots. They look super cute too. A unique alternative and probably better with actually absorbing condensation from the bottom of the cup. Love that it looks easy to make! Low key want to give this a try someday 🙂 Thanks fors haring!
Nancy ✨ mdrnminimalists.com
Aww thank you, I’m glad you like them! It is something so simple but super effective, isn’t it?! Not forgetting practical. You could make these in other colours or dye them to change up the looks too!
Thanks for commenting 🙂
Aimsy xoxo
This is such a fun Valentine’s Day craft, thanks so much for sharing!
Aww glad you like it!
Aimsy xoxo
I have never made macrame anything, but these heart coasters are so cute! The pictures are definitely if I want to try making it one day!
Aww, thank you…love how they turned out. It gets easier the more you practice and you get the cute items like these at the end!
Aimsy xoxo