

Today’s post is another beauty DIY, in the form of making your own soap from melt and pour base. This time it is how to make cute soap that is inspired by sushi…sushi soap!
I have previously made layered soap, and this time I am having a go at making something a little bit more artistic. This started as an idea for a gift for a friend who loves sushi with sushi soap being born. It is so amazing what you can actually make out of soap isn’t it?
Keep reading to see how to make these lovely soaps and check out the video tutorial at the end of the post!
*Please excuse some of the photo quality in the post…I forgot to take photos as i was going along, so have taken these from the video*
Sushi Soap:
So, the basic concept of these soaps is making three different types of sushi; salmon nigiri, tuna nigiri and sushi rolls. If you are new to sushi then the salmon and tuna nigiri are basically a square rice base with thinly cut pieces of salmon or tuna. The sushi rolls are rice filled with a seaweed outer layer, often filled with vegetables and fish. So, we are going to have a go at making all three of these today!
Let’s get crafting!

Sushi Soap – Salmon Nigiri:
Salmon Nigri is basically a rice base with a thin slice of salmon on top. This is really easy to replicate as soap, but you have to work quickly with the melt and pour base as it begins to cool and set quickly.
What you need:
- 120g Opaque melt and pour soap base
- 70g Clear melt and pour soap base
- 1.9ml (total) of essential oils – lemongrass, black pepper and Juniper berry
- Rubbing alcohol
- Orange mica powder
- Small loaf silicone mould
- Small square silicone mould
- Knife
Step 1 – Melt opaque soap base:
First, you want to melt the opaque soap base in a heatproof bowl or jug. You can do this two ways; either in the microwave or over a double boiler. This time i chose to melt in the microwave on short bursts of 30-60 seconds. Be careful that the soap base doesn’t burn.
Then you want to add in 1.2ml of your essential oils (lemongrass, black pepper and juniper berry), mixing this in thoroughly.

Step 2 – Pour into moulds and set:
Now, you want to pour your newly combined and melted soap base into your silicone moulds. Start by pouring a thin layer in the loaf mould and then fill two of the square moulds. Leave these to cool and harden.

Step 3 – Cut down set soap:
When the soap has set, you want to remove them from the moulds. Starting with the thin layer, use a knife to cut thin strips. These will represent the white strips that you see in a piece of salmon (like the salmon fat). Then place these back into your loaf mould, diagonally across the bottom (creating stripes). Spritz with rubbing alcohol.

Cut the squares into rectangular shapes to form the rice base of the sushi. I found that cutting them in half was the best way to achieve this, but use your own judgement if you are using a different mould. Set these aside for later.

Step 4 – Make the Salmon:
Now it is time for the fun part, making the salmon piece. Melt 70g of clear soap base; adding in 0.7ml of your essential oil blend. Then, add in the orange shimmer mica powder, mixing in thoroughly. I chose mica powder because of the shimmer, and to give it the real salmon look, but you can use soap colourant if you do not have this to hand.
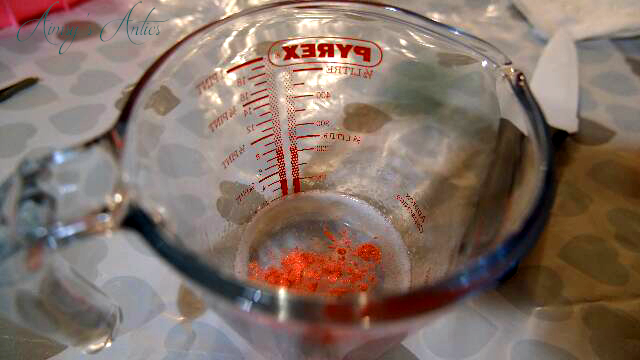
When all is mixed together, pour into your prepared loaf mould with the white strips in the bottom. You may find that some of the strips down float upwards into the melted mixture, but this isn’t a problem. When all of the salmon soap is in the mould, spritz the top with rubbing alcohol to help remove any bubbles that may be forming. Allow to cool and set.

Step 5 – Add the salmon to the rice:
Once the salmon piece of soap has set, remove it from the mould. Place your rice base pieces of soap onto the top to give you a rough guide of where you need to cut the salmon piece. You want the salmon piece to be slightly bigger than the rice base piece. Cut the salmon to size using the knife and bevel the edges (round off the edges) slightly to give it more of a salmon slice look. Save any offcuts that you have for one of the other sushi soaps. You can also score a few wavy lines along the top to give it a bit more detail too.

Then melt a little bit of opaque soap base and place a blob of this onto the rice base piece. Add on the salmon piece of soap to secure them both together. Allow this to set and you have your salmon nigiri sushi soap.


Sushi Soap – Tuna Nigiri:
The tuna nigiri soap is basically the same process as the salmon nigiri, but the only difference is how you make the tuna piece.
What you need:
- 120g Opaque melt and pour soap base
- 70g Clear melt and pour soap base
- 1.9ml (total) of essential oils – lemongrass, black pepper and Juniper berry
- Rubbing alcohol
- Red and brown soap colourant
- Small loaf silicone mould
- Small square silicone mould
- Knife
Step 1 – Make the base:
Follow the instructions above of the salmon nigiri to make the rice base. The only thing different is you do not need the thin layer of strips. Melt the opaque soap base, add in 1.2ml essential oils blend and pour into the square silicone mould. Allow the base to cool and set, before cutting it into rectangular pieces.
Step 2 – Make the tuna:
Melt the clear soap base, and add in 0.7ml of the essential oil blend (lemongrass, black pepper and juniper berry). Then add in a mixture of red and brown soap colourant until you get the shade you like. I wanted a dark red/burgundy colour as I thought this would represent the tuna perfectly. Pour into the loaf silicone mould and allow to set. Don’t forget to spritz the top with rubbing alcohol to remove any bubbles!

Once this has set, remove from the mould, cutting down into rectangular pieces. Make sure these are slightly bigger than that of your rice soap base. To give it a more realistic look, grab a skewer or a toothpick to make a few marks on the surface. Create lines going down the soap bar, in the same direction and add in a few diagonal. These will represent the texture of the tuna; giving it the tuna steak look. I also bevelled the edges/ rounded the edges of the slices.


Step 3 – Add the tuna to the rice:
Then melt a small amount of opaque soap base, placing a blob onto the rice base. Add the tuna piece on top of this and allow to set. Make sure the tuna is facing the right way up. Your tuna nigiri sushi soap is ready to go!


Sushi Soap – Sushi Rolls
The final sushi soap of the three…sushi rolls. This one is a little more fiddly than that of the nigiri but is so effective. There are various ways of making these sushi rolls, I merged two different recipes/methods for this. One being Kawaii Sweet World and the other being Soap Queen, so be sure to check these out too!
What you need:
- 120g Opaque melt and pour soap base
- 70g Clear melt and pour soap base
- 1.9ml (total) of essential oils – lemongrass, black pepper and Juniper berry
- 15g liquid glycerin
- Rubbing alcohol
- Dark green and Dark purple soap colourant
- Gold shimmer mica powder
- Small brownie tray
- Round silicone mould
- Round cookie cutter
- Cling film
- Knife
Step 1 – Make the rice base:
This part is the exact same as the previous two sushi soaps, however, it will be poured into round moulds rather than square. So, melt the opaque soap base and add in the 1.2ml of your essential oil blend. Mix this in well to combine and then pour into the round moulds. Allow these to cool and set.

Once the base has set, use a smaller round cookie cutter to cut out a piece of the soap. Now, if you have used a small round silicone mould then this part can be missed out, but because my mould was slightly larger than I wanted the soap to be I cut this out. Be careful when cutting them out as it can be very hard to cut through the soap once it has set. Metal cutters would probably be best for this. I had to use a rolling pin to hit the cutter through the soap. Set aside for later.

Step 2 – Make small vegetables:
In a sushi roll, there is often three pieces of vegetables or fish/meat; which we need to recreate in soap form. Remember the offcuts from the salmon soap? Cut these offcuts into smaller pieces, I opted for a rough cut look, but you could shape these however you like.
Then melt a small amount of opaque soap base, colouring one part yellow and another part green. Pour these into your mould in a thin layer and allow to set. These should set quickly with the layer being thin. Using your knife, cut these into smaller shapes as you did with the salmon piece. Then you have your three colourful parts to add to the sushi roll. Set aside for later.

Step 3 – Make the seaweed wrap:
When you get to this part of the sushi roll, you have to work quite quickly so that the ‘seaweed’ doesn’t set too much. You want this to be quite pliable.
Start by lining a small brownie tray with cling film; adding on a dusting of the gold shimmer mica powder. This should transfer onto the outside of the seaweed wrap. The cling film will help remove the soap from the tin, as well as give it a few wrinkle lines that you often see on the seaweed wraps.

Melt the clear soap base, adding in the 0.7ml of essential oil blend as before. Mixing this in well. Then add in the dark colours to the colour of seaweed. I found that dark green and dark purple colours gave me the right shade. Keep adding until you get your desired shade.

Now it is time to add in the 15g of liquid glycerin. This will help make the soap more pliable when setting. Mix in well before pouring into your prepared brownie tin. Allow this to begin to cool, but not fully set. You don’t want this part hardening; as it will make it difficult to roll.

Step 4 – Place all together
When the seaweed wrap part is ready, remove it from the tin and peel off the cling film. The gold mica dust should have transferred and incorporated with the seaweed soap. Trim any rough edges. Place the round rice part of the soap onto the seaweed, with the side down onto the wrap. You don’t want to place this flat down as you are wanting to judge the width of the wrap strip. Cut a strip from the seaweed soap piece that is slightly larger than that of the round rice base. You are going to top this up so that the vegetable pieces can be added.


Begin wrapping the seaweed piece around the outside of the rice piece until it meets. Trim off any excess and press the join together. The warmth from your hands should help the two pieces stick together. Set aside.

Melt a small amount of opaque soap base and top-up the sushi roll. You may want the soap to be slightly setting when you do this; as if it is too runny then it may flow out of the soap (trust me on this one!) Alow this to start to set and when a slight film has formed on the surface, add in your three coloured pieces of soap. This should help the pieces stick but not sink. If the soap isn’t set enough then the pieces will sink and you won’t see them sitting on the top. Clean off any excess soap that may be around the edge and allow to set. Your sushi roll sushi soap is ready!
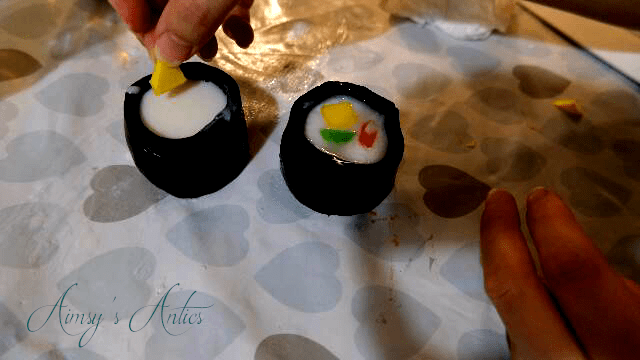


What do you think? Would you do anything differently? Are there any other foods you would like to see transformed into soap? Let me know in the comments below!
Sushi Soap – Video
See below my video tutorial of how to make these cute little soaps!
Sushi Soap – Pin it!
If you enjoyed this post, why not share the love and pin it for later?


Until next time,

This is absolutely amazing and so bloody creative!
Love, Amie ❤
The Curvaceous Vegan
Thank you! They were so fun to make 🙂
Aimsy xoxo
Omg these are so very cute!
Glad you like them!
Aimsy xoxo
These are so cute! And so easy to make, while I actually thought the salmon was real for just a moment. I would love to give these as a gift sometime.
It is amazing how real it looks, isn’t it? They would make a great gift for someone. I gave these away as a gift and the person loved them.
Thanks for commenting!
Aimsy xoxo
Oh my goodness how cute and fun is this?! This would be a lot of fun to try out!
-Charity http://www.morningsonmacedonia.com
It is so fun, especially when it turns out as it should. Sometimes you need a bit of a messy craft, don’t you?
Thanks for commenting!
Aimsy xoxo
Awesome blog! You have shared a nice post. Thank you!
Nahid | https://bestclicknow.com