

Another easy DIY make for you today using a digital cutting machine. See how to make your own DIY cake topper using the Silhouette Cameo 4!
In my last post, I made a pistachio and rose cake. To go with this cake I also made a DIY cake topper using my new(ish) gadget, the Silhouette Cameo 4. So, I thought I would walk you through this process so that you can make your own DIY cake toppers at home.

Now, I am using the Silhouette Cameo 4; however, this project can be made with any form of digital cutting machine, like the Cricut. You could make this by hand, scoring and cutting out the design with a craft knife; however, it will be laborious! A digital cutting machine just makes designing and cutting out your designs so much easier than by hand. It also opens up the world of papercraft or vinyl craft and perfect for those who may have injuries or issues with their hands/arms. I love how these machines make crafting more accessible. The only issue is learning the software and getting used to it.
If you would like more inspiration of that to make with a digital cutting machine, then why not check out DIY Wooden Desk Calendar. I used Vinyl to decal the calendar!
DIY Cake Topper
So, a cake topper is basically something decorative to put on the top of a cake. It turns out they are fairly easy to make yourself, especially if you have the tools and equipment to do so.
This cake topper has a cut out double square frame with the text ‘Happy Birthday’ floating in the middle. To finish off the design are several paper flowers and leaves to create a wreath effect. I will show you how to create the frame, as well as merging the text into the cake topper in this post. You can leave the cake topper blank, or add pretty decorations as I did.

To make your own DIY cake topper you will need the following items:
Please note that some links are affiliate links, marked with an asterisk (*). This means I may earn a small amount of commission should you make a purchase through the link, at no extra cost to you.
- Silhouette Cameo 4 (or any other digital cutting machine)
- Card stock of choice – I am using a gold card* and pink card*
- Bamboo skewers*
- Double-sided tape*
Step 1 – Making the Frame
Start by opening the Silhouette studio, which is where the design will be created. I have the basic free edition that comes with the Cameo 4 and this is enough to be able to make your own DIY cake topper.
Select the shape drawing tool and draw a square. Mine measures 13cm X 13cm as this suits the size of the cake. You can change this sizing up depending on the size of the cake you have.
Fill the square in with a colour, and match the outside line to the same colour. This will make it easier to see where the square is on the grid background of the design software.
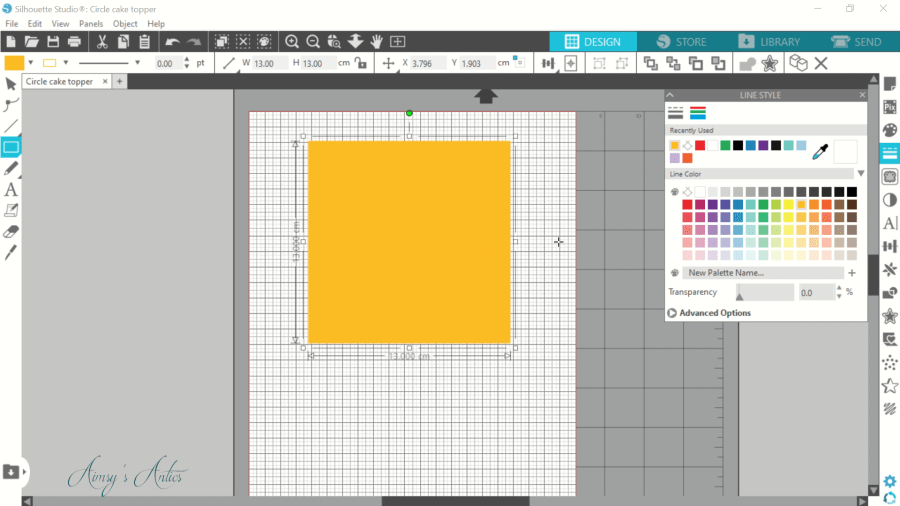
Next, draw another square, changing the dimensions to 12cm X 12cm, so that it is 1 cm smaller than the original square. Don’t change the colour to this square.
Select both squares and head to the ‘Transform’ tab on the right-hand side, selecting the align centre options. Do this for both horizontal and vertical, as this should align the squares exactly where they should be.
Keeping the two squares selected, click the ‘Modify’ tab and the divide option. This will weld the shape together, removing the middle square to leave a thin square for the frame.
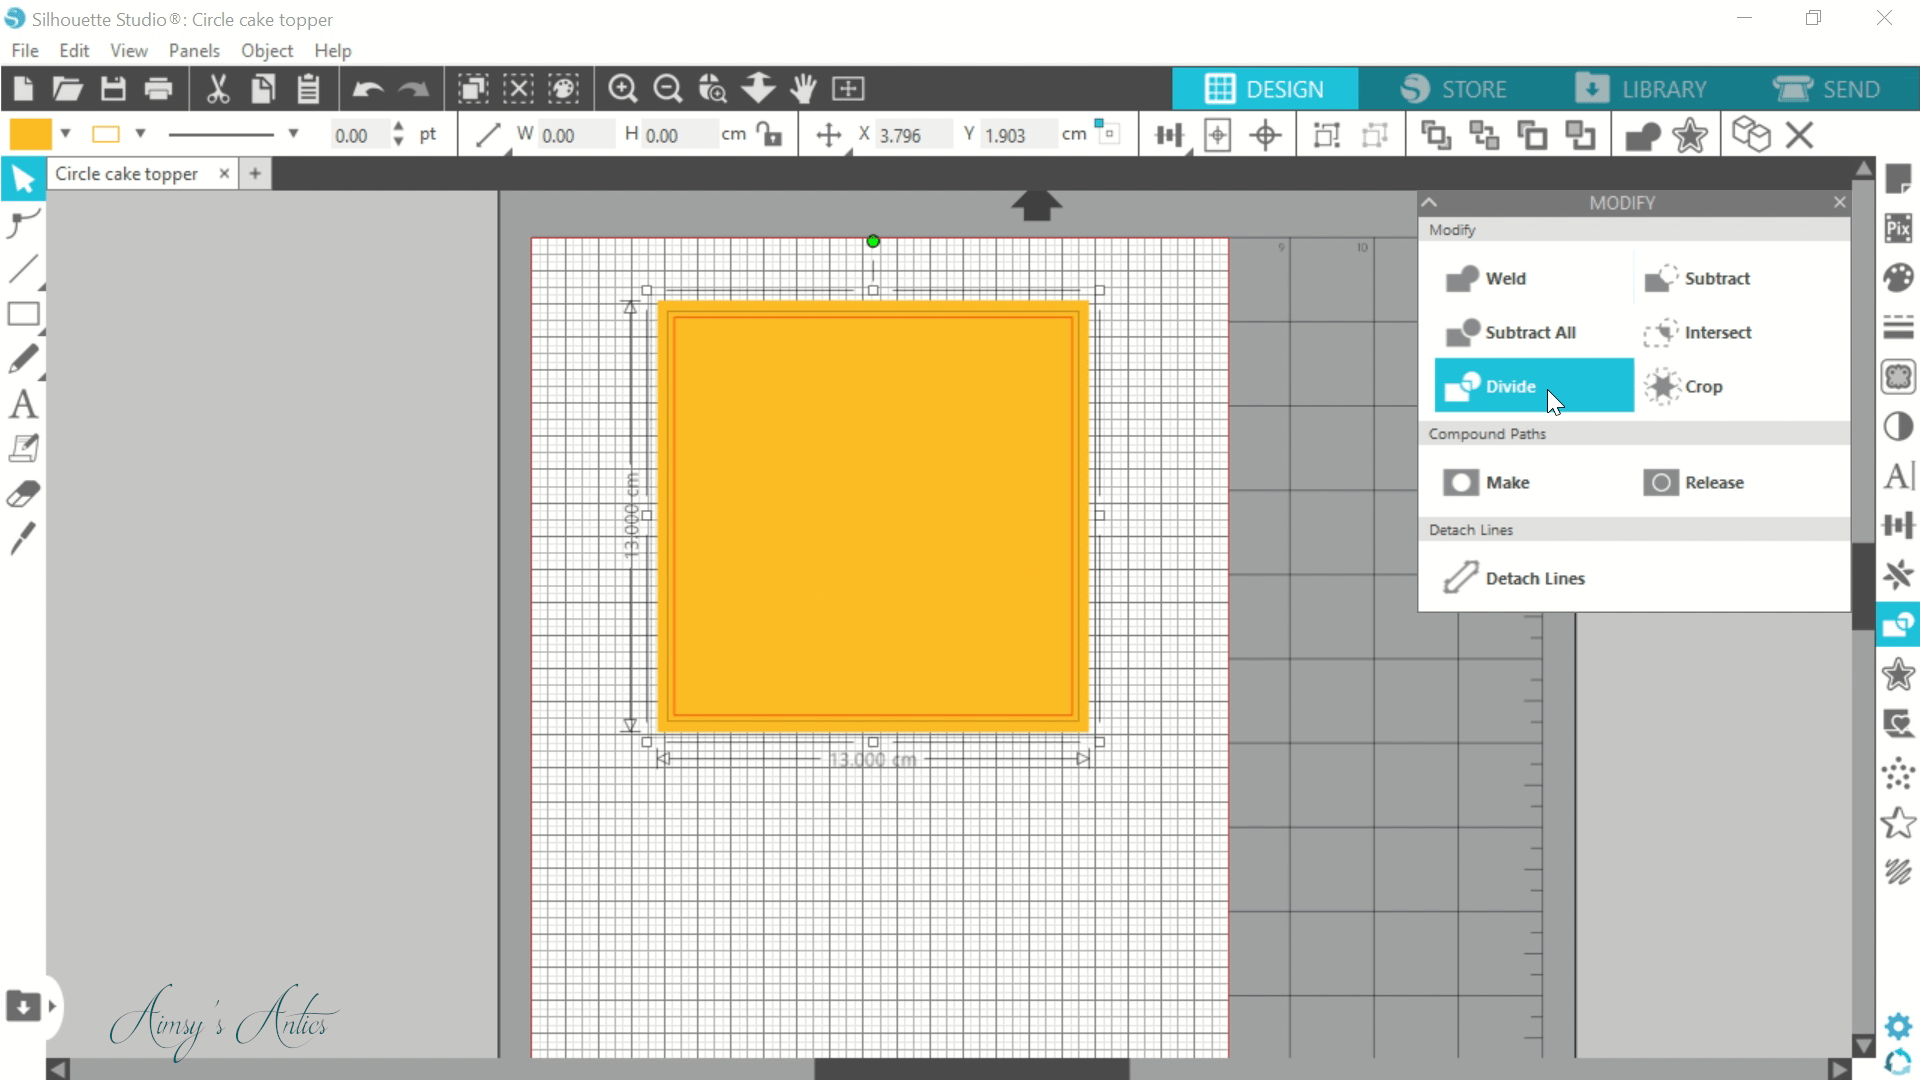
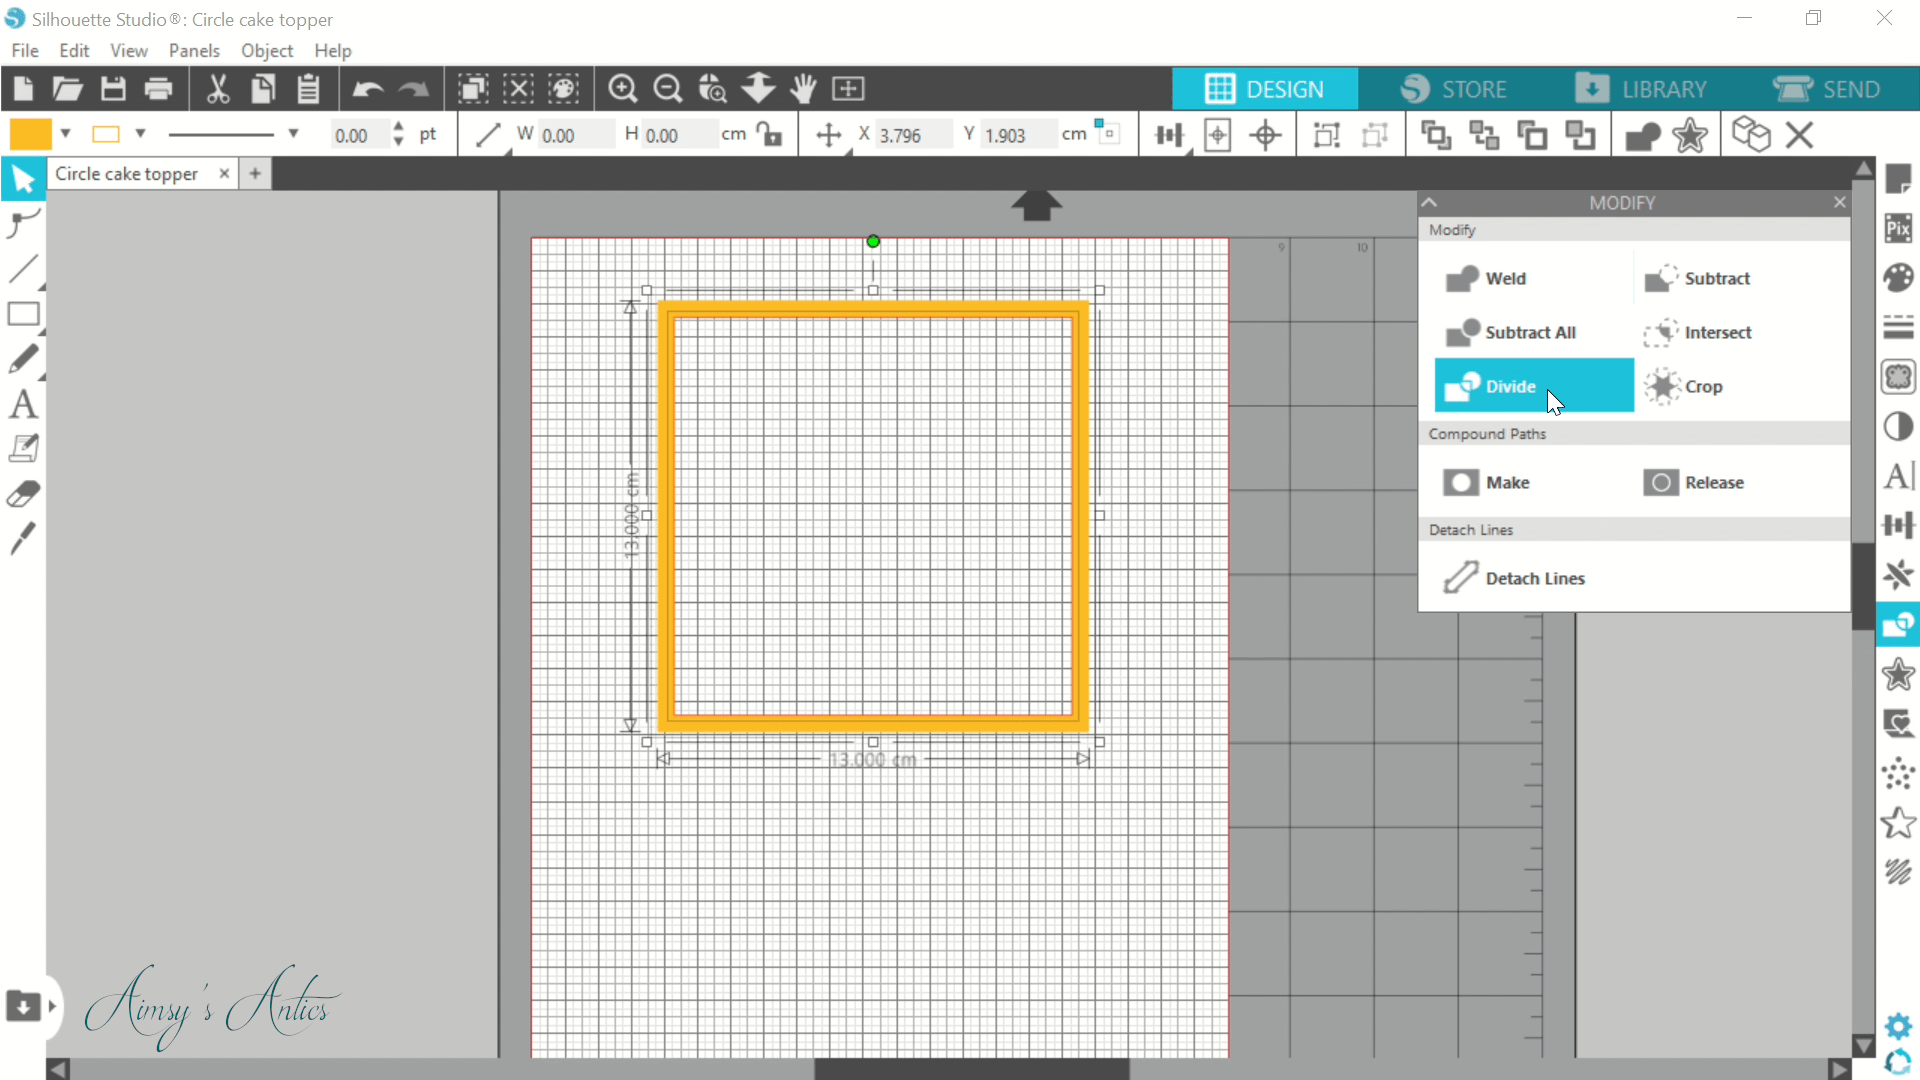
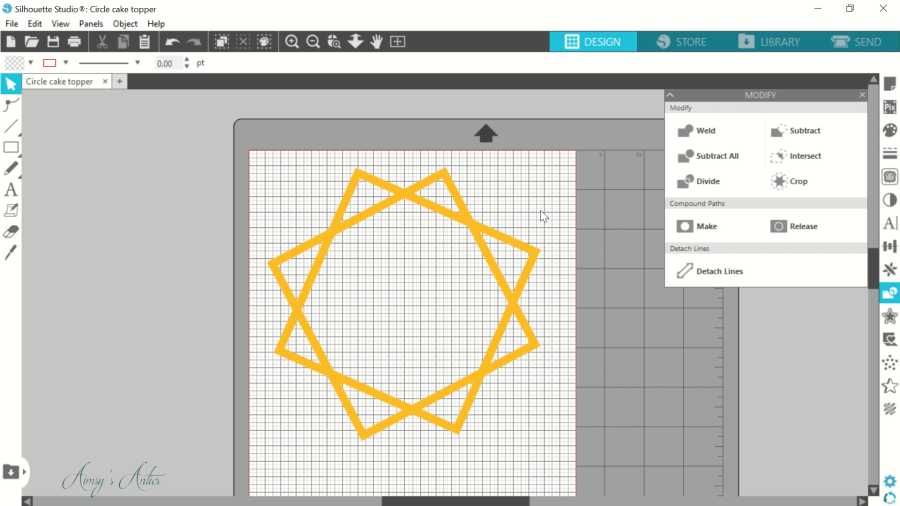
Duplicate the frame so there is two, and play around with the placement of these. I like it off centre, so there is a star shape forming. When happy, select both squares again and click the option on the top toolbar to group them together. This will make them one shape, so they both move together when moving them about.
Step 2 – Edit cut lines
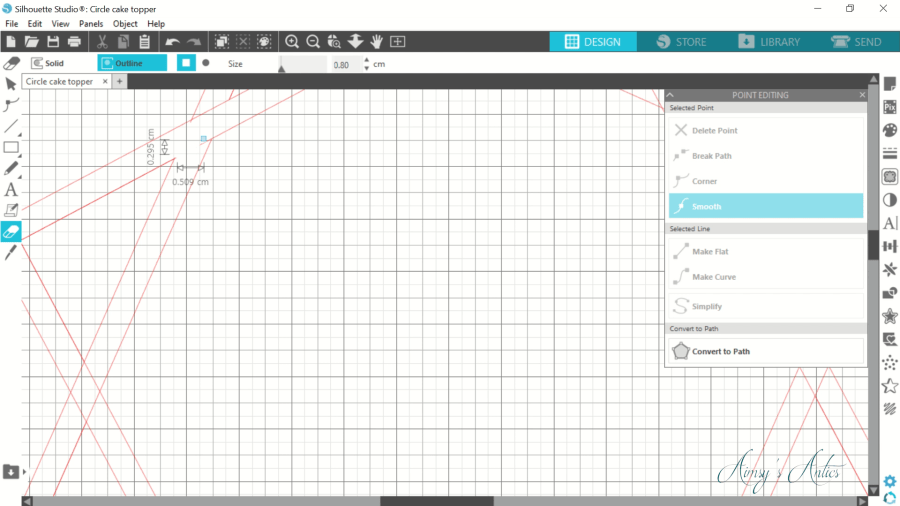
The frame of the DIY cake topper is taking shape. Take a look at the design in the ‘Send’ tab and you will notice that there are cut lines running through the design, where the squares cross. It is time to edit these cut lines so that the frame cuts out in one shape connected together, with parts cutaway.
The easiest way to remove the unwanted cut lines is with the eraser tool on the left-hand side toolbar. Now, this does take a little bit more time and patience to do, as you are manually removing the line; however, I found this the easiest option. You can attempt to edit the lines by selecting the ‘edit points’ tab on the left-hand side. I found that this did not fully delete the lines I wanted and was changing the shape of the square frame.
Use the ‘Send’ tab to keep checking your handiwork and making sure you have erased all of the unwanted cut lines.
Step 3 – Create the Middle Text
Once the outside frame is complete, it is time to concentrate on the floating text in the middle of the design. I chose ‘Happy Birthday’ as the cake was a birthday cake, but you can alter the message to suit the occasion.
Select the ‘text’ tab on the left-hand toolbar, and this will allow you to write your message. I like to split the ‘happy’ and ‘birthday’ into two so that I can move each individual word where I want it to be.
Highlight the text and head to the right-hand side toolbar for the ‘text style’ tab. This will allow you to change the font type and size of the design. You can also change the size of the text by selecting the text and dragging the square in the corner to make it larger or smaller.
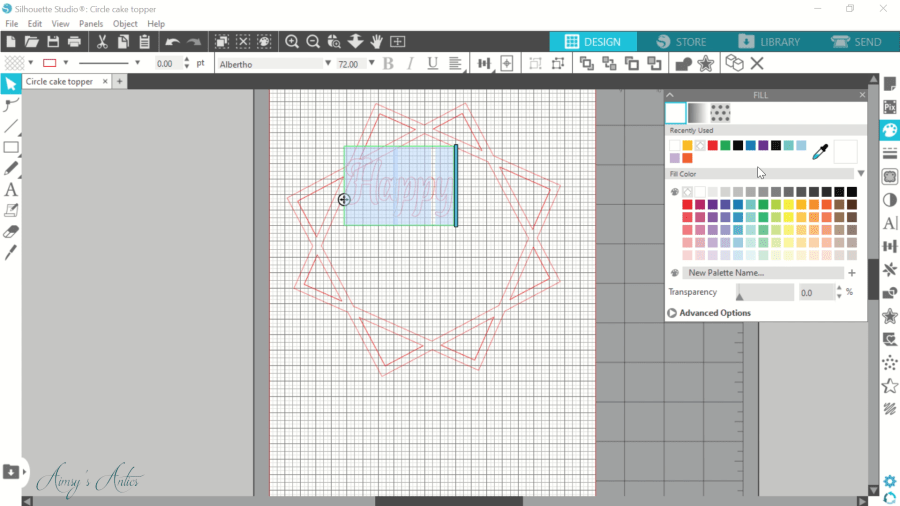
I made two cake toppers, using two different texts; which you may see throughout this post. The first font style is ‘Albertho’ which is a free download on FontBundles. The second font is ‘Steady Script’; again which is free on FontBundles. This isn’t sponsored, but I just love that they offer free fonts; as well as designs on DesignBundles, that you can use with an added licence of usage.
Whilst in the ‘text style’ tab, also alter the character spacing of the font, so the letters are connecting. This allows the word to be cut out as one and connect the words together and suspending in the middle of the topper. Play about with the style until you ave the text how you want it.
Using Offset on script text
The important thing to remember when choosing a font is that it is thick enough to be cut out successfully. If you like a script font that has delicate sweeping characters, then it can be difficult to get a sturdy cut and keeping it all in one shape. You can use script fonts, but you have to do some work to make them a bit thicker. To do this, head to the right-hand side toolbar and select the ‘offset’ tab. Change the distance setting, and you will see an outline form around the text. Set this to the thickness you like whilst still keeping some of the styles of the script.
Step 4 – Attach the Text and Frame
Enlarge or stretch the text so that the first and last letters are touching the square frame in some way. You also want to line up the second word with the first word. In the case of ‘Happy Birthday’ connecting the tails of the ‘p’s in ‘Happy’ with the ‘h’ and ‘d’ in ‘Birthday. Also adjust the lines of any letters that may not be connected fully, erasing the one between them say they become one.
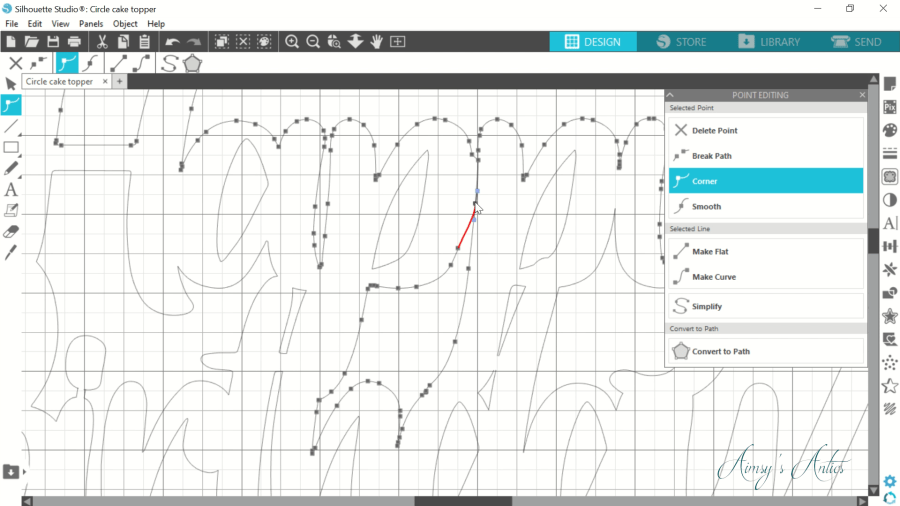
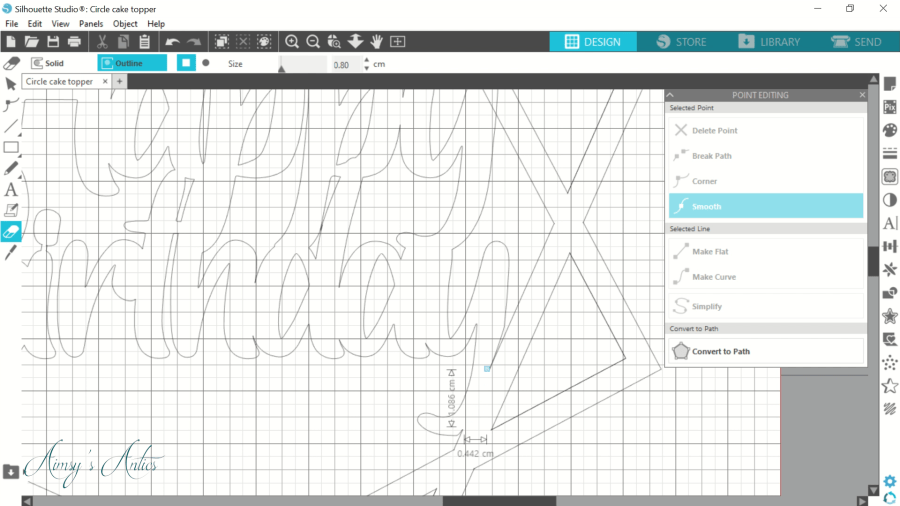
When the text is in place, select both, and click ‘weld’ in the ‘modify’ tab. This should merge the lines of the text, enabling them to be cut into one shape. However, the dot (tittle) of the ‘i’ is not connected. Therefore draw a small rectangle piece and place this between the dot and the top of the ‘i’. Make this a slim rectangle, so that it is not too noticeable. This will create a piece to connect the two together when cut out. Use the eraser to remove the lines where it overlaps to create one piece. Alternatively, you can just delete the dot!


Then, select all text and frame, and select group. Everything will connect together. It is then a matter of using the eraser again to remove any joins and cutlines where they are not needed. This is more so the letters that are connecting to the frame part. It will allow everything to be joint and cut as one piece.
Step 5 – Cut out and attach sticks
The final step using the Silhouette Studio is to send the design to cut under the ‘Send’ tab. Ensure you select the correct cardstock setting, as well as the blade depth, force and amount of passes. The software comes with pre-programmed settings, but they can be altered.
I find it is always best to carry out several test cuts to ensure you have the correct setting for the material you are using. Use similar cardstock or have several pieces of the cardstock you are wanting to use. The worst thing is designing the topper and cutting it onto your favourite card to find that it hasn’t cut how you want to then not have any more of the card. So, test, test and test some more to make sure!

Another tip with cutting out is to make sure the card is fully attached to the cutting mat. Now, I am a bit of a cheapskate and my mat has seen better days, so I use painter’s tape around the edge of my card to secure it down. I will eventually either try to re-sticky my mat or purchase another, but for now, it is the painter’s tape all the way!
When cut, pull the mat away from the design to ensure that the card isn’t ripped. Doing it this way seems to be more gentle on the card. Remove any inner bits to reveal the design.

Then, using double-sided tape, place this onto two of the edges of the cake topper. Secure the bamboo skewers onto these and the DIY cake topper is nearly complete. This will help the cake topper stick to the top of the cake. You can also use mod podge glue to help secure it in place too!
Step 6 – Add embellishments
Now, this step is optional, but I think it adds a bit of flair to the DIY cake topper. The design I am using for the flowers was free with my machine. However, there are plenty of 3d flowers on the Silhouette Design Store that you can use.
Cut out four of the flower designs, as well as some long wreath type leaves onto the relevant cardstock of your choice. Build the flowers, making them 3d using double-sided take to secure. Then layer the design, placing the leaves first, with the flowers on top. I use two different pink shades, one more pastel and the other a deeper pink in glitter. I love the contrast and I think they make the DIY cake topper pop.


Then the DIY cake topper is complete and ready to decorate your chosen bake.


What do you think of this design? Have you got a digital cutting machine? Would you like to see more makes using the Silhouette Cameo 4? Let me know in the comments below!
DIY Cake Topper Video
Here is the video version of this post. It may be easier to follow along with the steps via video format. If you like the video, then please don’t forget to give it a thumbs up and subscribe to my channel! I have recently hit the big milestone of 1,000 subscribers, so thank you to everyone who has subscribed…you are amazing! ❤❤
DIY Cake Topper | Pin it!
If you have enjoyed this post, then why not share the love and pin it for later? You can find me on Pinterest too!


Wow these cake toppers are lovely, thank you for sharing these suggestions 🙂 this seems like a brilliant project for baking lovers stuck inside at the moment x
Glad you like it! Yeah, it can really enhance a cake design can’t it?
Thanks for commenting 🙂
Aimsy xoxo
I’ve never used a digital cutter before but this looks amazing. You’ve done such a great job.
Oh, I only got it just before Christmas. They really do open up what projects you can do…cake toppers, card making and vinyl projects. I am sure there is a lot more but that is just a few things I have used it for so far!
Thanks for commenting 🙂
Aimsy xoxo
i never used a digital cutting machine, but this looks absolutely great! It complements so well the cake and I must say I am mouth watering just by the look of it! Thank you for sharing x
Oh, I resisted getting one, but I wish I had got it sooner. There is so much you can use it for! Glad you like this project…and the cake was delicious haha!
Thanks for commenting 🙂
Aimsy xoxo
This such a cute idea! I’ve never made a cut out design, but you’ve made it look like something I could do! Thanks for sharing.
Once the settings are right, these cut out so well! Plus you can really change up the designs. Glad you liked it!
Thanks for commenting 🙂
Aimsy xoxo
That’s a lovely cake topper Aimsy, so cute and elegant! x
Lucy | http://www.lucymary.co.uk
Glad you like it, Lucy! I love how it turned out 🙂
thanks for commenting 🙂
Aimsy xoxo
Wow! Art on a cake! Love this!❤️
It really pops the cake, doesn’t it? Glad you like!
Aimsy xoxo
Ooh! I love this! I bought my wedding topper for $20 each and it was expensive. I’m hoping to purchase a cricut soon and I an start making these. Thank you for sharing Aimsy! I’ll pin for later xx
http://www.lynnmumbingmejia.com
They can be so expensive, can’t they? Once the settings are right (it can take trial and error), then you can make these so much cheaper and to the design you want. I haven’t used Cricut before, but you can definitely do everything on either machine!
Glad you liked it!
Aimsy xoxo
Wow this looks amazing!! You are so talented 🙂
Have a great day,
Tiziana
http://www.tizianaolbrich.de
Aww thank you. It turned out so much nicer than I thought it would!
Glad you liked it 🙂
Aimsy xoxo
This looks so good! I don’t have the tools to make it but I wouldn’t have even had a clue where to start with something like this. It seems really easy too which is always great! x
Aww thanks, Sophie! Yeah so easy to do once you get into how the software and tools work, Its definitely an investment both in price and time learning, but you can make so many different things with it!
Thanks for commenting 🙂
Aimsy xoxo
The DIY Cake topper is such a great craft idea!
Glad you like it. Simple but effective, isn’t it?
Aimsy xoxo
This is amazing idea. In every of your posts I learn something new. Thank you so much for sharing.
New Post – https://www.exclusivebeautydiary.com/2021/03/most-worn-winter-fragrances-20202021.html
Glad you like it. Also glad you learn something new in each of my posts! Hopefully, they give you some inspiration 🙂
Aimsy xoxo
I haven’t used a digital cutting machine before, but I LOVE your cake topper! I also love the wreath with the 3d flowers!
Aww, thank you! I wish I had invested sooner, there is so much you can do with them. I’ve been making more cake toppers for my friend today too!
The wreath is beautiful, isn’t it?
Thanks for commenting 🙂
Aimsy xoxo
You’re welcome! That’s awesome you’ve been making more for your friend!