

Who doesn’t love a house plant? My collection is growing, and I wanted to spruce mine up by making a fabric plant pot for it. See how to make a DIY fabric planter in today’s post!
Today’s post is an easy sewing project, to spruce up your home decor as well as your houseplants. That’s right we are talking DIY fabric planters or plant pots and how to make your own.
So, I am accumulating a variety of houseplants, with the latest addition being Monty the Monstera. Does anyone else name their plants, or is that just me? And, well he just looks a bit plain and needs a bit of sprucing up with a new tuxedo, which is where this DIY fabric planter comes in.

Now, you may be thinking fabric and plants won’t mix well, but these plant pots just look beautiful. It is a perfect way to add a bit of texture and luxury to your home decor as well as hiding those plain plastic plant pots. There are so many available out on the market these days, from wicker basket types to more material types. Totally on-trend! Along with the beauty of them, is a bit of a pull on the purse strings, with some being over £30 -£40, depending on what material they are. That is where sewing skills come in very handy!

Not only can you use this method to make the fabric plant pots, but you can also change the measurements up to make some beautiful and fancy storage baskets too!
DIY Fabric Planter – Materials to Use
You can use a variety of materials and fabrics to make a fabric planter, however sturdy and heavy fabric is recommended. You will probably see the planters made from hessian and cotton canvas. But what if you find a material you absolutely love that is a bit softer? Well, heavy interfacing is your best friend in this and will give lighter material a stiffer and heavier feel. Mood Fabrics has a great guide on choosing the right fabric. I opted for a velvet outer material, regular lining material and that beautiful sequin as a trim.
Interfacing comes in a variety of types from lightweight to heavy, and I have used it regularly in sewing projects like this Make-up Bag with Boxed Corners, DIY Planner Pouch and DIY Tablet Case. So, if you are looking for more easy sewing projects, there are a few to keep you going!

Jump to the bottom to watch the video tutorial of this post!
DIY Fabric Planter – What you need:
I mixed three different materials to make the fabric planter in this project, as I like a bit of sequin trim, as you can see in this Christmas Stocking project. However, you can make these DIY fabric planters with just two materials and still get a beautiful effect.
To make the fabric planters you are going to need the following items:
- Outer material
- Lining Material (optional to have x2 fabrics like mine)
- Heavy Interfacing
- Matching thread
- Sewing Pins or clips
- Sewing Machine
- Iron

DIY Fabric Planter – Measuring
Before you can start cutting your materials, you need to know what size to cut them to.
What is great about this project, is you can alter the size of the planter for whatever plant pot you want. They can be made big or small and are really customisable. Like I said earlier, they can also be made as storage baskets too!
Measure the Base:
To determine the amount of material required to create the base of the DIY fabric planter, you need to measure the widest part of the pot. In my case, this is the drip tray that the plant pot stands on.
Use a large piece of paper/greaseproof paper/scrap paper (whatever you can get your hands on) and draw around the drip tray or top of the plant pot. Make sure this is turned upside down so you can draw around the widest part.
Then, use a ruler to measure out from this circle by 2cms, all around the edge. Join up these dots to get a second circle. this is what you will cut the material to. Cut out the pattern piece ready to use. You can draw this directly onto the fabric, but I find creating a pattern piece makes it easier to replicate the project.

Measure the Width:
This part is easy enough to do but does involve a bit of math. Determine the diameter of the base by measuring across from one side to the other of that newly formed paper template. Mine measures at 31cms. Then take this measurement and multiply it by π (3.14) to get the total width needed for the DIY fabric planter.

Measure the Height:
To determine the height of the fabric planter, use a ruler and measure up the chosen plant pot to where the rim of this is. Then add on a few cms so that you can get the nice folded down edge, as well as add on a few cms for seam allowance.
The height of mine measures 25cms with the added extras to fold down.
With the lining piece, I actually changed these measurements up and use 8-10cms for the sequin material and reduced the lining part by this much. In theory, I had two strips for the lining rather than one whole piece.

Now that you have the measurements it is time to get creating the DIY fabric planter:
Step 1 – Cut out Fabric and Fuse Interfacing
Cut out the fabric to whatever size was measured. You will need a base and width out of the inner lining, outer lining and fusible interfacing. As I said above I altered my measurements for the sequin trim so whichever you choose, measure accordingly and cut out using the template made.


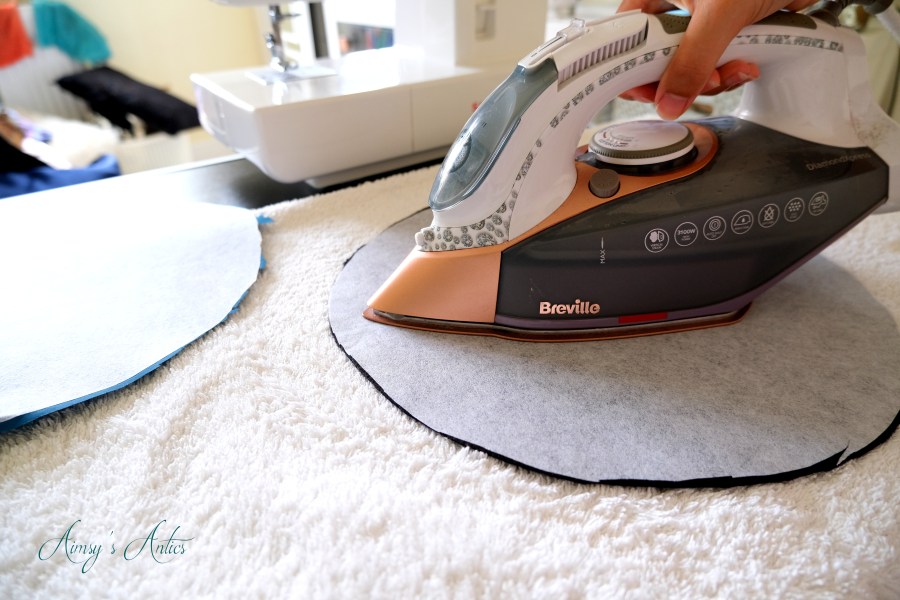
Then press all of the material so there are no lumps and bumps before fusing the interfacing. You want to fuse the interfacing on the wrong side of all of the fabric pieces. This will give it that needed stiffness to stand up when made. If you have a thick canvas type of material, you probably won’t need to attach the interfacing. If you do, then this will more likely be to the lining piece.
Step 2 – Form the lining part
Now, obviously this is if you are wanting to create the sequin edge. Skip this part if you are just using one piece of fabric for the lining.
Start by placing the sequin material along one edge of the lining piece, making sure the right sides are together. Then head to the sewing machine and sew a narrow-ish seam to connect the two together.


Press the seam flat with an iron, making sure this folds down towards the lining piece and not the sequin part. Sew a top stitch along this edge to secure the seam in place and help it lay flat.

Step 3 – Sew the sides together
Then it is time to form the main part of the fabric planter. All this is, is a simple side seam connecting the material together.
So, fold the material in half so that the two raw edges meet, and are right sides to right sides (inside out). Head to the machine and sew a seam along this edge to connect.
Repeat for both the lining and outer materials. The sides of the fabric planter are now taking shape.


Step 4 – Connect the base and sides together
Now it is time to begin forming the fabric planter by connecting the base and sides together.
Start with the lining piece, and pin the base to the bottom edge of the lining body. Make sure the right sides are together when doing this. Now, this part can be a little tricky and fiddly, but just keep easing the fabric around. You are going to need a lot (I mean a lot) of pins to secure it in place. Be careful too with the pins, I managed to scratch my arms too many times when sewing it together.

Head to the sewing machine, and sew a seam all around this pinned piece. Make sure to remove the pins as you go, as you could damage your sewing machine. As well as backstitching the start and end of this seam for added strength.

Repeat the same process for the outer material.
Step 5 – Connect the two pieces together
The DIY fabric planter should now be really taking shape. You should have two fully formed pieces for the planter.
Turn the lining planter right side out and place this inside the outer planter piece. Keep the outer piece wrong side out. Again, grab a tonne of pins and begin pinning the two pieces together along the top edge.
This part can be a little tricky, especially if the lining piece is slightly bigger than the outer piece. Just keep easing this around, and it should all come together.

Head to the sewing machine again, and begin sewing around the edge to secure the outer and lining together. Leave a 10cm gap so that the piece can be turned right side out, remembering to backstitch at either side of this opening. You may also find that you need to ease the material through the machine if it is a bit bulky.
Step 6 – Turn right side out and topstitch
Then it is time to turn the fabric planter right side out through the gap that was left. This can get a little bit tight because of the size of the gap, but gently ease the material through until it is right side out.

Fold the lining part down into the fabric planter and sew a top stitch around the top edge. This should close up the 10cm gap left. Make sure the edges of this gap are folded inwards so that you get a seamless closing.

Then the DIY fabric planter is ready to be used with your chosen plants and a bit of beautiful home decor!


What do you think of this DIY Fabric Planter? Will you be giving this project a try? Also, do you name your houseplants too? Let me know in the comments below!
Sign up to get posts into your inbox weekly…never miss a creative post!
DIY Fabric Planter – Video
Here is the video version of the post. If you enjoyed the video, don’t forget to like and subscribe to my channel for more creative goodness!
DIY Fabric Planter – Pin It!
If you enjoyed this post, why not share the love and pin it? Check out my Pinterest too!


What a great idea. Monty is definitely spruced up I named my cactus Colin when I was a kid
Glad you like it. I think he looks lovely in his new suit. What a great name for a cactus!
Thanks for reading and commenting 🙂
Aimsy xoxo
Oh my gosh this is absolutely gorgeous! I love the material you’ve used too, it looks so expensive.
Love, Amie ❤
The Curvaceous Vegan
Aww, thank you Amie! I am so chuffed with how it turned out. The velvet really does give it a bit of a luxe look, doesn’t it? It wasn’t that expensive really, I managed to grab a bargain on Amazon!
Thanks for reading and commenting 🙂
Aimsy xoxo
Love the sequins! what a fancy plant 🙂
Oh, I know, sequins and a bit of sparkle are just the best, aren’t they? He definitely looks a lot fancier now!
Thanks for commenting 🙂
Aimsy xoxo
Great idea, It looks pretty!
Glad you like it. I love how it’s turned out.
Thanks for commenting 🙂
Aimsy xoxo
What a lovely idea Aimsy! I love how you’ve added sequins to make the fabric planter pop! x
Lucy | http://www.lucymary.co.uk
Glad you like it, Lucy! Have to add a bit of glitz to it, it just wouldn’t look as special without the sequins, would it?
Thanks for commenting 🙂
Aimsy xoxo
I have recently shifted to my new home I am definitely using your idea for my plant and the sequin idea is just great ❤️ loving it.
I think the sequins really add to the look, don’t they? I bet yours will look lovely in your new home!
Thanks for commenting 🙂
Aimsy xoxo
I love how much this fabric planter spruces up a plain planter so much! We keep a lot of house plants so making a handful of covers would be an awesome way to add some color to the bases. Thanks for sharing!
Oh it really does add something else to them, doesn’t it? You can make these in all colours and sizes to suit each of your plants and really style them up. Glad you like them and thanks for commenting!
Aimsy xoxo
That’s adorable! Never thought of doing this for my plants before!
Glad you like them. It’s a great way to do something different with the decor, isn’t it? They also make great storage baskets too!
Thanks for commenting 🙂
Aimsy xoxo
I really like these! Perhaps a new DIY project for Fall! Thanks for sharing.
Glad you like them! A perfect project for the fall.
Aimsy xoxo
Hi Aimsy. What a novel idea! Certainly a great way of hiding those plain, plastic pots.
We don’t tend to name our plants as they never really survive long enough! Perhaps we could give them numbers to indicate how long they might last …
Glad you like it! Definitely a great way of hiding the plain plant pots.
Oh, no! Numbers might be the way forward!
Thanks for commenting 🙂
Aimsy xoxo
This is such a great idea. Shops are charging so much for fabric planters, so to be able to make your own unique version is great.
Glad you like it. I love how it has turned out. I know, I was shocked at how much shops charge for something like this? I agree it is great to be able to make something more unique!
Thanks for commenting 🙂
Aimsy xoxo
I would never have thought about making a fabric planter but wow, it looks so good. I’d probably need to put my plant in a plastic bag first though, I’m not the steadiest of hands when it comes to watering, haha! x
I only came across them when I was looking at different home decor and fell in love with the idea!
I try to remove mine to water, but I think I will have to go with the plastic bag method when it gets too heavy to move.
Thanks for commenting 🙂
Aimsy xoxo
This is a great idea, especially if you like to mix things up for seasonal decor. Why have I never thought of this as a thing before?! x
Sophie
Glad you like it! It will be great to be able to change them up, and the rest can be stored much easier than a ceramic pot.
I know I loved the idea when I came across it!
Thanks for commenting 🙂
Aimsy xoxo
I love your DIY fabric planter. This is such a fabulous alternative to just painting a pot a different color. Using fabric also adds an extra layer of coziness and warmth to the room.
Glad you like it! It’s a great way to change up the pot, isn’t it? I love how the fabric adds that extra bit of texture and cosiness to the room.
Thanks for commenting 🙂
Aimsy xoxo
I love how this fabric planter turned out! So luxe – also could be GREAT as a little christmas diy for a small tree xx
Its beautiful isn’t it? I have a lovely teal green velvet too so i am tempted to have a go at another planter.
What a great idea!! It would look great at the base of a tree! Deffo feeling a bit Christmasy now!
Thanks for commenting lovely!
Aimsy xoxo
What a great planter for houseplants! Practical and stylish, too.
Glad you like them. It really spruces up the houseplants, doesn’t it? They can be used as storage baskets too, so stylish organisation is a go!
Aimsy xoxo
Love your ideas – they look great! And fun!
Aww, glad you like them! Deffo a bit of fun to make and love the outcome!
Aimsy xoxo
Ooh I love this, what a fab idea! Love the sequins too 🙂 xxx
Glad you like it. The sequins are just beautiful on it, aren’t they? I love how they catch the light.
Thanks for commenting 🙂
Aimsy xoxo
Super cute idea! Thanks for sharing, I learnt some good DYI to do!! Also, loved the video!
xoxo Olivia | http://www.oliviaandbeauty.com/
Glad you like the idea and project! Love that it has helped you learn the DIY and thanks for checking out the video too!
Aimsy xoxo
Wow! Really adds a posh style on plants. Easy tutorial video. 😉
It’s a great way to luxe up the plants, isn’t it? Glad you like the video as well!
Thanks for reading/watching & commenting 🙂
Aimsy xoxo
I love this idea, thanks for sharing!
Glad you like it and hope it has inspired your creativity!
Thanks for commenting 🙂
Aimsy xoxo
Everything in this post looks so cute, including you 🙂
Kitchen Utensils
Glad you like it! Thank you!
Aimsy xoxo
What a great DIY! I love the mix of fabrics you chose and it looks like such a fun thing to make 🙂
Hope you are having a lovely weekend 🙂
Glad you like it. I think the mix gives it that more luxe look, don’t you think? I want to make more for all the plants now!
Thanks for commenting! Hope you are having a lovely weekend too 🙂
Aimsy xoxo
Hey that is such a good idea. I got into macrame plant hangers and I now have 3 in my house and its looking a bit much. This idea of yours is a perfect alternative. Thank you
Glad you like it! I want to make a macrame hanger but worried that it won’t go right and the plant will fall and break. Love the look of them though. Happy crafting, these will go fab with the hangers!
Thanks for commenting 🙂
Aimsy xoxo
I love a fabric house plant cover and this one is so lovely! They’re a nice change from normal pots! Thanks for sharing x
Thank you. They just add something else to the plants, don’t they? I want to make more now to spruce up a few more plants!
Thanks for commenting 🙂
Aimsy xoxo