

Another day and another sewing project. This past weekend I got out the sewing machine once again and got creative. This week I will show you how to make a DIY planner pouch, in an easy sewing project, perfect for keeping your planner organised and keeping the supplies with it.
Now, I haven’t been to school for many many (too many to count) years, but I still like to have some form of planner/notebook with me. This project is a really easy sewing project, and perfect for all ages. Whether you are heading back to school, or just wanting to keep your stationery supplies handy when journalling, then this project is for you. What better way then having a go at making your own DIY planner pouch?
Recently I have been trying to save on buying new things and using items I already have to make my own. A crafter always has an abundance of supplies, especially lots of scrap material, don’t they? I always say this, but fat quarters are great for easy sewing projects like this. I was able to make a DIY Tablet Pouch, and DIY Face Masks with my leftover scrap/ fat quarter pieces of material.

What is a DIY Planner Pouch?
A DIY planner pouch is a form of pencil case with pockets, that you can have attached to your planner. It is a great way for organising your supplies for on the go. Whether this is a diary/planner, bullet journal or just a notepad. The planner pouch in this project has a zipped compartment for your pens and pencils (or whatever you want to put in it), as well as a phone pocket, pen pocket and a large pocket on the front.

Sounds like something you would like to make? Then, let’s get crafting!
You can find the Video version of this post at the end. Jump to the video here!
How to make a DIY Planner Pouch:
This DIY planner pouch is adaptable, and the size of it can be changed up to suit what it is needed for. My planner/bullet journal measures at 21cm x 14cm, therefore I knew that the pouch has to be smaller than this. This is the journal I use* if you want a similar one.
The size of the pouch will more or less depend on the planner/journal you have, as well as how big you want it to be. Some pens/pencils may be too long for the size, so take this into account for whatever supplied you have.
What you need:
To make your own DIY planner pouch, you are going to need the following items:
Please note, some items on this list are affiliate links and are marked with an asterisk (*). This means that I will earn a small amount of commission, should you make a purchase through this link. This is at no extra cost to you.
- x2 pieces of contrasting cotton material – outer and inner material
- x2 pieces of iron-on lightweight interfacing*
- Decorative Zip* – I had to shorten these ones to fit
- Thick Elastic*
- Matching cotton
- Sewing machine
- Cutting tool (scissors or rotary blade cutter)
- Iron
- Pins or sewing clips*
Step 1 – measure and cut material
For the pouch measure and cut x2 pieces of the outer material, lining material and iron-on interfacing. These will measure at 18cm x 12cm each. If your journal or notebook is larger, then scale these up to suit. Make sure there is a 6 cm difference between the two measurements when changing the sizing. This will give the same shape to the pouch.
For the pockets cut x2 pieces of the outer material at 12cm x 9cm and 12cm x 12cm of the lining material. Again, if sizing up, make sure you keep the pocket at the same width of the pouch, altering the height of this to how you want.

Finally cut the elastic. To measure the elastic, place this around the back of the journal lengthways, and place it slightly over the front cover. Make sure it isn’t too tight as this may pull the pouch and bend the book when all sewn together.
Step 2 – Fuse interfacing
Once all the material is ready, it is time to iron on the lightweight interfacing. Choose one of the outer materials and one of the lining pieces. Place these wrong side down (patterned side down) and place over the interfacing to the wrong side. The shiny side is the side that should contact the material. Press with an iron, according to the interfacing instructions. Some iron-on interfacing call for a damp cloth over before pressing.
Whilst the iron is out press all the other remaining pieces of material, to make sure they are as crease-free as possible.

Step 3 – Create the pockets
The pockets need to be created first before the pouch can be sewn together. Place the two lining pockets together, right side to right side, and the two outer pieces right side to right side. Sew a small seam along the top edge of these.
Press open the seams and fold so that the right sides are then on the outside. Press again and sew a top stitch along this newly pressed edge. This will allow the pockets to lay flat, and keep that seam neat.


Take the outer pouch piece with the interfacing and place it right side up. Then take the lining pocket piece and place this down right side up onto the outer piece. Make sure to align the edges and pin together if needed.
Create a seam down the pocket piece of material. This can be any width you prefer. I placed my phone down and marked a line at the top and bottom of the pocket for where I wanted the seam to go. This created a larger pocket and a slim pocket for a pen.


For the outer pocket, select the pocket piece in the outer material and place it over the top of the newly sewn pocket. Again, line up the edges.

Head to the sewing machine, turning to the largest stitch possible and create baste stitches along the edges of the pockets. This will help keep the pockets in place whilst sewing the pouch.
Step 4 – Attach the elastic
Take the elastic piece and measure to the middle of the top edge of the forming pouch. Pin the elastic piece in place at this point, on the right side (outside) of the front piece. Repeat this at the bottom. Again, making sure to pin the elastic to the outside. Also, ensure the elastic isn’t twisted and is folding on the front of the piece.
Baste stitch this into place on the sewing machine. Make sure the stitch is close to the edge, and not too deep a seam. This will in the main pouch seam, so won’t be seen on the outside when the pouch is made.


Step 5 – Connect outer and lining pieces
When the front piece is complete, it is time to attach the lining piece. Place the lining piece with the interfacing attached on top of the outer piece. Make sure the interfacing side is facing up. Again, make sure to align the edges. Sew a seam along the right-hand side, making sure the pocket edges have been completed. This will be a bit bulky on the sewing machine, so may require hand winding on the machine at times.
Repeat with the remaining outer and inner pieces of material, placing this right-side to right-side.
Use an iron and press these seams open and then fold right-side-out (pockets on the outside) and press again with the iron. Repeat on the back piece. This will help keep the material as flat as possible for adding in a zip.

Step 6 – Attach zip
Ideally, the zip should be the same length as the edge, however, I only had long decorative zips available. I shared how to shorten and attach a decorative a zip in how to make a make-up bag. Align the zip top to the top edge of the pouch and cut this down so that it is still slightly longer than the pouch. This may mean cutting off the stopper. Create a stopper part to the zip by using the hand-wind option on the machine to carefully go back and forth over the zip several times. This will create a cotton build-up, and create the stopper part.
Take the side with the pockets, and place this right side up. Then pin one side of the zip to this edge. Try to align the fabric edge close to the zip teeth, test out that the fabric doesn’t get caught by opening and closing the zip a few times. Next head to the sewing machine and attach the zip, make sure this is sewn as neat as possible, as the thread will show. Double-check that the zip and fabric have been attached all the way along.
The zip may need to move as it is sewn. When doing this make sure the needle is placed down in the zip before brining up the foot, and then move the zip out of the way before continuing.
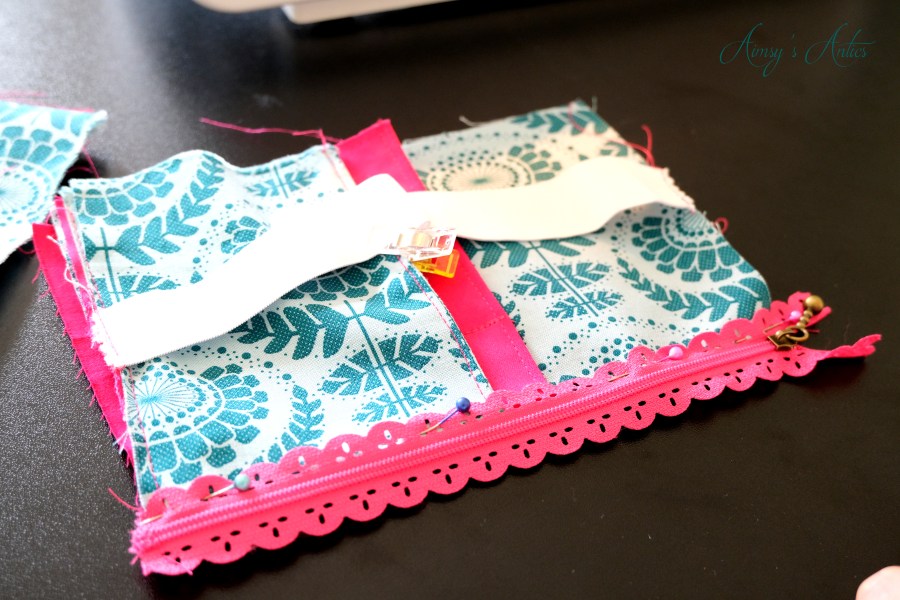

Repeat again on the opposite side of the zip. The two parts of the pouch are now attached via the zip.
Step 7 – Sew the lining and outer pouch
First, open the zip, then pin the edges of the lining together and the edges of the outer material together, right-side to right-side. The pouch will look inside out at this point. Leave a decent size gap in the lining piece so that the pouch can be turned right side out. Then starting at the bottom of this gap, backstitch and sew a seam all the way around the lining to the other and back. When sewing over the zip part, make sure these seams are facing the lining part of the bag, this will help the zip sit better in the seam. Backstitch when coming to the end of the seam/start of the gap.
When getting to the corners, place the needle down, lift the foot up and turn the material to the direction sewing, replacing the foot down again.


Step 8 – Turn right side out
Check the seams have fully caught the edges and pockets. Snip off the corners of each side, being careful not to cut into the seam. I use pinking shears to help reduce the fabric from fraying as well, cutting along all edges of the seams.
Then turn the pouch right-side out, using the gap in the lining. Push out all the corners fully, a blunt end of a pen or seam ripper can help to achieve this. This is most important for the outside part of the bag, as once the gap is sewn it will be harder to do. Then, sew up the gap in the lining and place the lining into the pouch.


Then the DIY planner pouch is complete!


There you have how to make a DIY planner pouch. All that is needed is to fill it with whatever stationery goodies you like, and the pouch is ready to go.
What do you think of this sewing project? Will you be having a go at making your own planner pouch? Let me know in the comments below!
How to Make a DIY Planner Pouch Video:
Here is the video version of this post. Don’t forget to like the video if you have enjoyed and subscribe to my channel for more crafty inspiration. There is always a video for every post!
How to Make a DIY Planner Pouch Pin it:


I loved the idea of making my own planner! Your steps are simple and I’ll try to make one myself!!! Loved the post
Glad you like it. Hope you can follow them as you make it, I didn’t know if some of the sets were a little wordy!
Would love to know how you get on and how yours turns out!
Thanks for commenting 🙂
Aimsy xoxo
This is such a great idea! Very creative and cute, too. I have a ton of fabric scraps just taking up space.
Glad you like it! This is perfect for using up a few of the fabric scraps….what would we do with out scraps?!
Thanks for commenting 🙂
Aimsy xoxo
Wow, that looks beautiful. I don’t think I would ever get how to make this even if I tried. But I love the colors you used. Thanks for sharing
Thank you! I don’t know how it turned out so well, I had a bit of a faff with the zip at first. I am sure you would be able to make it just as good!
Thanks for commenting and glad you liked!
Aimsy xoxo
Thank you! I don’t know how it turned out so well, I had a bit of a faff with the zip at first. I am sure you would be able to make it just as good!
Thanks for commenting and glad you liked!
Aimsy xoxo
Oh this is such a cute idea, I love it! I’ve just learnt how to knit so getting into creating things myself and I love the idea of this one. Thanks!
Glad you like it! Oh, I bet a knitted version of this would look ace! I am terrible at knitting, so will have to take a few tips from you.
Thanks for commenting. Let me know how yours turns out if you do have a go!
Aimsy xoxo
Oooh I really need to make one of these, this would be perfect for me right now!
Love, Amie ❤
The Curvaceous Vegan
Glad you like it! They are so handy to keep the main bits you need in. Especially if you want to take it on the go!
Thanks for commenting and have fun crafting!
Aimsy xoxo
This is such a lovely idea and it looks amazing! I love little bits like this to keep myself organised.
Becca x
Glad you like it! It’s perfect for keeping you organised!
Thanks for commenting 🙂
Aimsy xoxo
This is so cute Aimsy! What a great idea this is and I love the pattern you’ve used to make the pouch! x
Lucy | http://www.lucymary.co.uk
Glad you like it, Lucy! It’s a beautiful pattern isn’t it? There were loads in my craft stash to choose from.
Thanks for commenting 🙂
Aimsy xoxo
This is such a clever idea! I would never have thought of making a planner pouch but this is so cute 🙂
Glad you like it. I first wanted to create a pencil case, but then saw something where there were pockets. You can’t beat pockets, can you?!
Thanks for commenting 🙂
Aimsy xoxo
Your pouch is adorable! Thanks so much for the detailed instructions. The pics help to visualize the project, too.
Thank you so much. I’m really glad you like it! Sometimes sewing projects can be a little confusing, can’t they? I like to add a bit more detail and pictures to help you create the same, and I am glad it is useful.
Thanks for commenting!
Aimsy xoxo
Adorable and useful! Thanks for sharing!
Glad you liked it!
Aimsy xoxo
This is such a fun sewing project. I’ve always found zippers a little daunting, but your instructions were so helpful… and I really loved being able to watch everything come together with your video!!
Glad you like it! Zippers are tricky, but once you get the hang of it, it isn’t so bad. These are put in slightly differently to regular zips, as they are decorative. Usually, the side will be in the project, not on top of. Glad you liked the video too!
Thanks for reading, watching and commenting 🙂
Aimsy xoxo
It’s so cute. I’ll try to make it for my daughter’s birthday!
Glad you like it. Hope your daughter likes, and a happy birthday to her!
Thanks for commenting 🙂
Aimsy xoxo
Aw this is the cutest thing and it looks so handy!
Amber – The Unpredicted Page
Glad you like it, it is cute, isn’t it? Very handy for keeping everything together.
Thanks for commenting 🙂
Aimsy xoxo
This looks great! Thanks for sharing! 🙂
Glad you like it! Thanks for commenting 🙂
Aimsy xoxo
What a useful DIY – A planner pouch is so incredibly useful to have on hand. Thanks for sharing this! 🙂
Glad you like it! It is definitely useful to have to hand.
Thanks for commenting 🙂
Aimsy xoxo
I reckon my mum would love this, I’ll be honest I’m not much of a sewer mum loves little sewing projects though. I’ll have to point her in this direction.
Hope your mum likes the project! I love easy and quick sewing projects, so hopefully, she will like this one as well.
Thanks for commenting!
Aimsy xoxo
Aimsy
I love handmade goods and your idea of creating a diy planner sounds fun and my girls will absolutely love it. They make a great gift too. Thanks
Glad you liked the project! Definitely something for your girls to enjoy. I agree they would make a lovely gift, especially for any stationery addicts. So customisable too!
Thanks for commenting 🙂
Aimsy xoxo
This is such a great idea – I love how much it stores! It looks like such a simple but handy sewing project. I think this would make a great gift for any organisation lover!
Em x
Glad you like it. You can take so many supplies out on the go with this. Definitely make a great gift!
Thanks for commenting 🙂
Aimsy xoxo