

UPDATED 31/05/2020. I bring you another beauty craft today, in the form of a Lush dupe / inspired facial cleanser. A DIY Ultrabland recipe!
So, you may have seen a recent post on Aimsy’s Antics about how to make your own Rose Bath Bombs. I have dabbled with making my own products before. This has mainly been in the form of adding essential oils to coconut oil. I want to expand this and see what else I can create.
*This is an updated version of the post (31/05/2020) with the added option of a video tutorial in making this DIY Ultrabland. You can see the video below or over on my YouTube channel*
I have been using Lush’s Ultrabland oil cleanser for years, and I love it, but it is not cheap! For a 100g pot, it costs just short of £15, which, if using every day will be gone in no time. So, I headed to good ole’ google to see if anyone else has had a go at making their own DIY Ultrabland. I also wanted to see if it was achievable to make my own at home. Turns out it is!

What is Lush’s Ultrabland?
Ultrabland is basically an oil based cleanser. It is perfect for removing make-up, even waterproof mascara, as well as leaving your skin feeling lovely and soft. Lush state:
“A beautifully simple and effective cleansing balm to deeply but very gently remove all traces of makeup and dirt and leave your skin glowing. Based on an ancient Greek formula for cold cream, this luxurious facial cleanser combines hydrating almond oil and soothing rose water with antibacterial honey and rich, protective beeswax to lift away dirt without stripping away your skin’s natural defences. Not just for dry skin or makeup removal, use this cult cleansing balm on its own or as the first step in your routine to bring your skin back to balance and calm angry or acne-prone complexions.”
Lush

Why I use an Oil Based Cleanser
I started using Ultrabland a few years ago, when my skin was having lots of unruly breakouts. I had tried varying creams and ointments from the doctors which varied success. When my skin cleared and I stopped using them, a fresh breakout would start again in a few weeks. Some of the ingredients in these ointments can make your skin more sensitive, especially to sunlight. As I love to try get away for a bit of summer sun, I didn’t want my skin to be more prone to sun damage. So, I decided to look up more ‘natural’ cures for acne prone skin.
I discovered that using oil based cleansers and treatments can actually re-balance your skin rather than make it more greasy. Lush’s Ultrabland came up in a search, and I started using it from there. I wouldn’t say the Ultrabland was the whole cure for my problem skin, but it definitely helped! My post Products I use when Travelling details a few more of Lush’s range that helped with my skin.
Now, I still have the occasional breakout, more so when I am stressed, however, it is nowhere near what I used to experience.
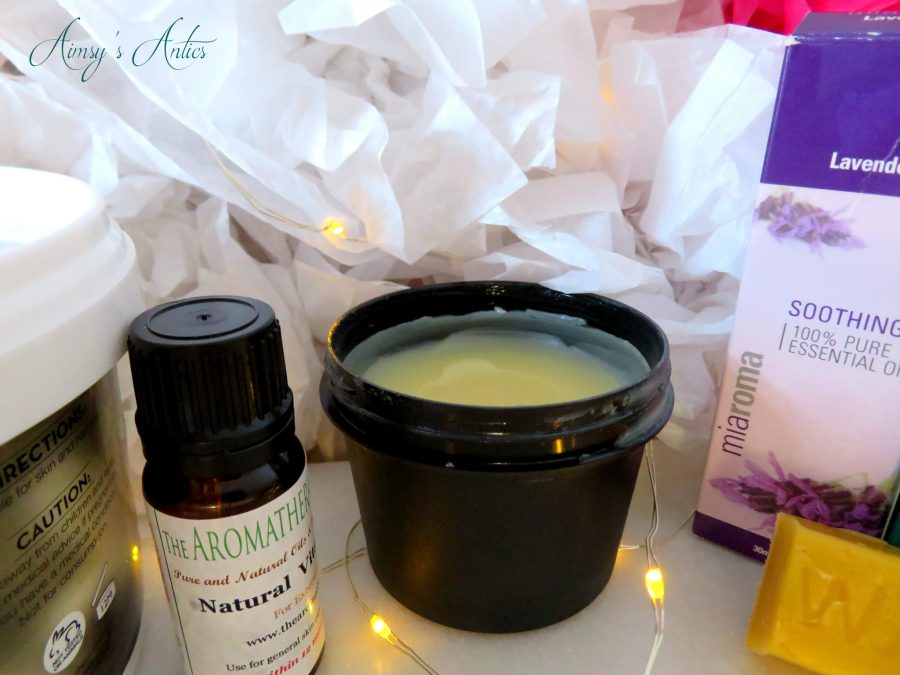
How to Make DIY Ultrabland:
So, after searching on Google and Pinterest I came across a blog post by The Makeup Dummy. I followed her recipe, except I added an extra ingredient that I know my skin likes; lavender essential oil. This recipe is not designed to be made for purchase, and only home use I guess. It does not have any ‘preservatives’ in and therefore could spoil if not treated correctly. I only realised you need preservatives in some products after making the recipe and then reading the comments on her post. But hey ho this DIY beauty products is a learning curve.
I’ve been using this recipe for at least a month, and have not noticed any adverse effects or changes to my skin. Obviously do a test patch if you are unsure, but if you have been using Lush’s ultrabland like me then hopefully you will have the same outcome as me.
Anyhow here is how to make your own DIY Ultrabland:
Ingredients for DIY Ultrabland:
- 1 Tablespoon (14g) of Beeswax, grated*
- 1 Tablespoon of Shea Butter*
- 8 Tablespoons of Almond Oil*
- 1 Drop of Vitamin E Oil*
- 3 Drops of Rose Absolute*
- 2 Drops of Lavender Oil
*Items linked above are affiliate links, therefore if you make a purchase through these links I may earn a small amount of commission, at no extra cost to you. You will get more than you need for one batch if buying these items, which will cost more than one pot of Ultrabland, however, will be cheaper in the long run for making several batches.
Additional Items needed:
- Pots or container for
made product (I use left over Lush pots). - Pan
- Small glass bowl
- Metal Spoon
I would advise using items that are not going to be used with food. The essential oils used may taint your food, even if you have thoroughly washed them. I bought most of my items from cheap shops like Home Bargains and B&M to keep costs down.
You should make 2.5oz of DIY ultrabland which filled one 100g pot and half filled a 25g lush pot for me.

Making DIY Ultrabland:
Firstly you want to make sure that you have all of your ingredients and items to hand, and organised within your workspace. You may also need some tissue or paper towels on hand to wipe any spills. I would advise having some form of protective cover on your worktop in case you spill any of the mixture when pouring it into your designated pots. Make sure your posts have been washed and dried before making the recipe.
Weigh out and grate your beeswax before starting, as this can be quite a time-consuming task.
Step 1 – Set up your Equipment
Grab your pan and fill it so that when you place your glass bowl in, it is just underneath, like a Ban-Marie. Begin to heat the water to a gentle simmer.

Step 2 – Melt Beeswax and Shea Butter
Next you want to add your grated beeswax and shea butter into the glass bowl and allow it to melt over the heat. Make sure it completely melts before moving onto the next step.

Step 3 – Add in Almond Oil
Now its time to add in your almond oil. Take your pan off the heat when adding this, and stir it in until it has melted and combined.

Step 4 – Add in Essential oils and Vitamin E
When the almond oil has been combined, you want to add in the vitamin e oil and lavender. Now, this step can be optional, however I feel like adding the rose and lavender makes the mixture smell more like Lush’s Ultrabland. They also have good effects on the skin. Just be careful when using near your eyes to remove make up.

Step 5 – Pour into pots
I moved my pots over to the sink to pour it into the pots. I thought this would be better for cleaning up any spills, even though I had my protective mat down on the worktop. Once you have filled your pot, pop the lid on and allow to set. This can take a few hours. You can place it in the fridge to set quicker.

There you have your own made DIY Ultrabland. Quite simple once you have all the ingredients.
DIY Ultrabland Advice:
There are some precautions when using this recipe; which are really for keeping the product going for longer. Make sure that water does not enter the pot, this can cause it to spoil and allow bacteria to grow in your DIY Ultrabland. Also use clean hands or a small spatula to remove it from the pot, as this will hopefully, again, reduce the chance of bacteria being added and growing in the pot.
Keep the pot in a cool dry place and out of direct sunlight too. You should be able to keep this for approximately 6 months, however if you use regularly it will be gone in no time.

Disclaimer:
I am a total newbie when it comes to making my own products. I have adapted The Makeup Dummy’s version and made it
This recipe also doesn’t contain all of the same ingredients to the original Lush version. That might be another experiment for me to have a go at. I will keep you posted if I do!

DIY Ultrabland – Video:
This is an update to the post, a video version/ tutorial for you to check out. Don’t forget to like and subscribe if you have enjoyed the video!
Pin it for later:
If you fancy saving this recipe for later, why not add it to your Pinterest? Here are a few Pinterest graphics for you to choose from!


As always, thanks for reading!

I have never thought about making something like this before but I love that you could customize it with oils you like! Thanks for sharing it!
I have really enjoyed making my own. Yes, it does cost a bit at the start as you are buying new ingredients, but it the long run you get a great deal for the initial price! Loving essential oils at the moment, so many benefits from them!
Thanks for commenting!
Aimsy xoxo
This is amazing! I’ve never tried to make my own skincare products! Maybe I should, at least I know what all is going on my skin. Great post!
It’s not the exact Lush recipe, but it works all the same. All fairly natural products too, which can’t be too bad for your skin can they?
I love that it is easy to make too!
Thanks for commenting 🙂
Aimsy xoxo
I love your DIY beauty product posts! This is another one I’ll try on a rainy day along with your bath bombs! Can’t wait to try it! Xx
Glad you like…wasn’t sure how well they would go down. I’ve really enjoyed experimenting..perfect for a rainy day!
Thanks for commenting!
Aimsy xoxo
I love DIY projects and this sounds just heavenly!!! I love beauty products and ones that I can try to make myself are always intriguing! Thank you for sharing!
Oh, this feels lovely on the skin! I loved making it and watching everything melt together.
Thanks for commenting!
Aimsy xoxo
I love your DIY posts, Aimsy, they always look like such fun. I have to say I’m not a LUSH fan as I can’t bear being pounced on the second I walk through the door. And I’ve been reading today about how expensive their bath bombs are so the fact that you’ve made your own dupe, which is probably far better for your skin, is a definite win! Bookmarking this for later, thank you 🙂 Lisa x
Glad you like them…I’m loving creating them at the moment. There’s definitely something about making something for yourself from ‘scratch. Oh the prices are definitely high, so might as well spend it on making it yourself, as you know exactly what goes in! Might have a tinker with the recipe and see if I can add any other ingredients in, like honey!
Thanks for commenting
Aimsy xoxo
I’d honestly never considered making anything like this before but this is a great option if you cant afford to re-purchase the Lush one over and over again!
Jenny
http://www.jennyinneverland.com
It is great if you need to fill in the time between purchasing new ones or just using it instead.
Skin feels lovely when using it too!
Thanks for commenting 🙂
Aimsy xoxo
This is such a clever idea. Thankyou so much for sharing.
https://www.thefrostedpineapple.com
It’s such an easy make and your skin feels lovely after use!
Thanks for commenting 🙂
Aimsy xoxo
This is so cool, Aimsy! I love the idea. I really want to make my own diffuser refills, I read that it is just a neutral oil like almond with essential oil added. You’ve inspired me to try some DIY! 🙂 Melis (Melis Living) xx
Oh, essential oils are brilliant and have a use for everything!
Let me know what DIYs you get up to, I would love to see your projects!
Aimsy xoxo
Loved this! I didn’t even think of making lush stuff at home!!
Thank you! I love having a go at making my own Lush products. Definitely helps when you can’t get to the shop /buy on line when you run out!
Thanks for commenting 🙂
Aimsy xoxo
This was much easier than I assumed that it would be when I first started reading – I’m impressed! I have been dabbling more in making my own products as of late both to save money but also as something fun to do with the extra time that we have now that all our usual plans and activities have been cancelled. I’ll have to give this one a try!
Oh, I thought it was going to be much more difficult to make as well. This was one of the first handmade skincare product I made and was pretty impressed with how it turned out. DIY beauty products are quite relaxing to make when you get into them.
You will have to let me know how yours turns out if you do give it a go!
Thanks for commenting 🙂
Aimsy xoxo
I love when you can make your own Lush dupe! I haven’t trued ultrabland before, but it is great when a makeup remover works so well. I love that it is so easy to make as well. Thanks for sharing this amazing tutorial!
Nancy ♥ exquisitely.me
It is so easy to make, I didn’t realise before I first started making it. I love having a go at making my own Lush products, especially when I can’t get to the stores or buy online (like now). Definitely a great make-up remover!
Thanks for commenting 🙂
Aimsy xoxo
I love experiments and projects. This one is quite an undertaking, however it’s got to feel satisfying to make your own products. Thanks for the idea and detailed instructions.
http://www.susanberkkoch.com/blog
Oh, I really enjoy experimenting and making my own products, whether it is this DIY lush or bath bombs…the list is endless!
Glad you found the instructions detailed, hopefully, it will make it easier to make your own!
Thanks for commenting 🙂
Aimsy xoxo
What an amazing idea to make your own skincare product Aimsy! x
Lucy | http://www.lucymary.co.uk
Thanks Lucy! I love making my own, definitely lowers the cost in the long run!
Thanks for commenting 🙂
Aimsy xoxo
I haven’t made anything like this before but this diy tutorial makes me want to try make it for sure! Sounds great
Mel | http://www.moonlightmel.co.uk
I absolutely love having a go at making my own skincare products. It definitely gets a bit addictive when you start (well it did for me anyway). You will have to let me know how it turns out if you do give it a go!
Thanks for commenting
Aimsy xoxo
I was so curious as to what Ultrabland was so thank you for including that definition in there! It sounds super interesting! I’ve never used an oil based cleanser before. It’s great that you were willing to try making your own! Such a good idea and definitely a great way to personalise the product to suit you a bit more.
I love having a go at making my own products, especially when they are quite easy to make. Glad you learnt something new from this post!
Thanks for commenting 🙂
Aimsy xoxo
I had no idea what an ultra brand is until I read this. I love that you duplicate the products you buy, as I feel like that even makes for a healthier alternative tailored to fit you. Lavender is amazing in skincare, and beeswax makes for a smooth base. 🙂
I love being able to replicate them, it makes it so much cheaper in the long run too!
Definitely love lavender for the skin, as well as beeswax. This is perfect for removing make-up!
Thanks for commenting!
Aimsy xoxo
That is so easy to make, even the recipes are easy to find. I love your DIYs. Thanks for sharing
It sounds complicated when you see the list of ingredients, but definitely easy to replicate! Glad you are enjoying my DIYS!
Thanks for commenting 🙂
Aimsy xoxo
This looks so much like the original! I’ve never tried Ultrabland before but I’ve heard so many amazing things about it. I love almond oil based cleansers too so I really should try this. I’m quite sensitive to lavender though so I’ll have to sub that out for something else x
Sophie
I was thinking about you when I added the lavender and thought , this wouldn’t be any good for Sophie! You can definitely leave it out and add a different essential oil to the mix. It has turned out so much like the original, I love how the skin feels afterwards; something I have only felt with oil-based cleansers.
Thanks for commenting 🙂
Aimsy xoxo
I just love DIY beauty products cause you know that it is organic, no harmful chemicals are there. This is pure joy ❤️ love it.
Oh, there is something about making your own, isn’t there? I love experimenting with it all.
Glad you liked and thanks for commenting!
Aimsy xoxo
I used to buy a lot from lush! But never the skin care so maybe I need to try it more!
I love their skincare. I moved towards it more when I was getting bad breakouts and they helped my skin immensely!
Thanks for commenting 🙂
Aimsy xoxo
I’ve typically been a soap and water gal but as I’ve aged I’ve found that really doesn’t work anymore. I’ll have to check out these products – thanks for the intro!
I must admit, I did fall off the bandwagon with this one, and was using only soap and water. But, since having to wear a face mask for work, my skin has started breaking out again, which is why I’ve jumped back into using this.
Glad you like!
Thanks for commenting 🙂
Aimsy xoxo
This looks great and so fun to make! I love lush stuff so would be super cool to make a dupe at home. Thanks for sharing 🙂
Glad you like. It is so easy to make at home, perfect for filling in when your Lush one runs out (or you want to make it a bit cheaper).
Thanks for commenting 🙂
Aimsy xoxo
I love making my own natural cosmetics and in fact have all the ingredients already – I might give this a go! Thanks for sharing!
Me too! Its fun to have a go and see if you can create something that is useable and beneficial for the skin isn’t it?
You will have to let me know how yours turns out if you do give it a go!
Thanks for commenting!
Aimsy xoxo
Me too! Its fun to have a go and see if you can create something that is useable and beneficial for the skin isn’t it?
You will have to let me know how yours turns out if you do give it a go!
Thanks for commenting!
Aimsy xoxo
This doesn’t seem too terribly hard to make. I’ll have to try it out!
It is so easy to make! Let me know how it goes!
Thanks for commenting 🙂
Aimsy xoxo
This is a great post, thanks for sharing!
Thanks! Glad you liked it. Happy crafting!
Aimsy xoxo
Great post love to see all your posts. Thanks for sharing these posts
Glad you like!
Thanks for commenting 🙂
Aimsy xoxo
Great post thanks for sharing.