

I have an autumn-inspired DIY project for you today and one that is going to bring all the cosy vibes. That’s right, I am going to show you how to make DIY Autumn candles.
When Autumn rolls in, you think about getting cosy and wrapped up as the nights get darker earlier and the temperature drops. To add to this cosiness, what’s better than lighting a beautiful candle that has a fabulous autumn scent? That is where we have these DIY Autumn inspired candles.
Now, these DIY candles are inspired by Autumn, from both the fragrance used and the silicone moulds used. One mould in particular just screams getting cosy, as it is a cable knit wool ball design. I don’t know about you, but when the temperature drops, I love to have a cosy blanket to cuddle up in, and this mould/candle just screams that to me.

I have previously shown DIY Christmas Candles, Mean girls inspired wax melts and DIY teacup candles, if you are interested in other candle making projects.
DIY Autumn Candles
In this post, I am going to share with you three different fragrances that have that autumn vibe to them. If you prefer wax melts, then do not fear, you can tailor these recipes to use in wax melt type moulds. The soy wax used can be used for both pillar candles (mould candles) and wax melts.
These candles are easy to make, and once you make a batch, you won’t be able to stop making more. These would make a great gift for the candle lover out there too.
There are some safety precautions, so make sure that you complete your research as well. I am not a candle making expert and do this as a beginner hobby. Never leave a candle unattended, and make sure these are placed on a heatproof surface, as they will get very hot when lit. The wax will also run down the sides, so you want to protect your surfaces! You want to have fun making your candles, but also be safe too!
Also, protect your surfaces when making these candles. I have found that fragrance oils can leave marks, so always use a protective mat to reduce any damage!
So, if you would like to see how to make DIY autumn candles, then let’s get crafting!

To make the DIY Autumn inspired candles, you will need the following items. Please note some items on this list are affiliate links, which will be marked with an asterisk (*).
- Pillar Soy Wax*
- Silicone moulds – these are what I used: Large Knot*, Wool Ball*, Bubbles, Geometric & Swirl
- Fragrance oil – Here are what I used: Treacle Toffee, White Chocolate Christmas cookies, Golden Embers & Plum
- Candle wicks
- Wick stabiliser
- Wooden craft stick for stirring
- Thermometer*
- Wax melting Pot*

Step 1 – Prepare Moulds
The moulds that I am using in this project are all made with silicone. You can use the moulds as is however they need a hole puncturing to allow the wick to pass through. This will make it a functioning candle.
So, use a sharp instrument to pierce through the silicone to create the hole. You can use a thick needle or skewer to do so. Be mindful of the size you puncture, as if it is too big, then you run the risk of wax leaking when pouring it in. Too small and you will struggle to thread the wick through. To make the process easier you can always invest in a wick threader, which is like a large sewing needle.
Then, thread the wick through, placing a stabiliser on the end to help keep it central. The wick must be a straight as possible through the middle of the candle. This will allow it to burn more even.
Place the moulds in something that will help keep them upright. I raided the cupboard for old cups to place them in. This will keep them secure and upright when pouring in the wax. The wick out of the bottom of the moulds will make them unstable, and even more so when filled with wax.


Step 2 – Measure Wax and Fragrance Oil
Now it is time to weigh out the amount of wax you need for the mould. To get the amount needed takes a little bit of maths, but is easy to figure out once you have the formula.
Before piercing the moulds for the wicks, place water in them and then place the water into a measuring jug. Measure ml and work out 20% of this, and minus it from the total ml. This will give you the amount in grams of wax that you need.
Then, you want to work out the amount of fragrance oil you require. Now different wax has different fragrance loads, but I like to work out a 10% fragrance to the candle. So work out 10% of the total amount of wax to get the amount of fragrance needed. Pour this out into a separate container and leave for adding to the wax later. You don’t want to add the fragrance oil from the bottle to the melting wax, just in case you accidentally add too much. Removing the fragrance from the wax will be impossible, whereas, with a separate container, you can add it back into the bottle.
For my moulds, these are the amounts that I worked out. Bear in mind, these measurements may differ slightly from your moulds. I also combined several moulds at once to create a larger batch. My top tip is to make sure you write all the measurements down, then you have it to hand if you want to recreate the candles again and again, without the need to re-measure each time.
- Wool Ball Mould – 70ml
- Knot Mould – 100ml
- Geometric Mould – 100ml
- Swirl Mould – 150ml
- Small Bubble – 50ml
- Large Bubble – 200ml
Step 3 – Melt Wax & Add Colour
Now the next step is to melt the wax down. Place the wax into a melting pot, and place the melting pot into a pan with water inside. Make sure the water isn’t too high, but also not too low so the melting pot is touching the bottom of the pan.
Your wax packaging should indicate the melting point for it. When the wax begins to melt, you can leave it as is, or add some colourant in. I like to use wax dye, but you can get liquid candle dye as well. With the wax dye, you need to melt this into the soy was, so add a little of the desired colour in. I chose to go for a gold/yellow colour for the treacle fragrance, plain soy for the white choc cookie fragrance and a plum purple colour for the plum fragrance.

Step 4 – Add Fragrance
Remove the melting pot from the heat once all of the wax has melted. I like to check the temperature of the wax before removing it, as it needs to be at a certain temperature to add the fragrance. I like to add my fragrance at 75°c as I feel it gives the candles a good hot and cold throw.

So, take the temperature of the wax and wait until it reaches that magic number. Then you want to add in your autumn-inspired fragrances. I use one fragrance per batch and haven’t mixed any of them. Stir this around for a good minute or two to help the fragrance oil bond to the wax. The fragrance oil will cool the wax slightly when adding, so keep an eye on the temperature, as that is important for when pouring the wax.


Step 5 – Pour into Moulds
Keep monitoring the temperature of the wax. When it reaches approximately 60°c, you want to pour it into the moulds. I have found this temperature one of the best when pouring the candles, however, consult your wax as this may differ.
Pour the wax gently and slowly into the mould. This may help reduce any bubbles forming in the wax. Don’t worry if you do get bubble/sinkholes when the wax has set, as I will show you how to fix them.
Let the wax cool and harden for at least 4-6 hours, although I like to keep mine overnight. Removing too soon from the moulds will cause a misshape to the candles.

Step 6 – Fix Sinkholes (Optional)
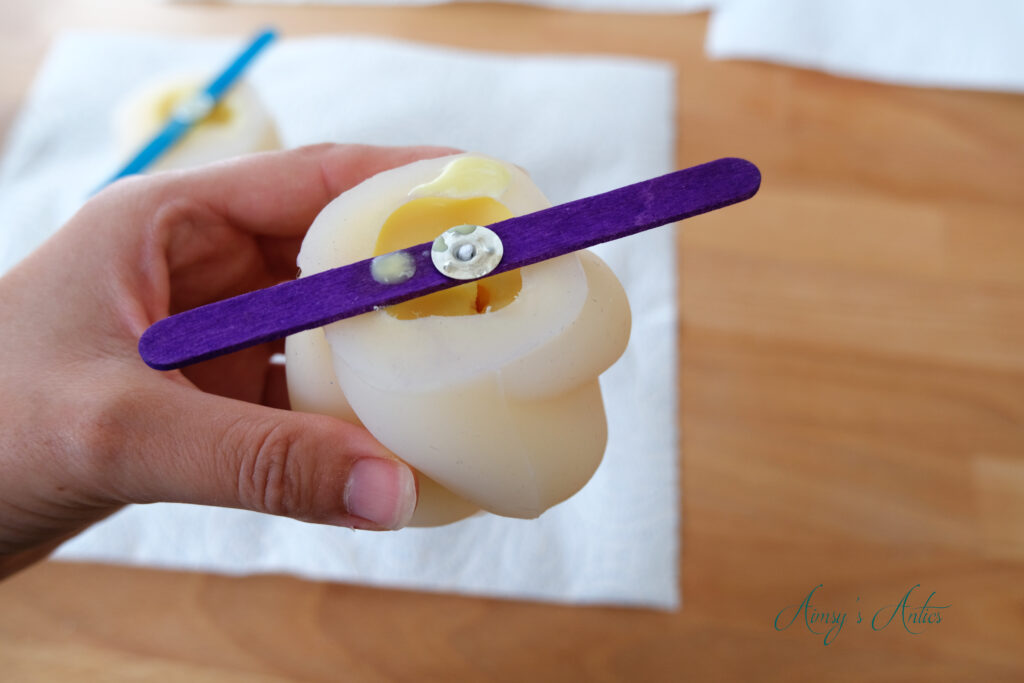
Now you might not have these, but for my candles, I had a few sinkholes and un-even bottoms. Luckily, it is quite easy to fix these, and all you need is a heat gun.
gently begin warming the wax so that the top few layers begin to melt (whilst in the mould). You will see the melting wax begin to fill any holes and even out.
When you are happy that the candles are even and any sinkholes/bubbles have been removed, then set the moulds aside and allow the wax to re-harden.

Step 7 – De-Mould and Trim Wick
After the wax has been set, the DIY autumn candles can be de-moulded. Be careful with this, as your nails can catch the wax and leave marks. Gently begin moving the mould and pushing the candle out. I like to turn mine inside out to get the candle out, but use whichever method works best for you.
Then, it is time to remove the wick stabiliser and trim the wick at the bottom of the candle. Use a sharp pair of scissors and trim the wick down to the bottom of the candle. This will remove the metal end of the wick, but that is fine. Just be careful when burning, and keep an eye on how far the wick has burnt. It is probably best not to attempt to melt it fully as this will be riskier with the exposed wick.

Then the DIY Autumn candles are complete and ready to bring in the cosiness and be enjoyed.


What do you think of these DIY Autumn candles? Will you be making your own? What brings cosiness to you in Autumn? Let me know in the comments below!
DIY Autumn Candles – Video
See the video version of this post here too! Don’t forget to give the video a big thumbs up if you have enjoyed it, and subscribe to my channel if you aren’t already. It would be lovely to see you over there too! Thank you so much for reading and watching!
DIY Autumn Candles – Save it!
If you have enjoyed this post, then why not share the love by sharing it or pinning it? You can also check out my Pinterest for more creative inspiration!


Have a creative project in mind, but don’t know how to plan it? I have you covered with a FREE creative project planner when you sign up to my email list. Grab yours now!

This is an awesome DIY. Those candles look so pretty. Thank you for sharing.
Aww, glad you like them. They turned out great, didn’t they?
Thanks for commenting 🙂
Aimsy xoxo
I love the molds you used for these candles! I have never seen anything quite like the geometric candle, and the knotted/blanket candle is screaming cozy fall vibes to me. The colors and scents (especially the plum) are lovely too. 🙂
I know, I love a unique candle, and the wool ball just screams cosiness to me too. Yes, the plum one is lovely!
Thanks for commenting 🙂
Aimsy xoxo
What an insightful and helpful post!! I would love to make these – a great present idea too xx
Glad you liked it. Yes, they would make great presents, or for keeping all to yourself haha!
Thanks for commenting 🙂
Aimsy xoxo
These are incredibly cute. I’ve never made candles before but you make it look so easy that I’d like to try it. Thanks for sharing!
They turned out well, didn’t they? Once you get the hang of it, it is fairly easy to make yourself!
Thanks for commenting 🙂
Aimsy xoxo
This looks like such a fun craft. I love that you get something useful as a result. My favourite has to be the knot design. It looks almost too good to burn though.
The knot design came out so well. I know, I don’t want to burn them just yet as they are too pretty to look at! Candle making is a great craft to have a go at!
Thanks for commenting 🙂
Aimsy xoxo
Oh this is a project I could surely get behind to! I always loved candles and the idea of making them always inspired me but never had a chance yet! So will have to keep this for later on and try them out x
Oh, once you start making candles, you will not want to stop! Hope you have fun making your own, totally worth it!
Glad you like these, I wasn’t sure how they would turn out as I haven’t used moulds before, but they turned out so much better than expected!
Thanks for commenting 🙂
Aimsy xoxo
I would love to make these!
Danielle | thereluctantblogger.co.uk
Glad you like them. An easy way of creating your home decor!
Thanks for commenting 🙂
Aimsy xoxo
These candles look lovely, what great moulds! I’ve never made my own candles before but my sister makes the best ones – they always smell so good! 🙂
Hope you are having a great weekend 🙂 We finally have a sunny day after some rainy ones so will make the most of it!
Glad you like them. The moulds are great, aren’t they? Such a good way to make creative candles 🙂
Oh, how lovely to have some sun, we have got rain at the moment and the temperature has dropped. Hope you have a lovely weekend and week ahead!
Aimsy xoxo
These are amazing! I love the cable knit mould design so much – it’s such a unique shape 🙂
https://www.femaleoriginal.com
Glad you like them. The cable knit is one of my favourites too!
Aimsy xoxo