

In today’s post, I am going to show you how to layer heat transfer vinyl (HTV) using the Silhouette Cameo. A perfect way to add designs to your plain clothing!
You may remember, last week I made my own pyjamas and added a graphic to them. Well, in today’s post I am going to show you exactly how I made the vinyl decal and how you can make your own too. Not only that, but I will show you how to layer heat transfer vinyl, to get the design how you want it.
This project is using the Silhouette Cameo 4, which is a fab digital cutting machine. However, you can replicate this project on any other digital cutting machine, like the Cricut. The software’s are different, but you should get the same result.
There are so many projects you can make with a digital cutter, from greeting cards, cake toppers to vinyl decals.
Heat Transfer Vinyl (HTV)
If you are new to the vinyl world (like me), then you may or may not know the different types of vinyl you can get. Adhesive vinyl, both temporary and permanent, is what you would normally see attached to objects. Think signs, car decals, wall decals, and that is probably adhesive vinyl.
Heat transfer vinyl otherwise known as HTV is the type of vinyl that is applied to fabric and clothing using heat to set it. Traditionally a heat press is used to heat and press the vinyl into the fabric, however, you can still get great results with using your regular iron. I don’t have a heat press, so will show you how to layer heat transfer vinyl with an iron, in this post.

So, without further ado, here is how to design and layer heat transfer vinyl decal onto a t-shirt.
How to Layer Heat Transfer Vinyl
As my pyjamas have a cacti print, I emulated this design in the decal. I wanted to tie in the pyjama bottoms and top together with the design of the cactus. Originally I was planning on drawing my own design and transferring this onto the top, however, I am no artist. Creative and crafty, yes, being able to draw is a big nope! With that idea out of the window, I looked for free cactus designs online. Again, I couldn’t find a design that I liked, when inspiration struck.
I took photographs of the individual cacti on the fabric and used these instead. That way the cacti look very similar to the print of the fabric…genius or what?
What you need:
To make your own heat transfer vinyl decals, you will need the following items.
Some items on this list are affiliate links, which are marked with an asterisk (*). This means I may earn a small amount of commission, should you make a purchase through this link, at no extra cost to you.
- Silhouette Cameo 4 or another digital cutting machine
- Computer/Laptop with Silhouette Studio
- Heat Transfer Vinyl*
- Vinyl weeding tools
- Ironing board*
- Iron

Step 1 – Trace Design
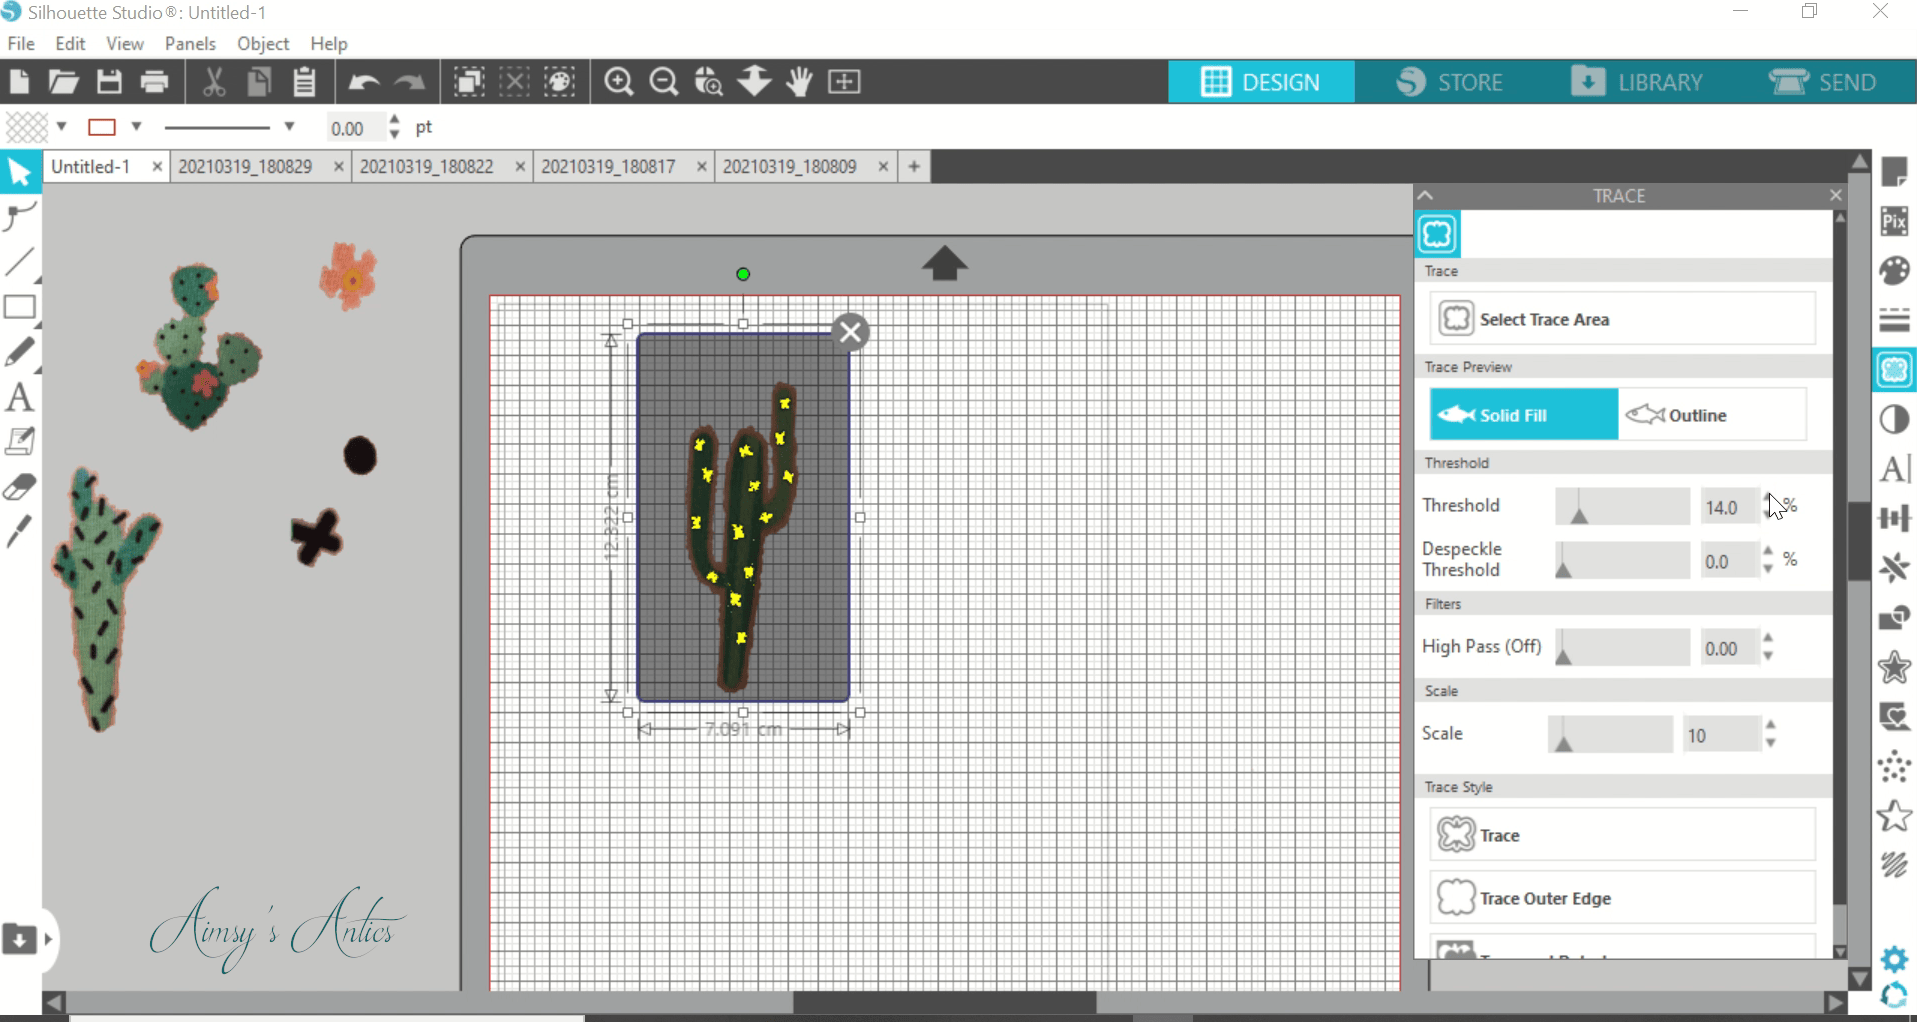
The first thing to do is create the design. As I have taken a photo of each cactus and other designs on the fabric, they need to be removed from the fabric background. Crop the photo to the size needed and select the trace options. Select the trace area by drawing around the cactus and set the trace to 47% selecting the trace and detach option.
You may find that the cactus traces, but also a bit of the background fabric comes with it. All you need to do is select the eraser tool to remove this. Be careful near the edge of the cactus, you don’t want to erase this part! Zoom in as close as you can, as this helps a lot! Repeat the steps with all the cacti designs you like. There are three different cacti on mine.

I also traced the background patterns of flowers, dots, crosses and lines. I thought this would tie in the designs more.
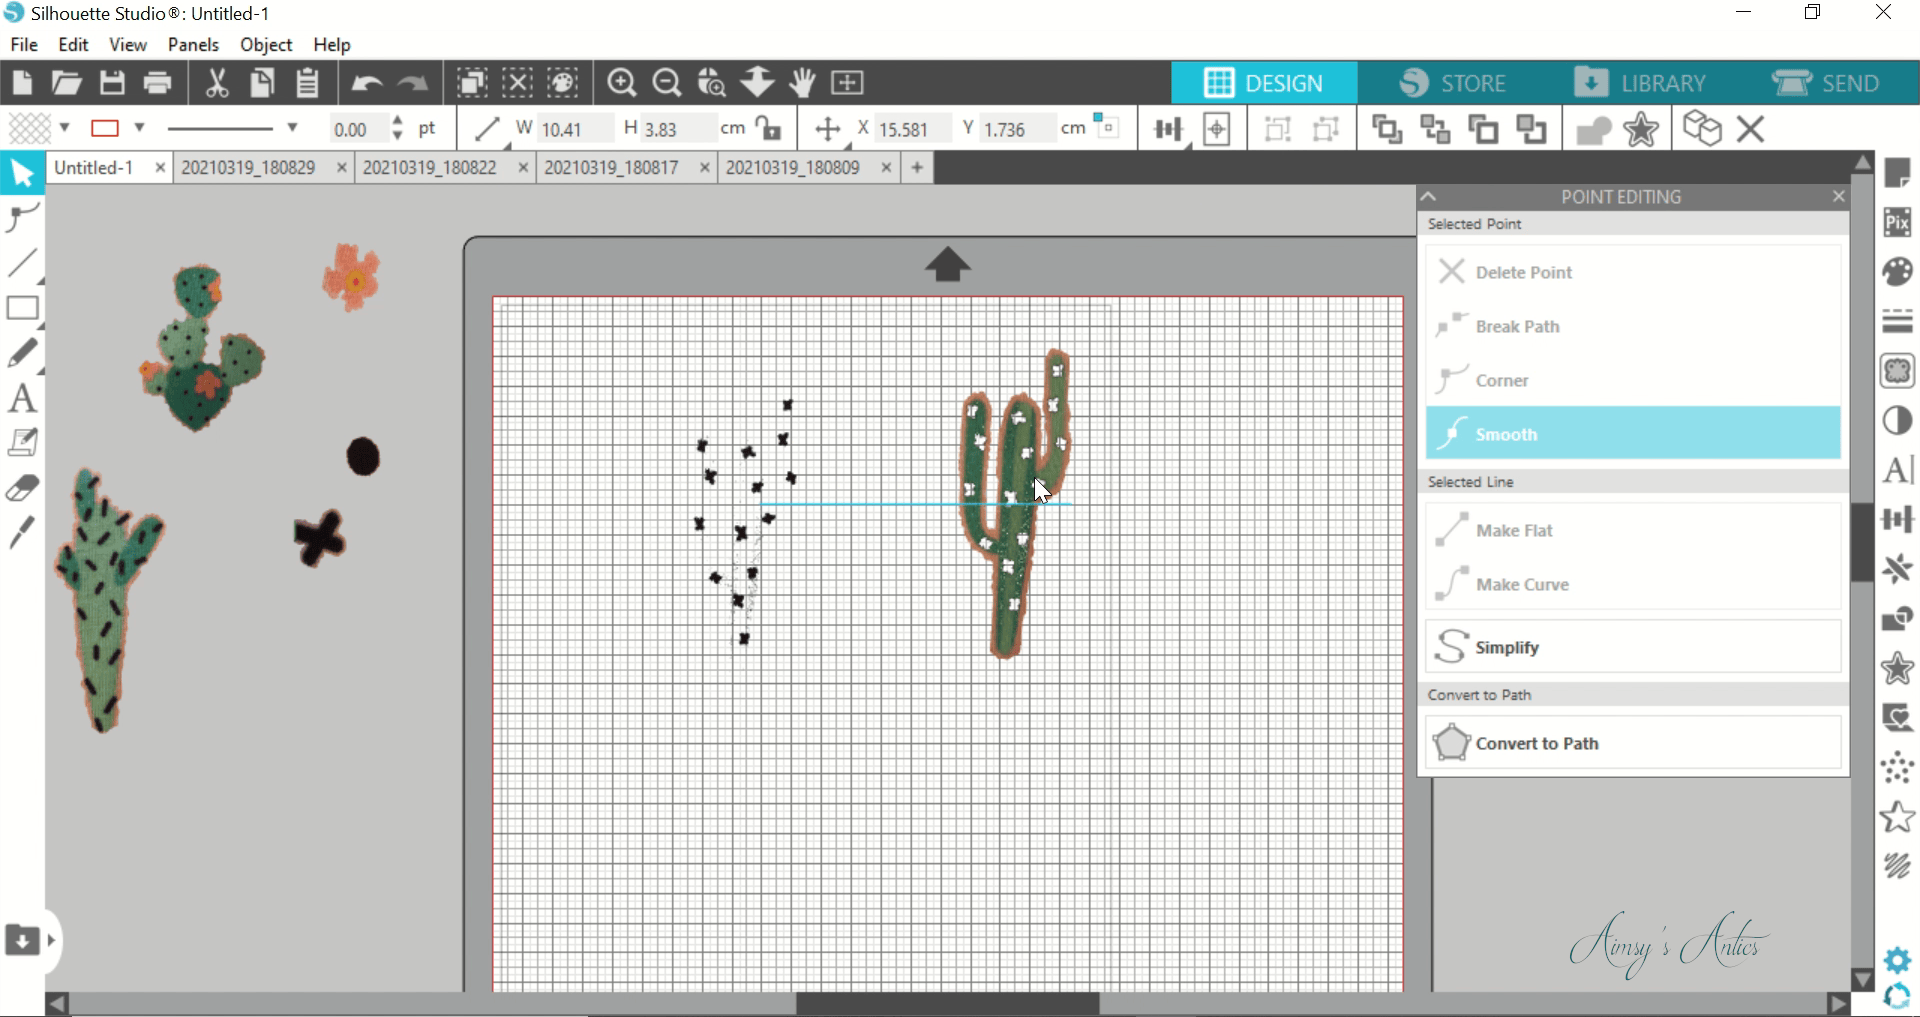
The cacti also have dots or lines on their designs, which I wanted to keep. This means we need to use the ‘Trace’ option again to remove them. So, select the area for trace and set it to 20%. Again select the trace and detach option. Your design may vary with this, but in essence, you want to trace the dots or lines area only, so play around with the percentage of trace.
Move these from the cacti, and you will see the cacti have holes or lines cut out from them. Separate the designs by moving these bits to one side.
Step 2 – Offest designs
Once you have all your designs traced and ready to go, it is time to create an offset. This will provide an outline around the design so that you can have a different colour to highlight the cacti. In this case, I have a black outline with green cacti.
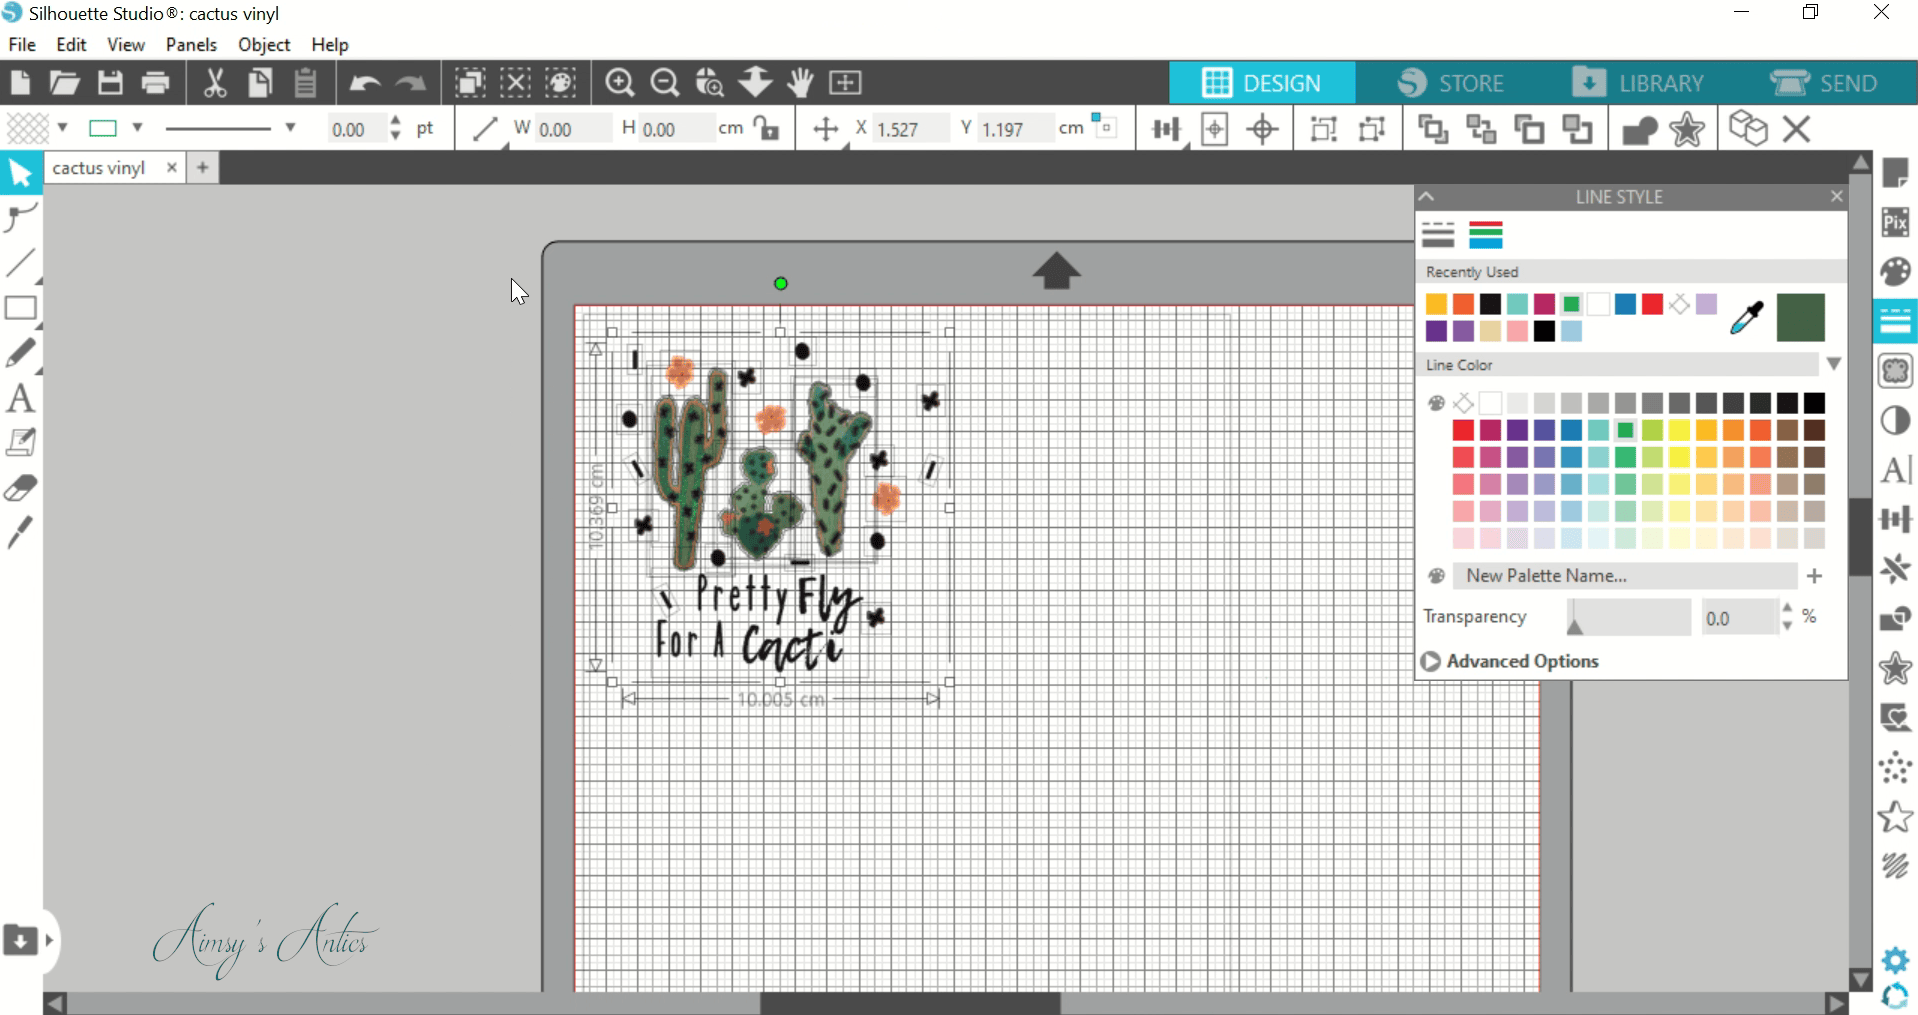
Select the cacti and first change the line colour to green. This will outline the cacti parts in green, which will help with the cutting process later. Repeat this for the other designs, changing the line colour to match the chosen heat transfer vinyl.
Then it is time to use the ‘Offset’ button. Select one of the cacti, and click the offset button, changing this to 0.100cm and clicking apply. You will see an outline around the design that has been created, however, we want this line to be separate and not just a thicker outline of the cactus. The layering of the vinyl will be too bulky this way. Therefore we need to create another offset. This time changing it to 0.020cm. If you move the fower design away from the offset, you will see that the offset is a line cut-out of the design. I hope that makes sense!
Repeat this for all designs of the vinyl decal.

Step 3 – Create design and add text
When all of the elements have their outline, it is time to arrange everything into place. So, place the cacti, followed by the added extras of the flowers, dots, lines and crosses.

Once this is all in place it is time to add in some text. I am throwing it back to the late ’90s with a song by The Offspring. You know the one “Pretty fly (for a white guy)”, instead, changing the wording to “Pretty Fly for a Cacti”. I can’t take any credit for this, as I saw it on a print on Etsy and absolutely loved it!
Add in the text, by clicking the text option splitting each word individually. This gives you more scope to positioning the words, and changing the font of “fly” and “cacti”.
Change the line and fill the words to black, as this will be cut out of black heat transfer vinyl. Positioning the words where you want them and group them all, so that you can move them as one. Also, select ‘weld’ to make sure the letters cut out as they should and within the design. This is important if they are connecting letters. The font for “Pretty” and “For a” is ‘Tulip’, and the font for “Fly” and “Cacti” is ‘Lemon Tuesday‘. These are free fonts, but please may only be for personal use.
Also, position some of the extra decals of the design around the words, so that the whole design looks like one, rather than just sticking the font on as an afterthought.
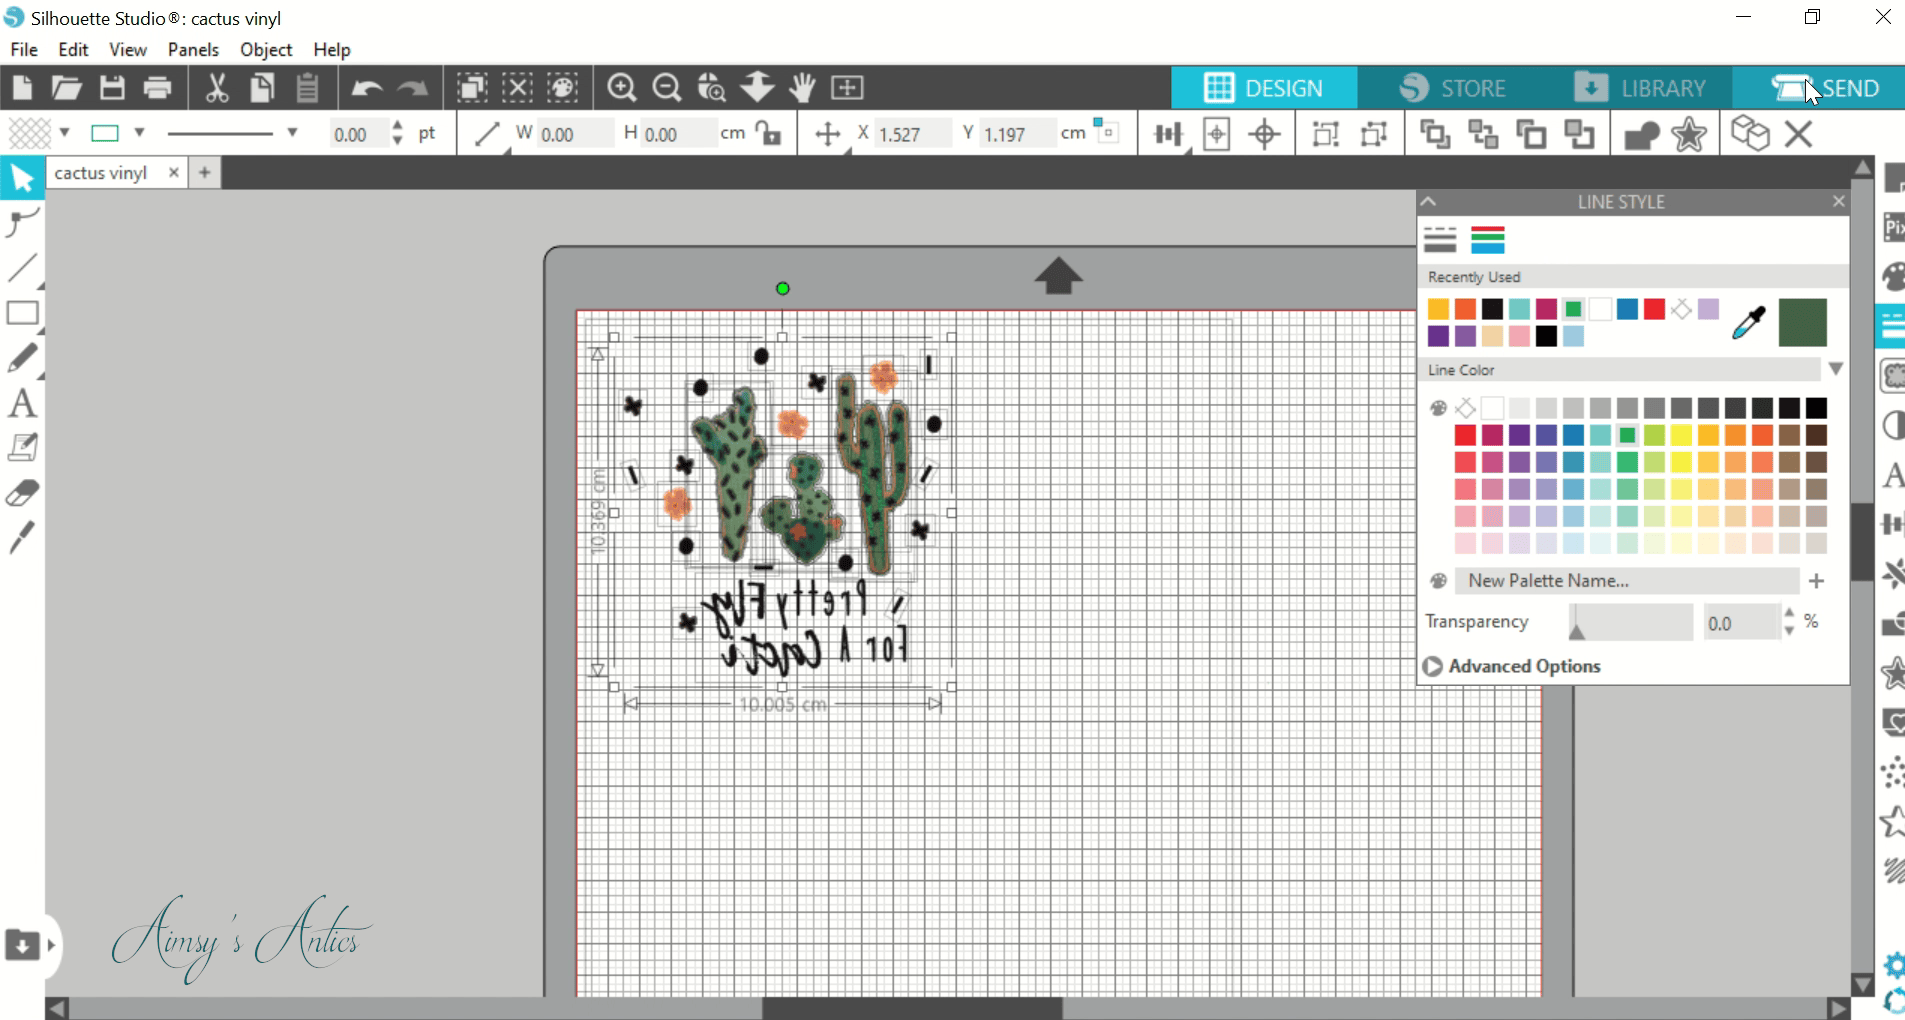
Before cutting out, select the whole design and flip it horizontally or mirror it. This is because the backside of the vinyl is the part that adheres to the fabric. If you don’t mirror it, it won’t read the right way.
Step 4 – Cut Out Design & Weed
Once the design is complete, it is time to cut it out on the Silhouette Cameo 4. Change the settings in the send tab to ‘Heat Vinyl, Smooth’ as this gives you the best setting for the heat transfer vinyl I used.
Go to the ‘line’ tab in the send tab, selecting black colour only. This will tell the machine to only cut the items with a black line.
Select the black heat transfer vinyl and place it onto the cutting mat, making sure it is smoothed down fully, with no air bubbles. Load it to the machine and begin cutting. Repeat the same process with the other colours of the design. In this case, I have green for the cacti, yellow for the middle of the flowers and orange for the outline of the flowers.

Once all designs have been cut out, It is time to weed them. First, remove the vinyl sheet from the cutting mat. To do this, pull a small bit of the vinyl, then turn this over so the cutting mat is on top, and peel the mat away. This will help the vinyl come away smoothly without any bubbles forming.
Then using weeding tools, weed out the vinyl designs. I like to do it all in bulk so that it is one task done at the same time.

Step 5 – Layering the Heat Transfer Vinyl
Now it is time to begin attaching the heat transfer vinyl, create the layers with it.
First, make sure the garment it is being added to is crease-free. Place this down on an ironing board, ready to press the vinyl.
Place the green cacti vinyl first, in the position where you want this to be. Then use a Teflon sheet, placing this over the design. This will protect the vinyl from the heat of the iron. Select a high heat setting on the iron, and press this over the Teflon sheet. Make sure the pressure is even and firm for a few minutes before removing the iron.
The heat transfer vinyl I used is cold peel, which means you have to wait for it to cool down before you can peel the backing off. Peel off the back when able, to reveal the design has stuck. If some of the vinyl hasn’t stuck, then replace the backing and go through the process of pressing again until it sticks.


The next layer is the black vinyl layer. Line the edges of the cacti up, using the edges of the green cacti as a guide. When the design is lined up, repeat the same pressing process as before, ensuring all have adhered to the fabric.

The final parts to add is the flowers. Place down the yellow middles around the design, following the same process. Finally, line up the orange outline of the flowers around the yellow middles; again pressing these into place.


Then the cactus vinyl design is complete, and that is how to layer heat transfer vinyl.


What do you think of this heat transfer vinyl decal? Are you a fan of old lyrical puns like me? Let me know in the comments below!
How to Layer Vinyl – Video
Here is the video version of this post, if you find it easier to follow along with. Don’t forget to give the video a thumbs up if you have enjoyed it, as well as subscribing to my channel!
Pin it!
If you have enjoyed this post, why not share the love by hitting the share buttons, or pinning it for later? Don’t forget to check out my Pinterest for more creative inspiration!


I missed your blog. This design is awesome but it looks like hard work. I watched the YouTube to understand it better. Thank you for sharing.
“Pretty fly for a Cacti”
Glad you like it. Yeah, it is a bit of work to get the result, but was fun to try and design. I wish I could draw, as it would have made it a bit easier I think haha! Glad you like the post and video, thank you so much for watching and commenting 🙂
Will be checking out your blog…haven’t visited it in a while!
Aimsy xoxo
This looks like such a fun craft and looks really professional too.
Yeah, it is fun to see the designs come to life. This is the first heat vinyl project I have done, so pretty impressed with how it turned out.
Glad you liked it and thanks for commenting 🙂
Aimsy xoxo
Oh my goodness! These pyjamas are so cute! I had no idea about heat transfer vinyl. I love this! Thanks so much for sharing how you do it!
It totally changes up and makes the pyjamas a set, doesn’t it? I want to put decals on everything now haha!
Glad I have shown you something new, and that you liked it.
Thanks so much for commenting 🙂
Aimsy xoxo
I didn’t know there was so much involved with vinyl! You have done a great job here and it matches the fabric on the pants so well, what a cute pyjama set you made! 🙂
Hope that your week is off to a good start 🙂
I think there are other methods, but I found this the easiest wy for me. Glad you like it, it ties in the pyjamas so well.
Thanks for commenting 🙂
Hope you are having a lovely start to the week!
Aimsy xoxo
This turned out amazing! The design is cute! It was interesting to learn about the process.
xoxo
Lovely
http://www.mynameislovely.com
Thank you…turned out so much better than I expected. Especially for the first time with this type of vinyl!
Glad you liked 🙂
Aimsy xoxo
Wow I already fell in love with the design in the last post but I didn´t realize you designed it yourself!! So awesome 🙂
have a great day gorgeous,
Tiziana
http://www.tizianaolbrich.de
It just ties the pyjama set together, doesn’t it? Glad you like it 🙂
Thanks for commenting…have a great week!
Aimsy xoxo
I always learn so much from your DIY posts, Aimsy! I don’t think this is something I’d do myself but wow, the effect is fab. I love how straightforward you make this look, and how easy it is to customise your own clothes 🙂 x
Aww glad you do, crafting is a thing to be shared! This was the first time I did this type of vinyl (after lots of research) so happy with how it turned out. Definitely will be customising so many things now haha!
Thanks for commenting Lisa 🙂
Aimsy xoxo
Okay, not only the PJs looked amazing before, but this little touch is such a special bit! I loved this post, I need to learn to do stuff like this as it seems quite fun! Thank you for sharing Aimsy xx
The designing part can be frustrating at times, but well worth it for the result and is fun to do! I love how it ties in the two pieces.
Glad you liked it and thanks for commenting 🙂
Aimsy xoxo
Wow this is so cool! I really want to give this a try – such a fun DIY project!
Molly xx
https://volumesofbeauty.com
Glad you like it…definitely a fun DIY!
Aimsy xoxo
This looks awesome! I bought heat transfer paper and made my nephew some funny shirts for Christmas haha! Love this cute cactus print to match your pjs! Thanks for sharing, Aimsy! Beautiful as always xx
Lynn | https://www.lynnmumbingmejia.com
Oh, they are just great for customising, aren’t they?! Glad you like it, I love how it ties the pyjamas together.
Thanks for commenting 🙂
Aimsy xoxo
My friend makes her own tee-shirts with sayings. She uses the heat transfer vinyl too. She makes them for gifts. They are so cute and it is nice to get a homemade gift.
I bet she makes great gifts…that is a plan for this coming Christmas! Love handmade gifts, I think they have more meaning.
Thanks for commenting 🙂
Aimsy xoxo
Pretty Fly for a Cacti is such a great phrase! These are so cute!
Katie | katieemmabeauty.com
Oh it is fab isn’t it?! I’ve also seen “pretty fly for wifi” as a little wifi password artwork haha!
Had to bring in some older song lyrics! Glad you like it and thanks for commenting 🙂
Aimsy xoxo
Oh my goodness, so many great tips. These pyjamas are so cute!
Danielle | thereluctantblogger.co.uk
Glad you like it…I love how the set looks with this added.
Thanks for commenting 🙂
Aimsy xoxo
This looks great. I’ve worked a lot with vinyl but have yet to try HTV.
Thank you, I love how it turned out. This was the first time I worked with HTV, and I am pretty impressed with how simple it was to use.
Thanks for commenting 🙂
Aimsy xoxo
I didn’t realise this was heat transfer vinyl! It looks really good. Do you recommend the Silhouette cameo over something like a Cricut machine? I wasn’t sure how they differed when it came to fabric, but I deffinitly want to invest in one for some personal projects! Em x
It adhered really well to the fabric…and is still in place after washing!
I found it really hard to choose, as the Cricut is more popular and readily available in the shops here. But, I went with the Silhouette as you have a bit more creative freedom with the software. It does take some learning and I am no means an expert, but I am fairly happy with the Silhouette. I haven’t used a Cricut before though so it’s hard to compare. They are very similar and I think you can do more or less the same on both machines. You will definitely not regret investing…there is so much you can create with the cutting machine!
Thanks for commenting and glad you liked. I don’t know if I helped any with choosing a machine though ahah!
Aimsy xoxo