

In today’s post, I have another sewing project to share with you. This DIY cropped tie front top is a great summer make, and the best thing is the sewing pattern is absolutely free!
Summer is upon us, and at the moment the UK is at a start of a bit of a mini heatwave, so this me-made wardrobe item is perfect for that. A DIY cropped tie top, that you can style with jeans, skirts or even use over swimwear when visiting the beach.
DIY Cropped Tie Front Top – Free Pattern
The best thing about this cropped tie top, aka the Elliot top, is that it is a free sewing pattern by Cool Stitches. The Elliot top consists of a deep V neckline, cropped waist, tie fronts and puff gathered sleeves. Think risqué cottagecore. The pattern comes in a few sizes and is a pdf download, which means you can print it straight away to get sewing. You can offer a donation for it of whatever price of your choosing, meaning you can pop £0.00 into the amount box if you wish.

Now, I found the top a little daring with the deep V neckline, and therefore I popped in a hook and eye as well as the ties. I also added a little bit of length with an extra ruffle/peplum as the copped part came up a bit too cropped on me. I think these additions add something extra to the top and it turned out great.
So, if you would like to see how to make a DIY cropped tie front top, using the Elliot top pattern by Cool Stitches, then… Let’s Get Sewing!
DIY Tie Front Top – What you need:
You can make this top in a variety of fabrics, but as you may have seen in my other sewing makes, like the wrap skirt, and tea dress, I love to sew with viscose. This make is no different, with this beautiful turquoise blue gingham print viscose from Minerva fabrics (the link is a similar fabric, as I can’t find the one I bought). I love the print on this and the colour. It really does have the summer picnic, vibes don’t you think? The fabric was £2.99 per metre and I bought 3 metres. The top calls for less than this, so you may see this fabric make another appearance with all I have left.

Always remember to wash, dry and iron your fabric before starting your project. This will account for any shrinkage that may occur, especially if using viscose before the item is made.
So, to make the cropped tie top, you will need the following items. Some items on this list are affiliate links, which will be marked with an asterisk (*).
- Fabric of choice and matching thread
- Elliot top by Cool Stitches
- Sewing machine*
- Rotary cutter* or Sewing scissors*
- Sewing pins*
- 10mm wide elastic*
- Safety pins
- Hook and Eye closure*
- Fabric marker* / tailor’s chalk
- Measuring tape
Step 1 – Cut out Pattern
Start by preparing the fabric. Pin the pattern onto the fabric as indicated, then cut these out with scissors or a rotary cutter.
Next, the pattern calls for long strips of fabric to make the ties and channels for the ties. This has to be marked out using the measuring tape, rather than a pattern piece as they are quite long strips required.
You should have two front bodice pieces, one back bodice piece, two sleeves and strips of fabric for the channels and ties. Then, overlock/zig-zag stitch the raw edges of the bodice pieces to reduce fraying.

Step 2 – Connect Bodice Pieces
The first thing to sew is the darts on the front bodice pieces. Mark where indicated on the pattern pieces and then sew the darts into place. I find it helpful to pin the darts so that I can follow the line of the dart.

Place the front bodice pieces onto the back bodice piece, right sides together. Pin at the shoulders and head to the sewing machine. Sew together at the shoulder seams.

Step 3 – Sew the Sleeves
The first thing to do with the sleeves is to sew gathering stitches along the top edge. This will help gather the sleeves in where they are connected to the top, giving it a puffed sleeve look. To sew these, turn the stitch size to the largest possible on the machine and sew two even rows of stitching where indicated on the pattern. Ensure a long tail is left on either side. Using the top two threads, gently pull to gather to the desired length.

Then lay the bodice of the top flat, and pin the sleeve to the armhole part of the bodice, right sides touching. This will be sewn in a raglan style and is an easy way of adding in sleeves. I used this method to make my DIY hoodie and Pyjamas. Head to the sewing machines and stitch the two together.
The sleeve will now be attached, with the underneath still unsewn, as well as the side seams.

Step 4 – Sew Side Seams
Now is the time to sew the side seams, following this seam up into the sleeves where they are open. Remember to backstitch at the start and end of each of these seams.

Then, it is time to finish the neckline, by rolling the edge once and then once again, approx. 0.5cm each time. Press into place to help keep the shape, and use pins if needed. Then sew a stitch along the edge of the fold to complete the rolled neckline.

Step 5 – Create the Channels
The top is coming together, however now, we need to create the channels for the ties. For this, the strips of fabric are folded like bias binding and attached to the bodice of the top. I used a bias binding maker, however, you can easily fold without this. Start by folding one edge of the strip towards the centre of the strip, repeating on the other side. The bias binding maker does this movement for you whilst you are pressing with an iron.
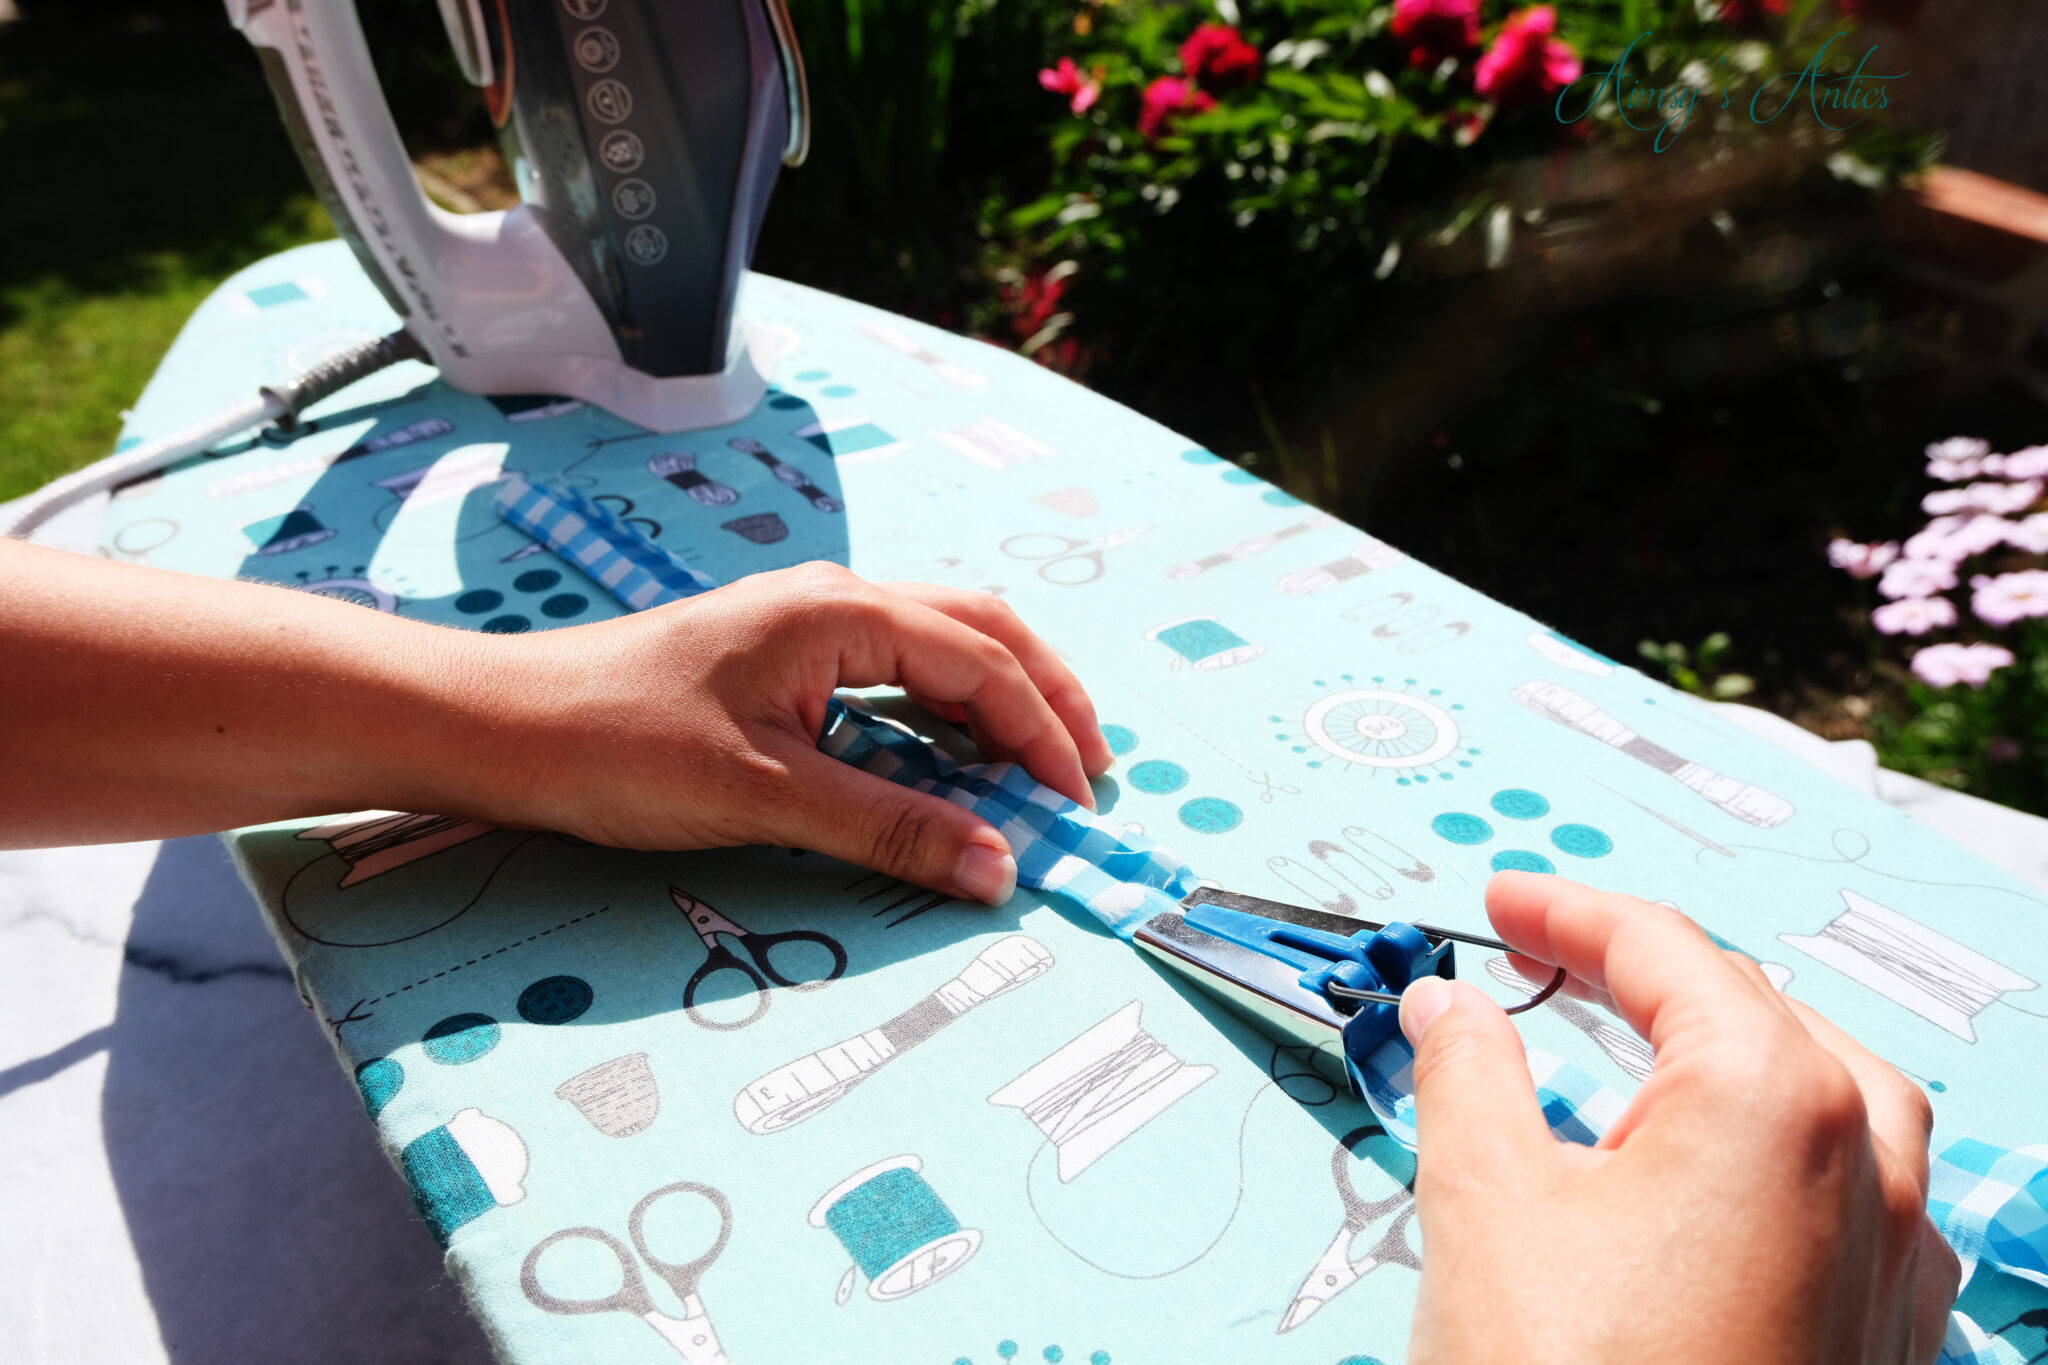

The strips will be much longer than the bodice of the top.
Then, it is time to mark out where you want the ties to sit on the top. To do this place the top on, and begin pinning the strips around where you like. Then, mark with a fabric marker or tailors chalk where the channel will sit. Repeat this for the second channel.
At this point, I realised that the copped top was too cropped, and the bottom tie sat more or less on the bottom edge of the top. I added an extra strip of material after attaching the channel. Cut the channels at each end of the bodice, leaving approx. 2cms over. Fold the ends inside so that the raw edges are enclosed inside the channel, but so there is still space for the tie to pass through. Sew the channels in place, sewing on each outside edge to the bodice of the top.


Step 6 – Create the Ties
Next, it is time to sew the ties. Take the designated strips and fold them in half lengthways, right sides together. Sew a seam to join together into a tube. Then, it is time to place a safety pin at the end of the tie and thread this through the inside to turn it right side out.
Finish off the tie by folding the end inwards once and folded again. Secure in place with stitching. You may find this bulky on the machine, so hand-winding the sewing machine may help with sewing this.
Using a safety pin again at the end of the complete tie, thread this through the channel until you have equal amounts on either side. Make sure that the ties don’t twist inside the channel when threading through.

Step 7 – Finish Sleeves
The sleeves of this top are elasticated to help give a puffy shape to them. Complete a small rolled hem on the open edge of the sleeves. Then, fold this again, making it wide enough for thin elastic to fit through. This will create a channel for the elastic. Pin in place and sew, leaving a small opening to add in the elastic.

Measure the amount of elastic you need by wrapping this around your arm until two ends meet. You want it to be snug, but not too tight to make the puffy sleeve. Remember you are going to be wearing this so you want the elastic to be comfortably tight around your arms.
Place a safety pin through one end of the elastic and begin threading it through the channels. Once it has come back around and out of the gap, sew the two ends of elastic together. Place the elastic inside the channel/casing and then close up the opening. The sleeves should now be complete.


Step 8 – Add on Extras
If the top is fitting well, then at this point the top is nearly complete and you can hem the bottom edge with a rolled hem. However, I added an extra strip of fabric to add length and a slight ruffle/peplum to the top.
Lay the top out and measure from one side to the other. This should give you a rough measurement of how long the strip of fabric needs to be. Add on a few more centimetres to each end. Then sew two rows of gathering stitches to give the added piece a bit more of a ruffle. Then place the strip and bottom of the bodice right sides together, pinning in place. Gather the peplum piece to fit the bodice. Then, head to the sewing machine to sew together.

Finally, finish any seams with a zig-zag stitch or overlock, and hem the bottom of the peplum with a rolled hem. Try the ties, and if required add on a hook and eye closure above the top tie.
Then the DIY cropped tie front top is complete and ready to wear!


What do you think of this DIY cropped tie front top? Will you be having a go at making your own, and would you make any adjustments? Let me know in the comments below!
DIY Cropped Tie Front Top – Video
Here is the video version of this post and the making of the cropped tie top. Don’t forget to give the video a like if you have enjoyed it, and subscribe to my channel to keep up with all my creative antics over on Youtube!
DIY Cropped tie Front Top – Save it!
If you have enjoyed this post, then why not share the love by sharing it or pinning it? You can also check out my Pinterest for more creative inspiration!


Have a creative project in mind, but don’t know how to plan it? I have you covered with a FREE creative project planner when you sign up to my email list. Grab yours now!

Love the Gingham fabric you’ve chosen for this! It’s absolutely stunning. Thank you for sharing this and making it so easy to follow along. My gran does a lot of sewing and she’s teaching me atm so if love to have a try at this. Love how you’ve included what’s needed as well!
Jordanne || Ofaglasgowgirl
Glad you like it, the fabric is great, isn’t it?
Ooo, have fun sewing it, if you do give it a go! It is quite a low neckline so keep that in mind when making it, as it is a bit lower than I am used to.
Thanks for commenting 🙂
Aimsy xoxo
Aimsy, you’re so talented and creative! This is such a great step by step guide for a DIY project. I’m a summer baby, so I absolutely love this front top. It’s always fun to sew our own clothes, isn’t it? Thanks so much for sharing this! x
Aww, thank you. Definitely fun to make your own clothes. I often go round the shops and I think, I could have a go at making that haha!
It’s a great top for summer, isn’t it?
Glad you like it and thanks for commenting 🙂
Aimsy xoxo
I love how this top came out! I am always in awe with your sewing knowledge and products! love that you took everything to the garden to enjoy some sun, whenever i will have space i will have to give it a try x
Glad you like it! Oh, ay chance and I will be outside. I would love one of those summer houses so I could craft outdoor more haha! The only problem with outside and trying to cut/pin/sew is the wind blows the fabric, and viscose likes to move haha!
Thanks for commenting 🙂
Aimsy xoxo
This turned out so cute! x
Thank you! Glad you liked it 🙂
Aimsy xoxo
The top came out so well! I especially love the style of the sleeves. Great job
Thank you so much! The sleeves are my favourite part too!
Thanks for commenting 🙂
Aimsy xoxo
Such a cute crop top! I usually don’t do sewing as I have not any idea about it but this diy is awesome so I am gonna tell my mom to try this for me!! Thank you for sharing such a detailed post xx
Glad you like it! It is one of the easier makes that I have completed, although it does have some complex parts to it.
Hope your mum enjoys sewing it!
Thanks for commenting 🙂
Aimsy xoxo
This is such a cute top Aimsy! I love the colour of the gingham and it looks great on you! Thanks for sharing!
Thank you, glad you like it! The gingham is such a fun print, isn’t it?
Thanks for commenting 🙂
Aimsy xoxo
Wow!!!!!! Love this DIY. Love the color of the blouse. It’s lovely and suits you well. You should be a fashion designer or a boutique owner after sharing all these cool DIYs. You have the talent. That’s amazing!
Glad you like it! The colour and print is just beautiful, isn’t it?
Oh gosh, I don’t think my skills are good enough to be a designer haha! Thank you so much for the compliment though!
Thanks for commenting 🙂
Aimsy xoxo
Oh wow Aimsy! This DIY cropped tie top looks so fab. This is pure style and class and I love the fabric. It’s so nice on you. WOW! I’m a fashion designer and it’s been a while since I hit the sewing machine. Imma have to try this. Thank you for sharing.
Thank you so much, I am glad that you like it! It’s a great piece to get back into sewing with and the fact the pattern is free adds to this!
Thanks for commenting 🙂
Aimsy xoxo
This is the most gorgeous top ever and I love the step by step guide xx
Aww, thank you. I’m glad you like it and the step by step to make it.
Thanks for commenting 🙂
Aimsy xoxo
This is such a cute print for summer, and this is beautifully made!
xoxo
Lovely
http://www.mynameislovely.com
Such a great print for summer isn’t it?! Glad you like it 🙂
Thanks for commenting 🙂
Aimsy xoxo
Oh WOW this came out so good! You have some mad skills here. I always admire people who can sew.
Allie of
http://www.allienyc.com
Thank you, I am glad you like it! It all takes practice and patience, belive me I have sewn many disasters in my time haha!
Thanks for commenting 🙂
Aimsy xoxo
That is such a cute top on you! I love the statement sleeves and the tie feature is so sweet. Lovely print for summer as well!
Hope your week is off to a great start! 🙂
Aww, thank you. I love the sleeves the best too, there is just something about a gather puff sleeve, isn’t there?
Thanks for commenting! Hope you are having a lovely week.
Aimsy xoxo
Such a cute top! I love the pattern!
Thank you! Glad you like it. The gingham pattern is just perfect for summer, isn’t it?
Thanks for commenting 🙂
Aimsy xoxo
That is such a cute top sweetie!
Danielle | thereluctantblogger.co.uk
Aww thank you, made it just in time for the lovely weather!
Thanks for commenting 🙂
Aimsy xoxo
This looks so good, deffinitly something you’d see online at the moment. You look really great in it! I love the fabric, it reminds me of the summer dresses I used to wear for school so this looks really cute to me. Thank you for sharing, I am going to be making it this summer! Em x
Oh, the gingham fabric is just great, isn’t it? I have it in yellow and was making a dress with it, but I ran into problems so haven’t finished that one yet! I like it but feel slightly self-conscious because of the ties, but it feels great o!
Thanks for commenting 🙂
Aimsy xoxo