

I am back with another Silhouette Cameo 4 make and tutorial in this week’s post. Today I will show you the process of making your own DIY mermaid cake topper to dress up your bakes. Perfect for the mermaid lover out there!
My niece has just turned 7, and like most young ones, loves all things mermaid related. So, in honour of her turning 7 and her love of mermaids, I joined forces with my friend, who is an amazing cake maker (check her out: @JPBakes), to create the perfect mermaid themed cake. To finish off the cake I made the DIY mermaid cake topper using my silhouette cameo 4.

I have previously made a DIY cake topper, however, this one is taking it up another level. Not only is it a mermaid theme, but it also includes a shaker part to it. That means sequins are freefalling behind the design to give it an extra layer of detail. It does give it an extra bit of pizzazz.
I will also show you a bonus cake topper, and how to merge mermaid scales to a number to create a unique number topper too! This is the best cake topper I have ever made and is super easy for you to recreate too.

So if this piqued your interest and you have a digital cutting machine, like the Silhouette Cameo 4, then… Let’s get crafting!
DIY Mermaid Cake Topper – What you need
To make this DIY mermaid cake topper, you will need the following items. Some items on this list are affiliate links and will be marked with an asterisk(*).
- Digital cutting machine
- Laptop/PC
- Cardstock – Mermaid pack*, Tropical Pack* & Glitter pack*
- Thin Acetate*
- Foam tape*
- Foam pads*
- Glitter
- Sequins
- PVA glue and precision applicator bottle*
- Double sided tape*
- Bamboo Skewers*
- Hot Glue Gun*
Step 1 – Design the Shell Base
The first thing to create is the shell base of the cake topper. This will be in three different layers of the backing piece, the acetate sheet to make the shaker part and the front decorative outline of the shell. Now, it is not as complicated as it looks and you only need a shell outline to complete this part. This will be fully designed in the Silhouette Studio too.
I found a royalty-free outline of a shell. If you are artistic, then you could draw your shell instead. Re-size the shell to the preferred size that you want, I believe mine is about 15cm wide.
Then, select the ‘offset’ tool on the sidebar, setting this to your desired thickness. Move the two pieces away from each other and you will see that the shell has a separate offset created. The only thing with this is, we need it to be the backing, so using the point editor, delete all of the inner parts of the design, until you just have the outline left.

Re-size the outline to slightly larger than the original shell piece. You also want to create a slightly smaller outline by copy and pasting, or using the offset option again, for the acetate. You want this to be slightly smaller (but not too much) than the decorative part of the shell.
Finally, create several offsets of the decorative/outer part of the shell, until you have thick lines. You want the outer part of the shell to be thick enough to hide the foam tape when creating the shaker. To make it easier, change the line and fill colour to match which colour card you are going to use. This will help visualise the shell within the design programme.

Step 2 – Create the Mermaid Tail
The next part is to create the mermaid tail addition to the shell design. Again, I am using a royalty-free mermaid tail picture for this.
Select the picture and alter the size to suit your shell. I didn’t want mine too big on the shell but equally wanted it to stand out against the shell background. Create an offset of the tail and colour the line and fill your desired colour, making sure this contrasts with the scales. Set this to one side.
After this, use the ‘Trace’ option, selecting the tail end scales part, selecting ‘trace and detach’. If they have separated, use the ‘Weld’ option to connect the two parts. You should now have the scales and tail end separate from the background of the tail. Change the colour of these to suit which card you are using. I am using glitter blue cardstock for the background and purple cardstock for the scales. The cut out will give a ‘peek-a-boo’ style to the tail and highlight both parts.
You may find that you need to create another offset of the scales/tail end to thicken the lines. This will make it easier to cut out, as well as stick together.

Step 3 – Create the additional Shells and Coral
To add more definition to the DIY mermaid cake topper, we are going to add some more details. I used images of starfish and shells for this part. So, using another royalty-free image of starfish, use the ‘trace’ option once again to highlight the top detail, selecting ‘trace’ to complete the action. Then, change the fill and line colour of this, as well as the remaining part of the starfish.
Repeat the same action with the shell, to create two layers to it, again using slightly different colours to highlight the difference. I created several different sizes to add variety to the additions to the cake topper.
After the starfish and shells are complete, it is time to concentrate on the coral pieces. Again, like before you can find royalty-free clip art images, or search the Silhouette design store. You can always use some of the free designs that came with the machine, think of different leaves that could look like coral.
Use a variety of different shapes of the coral to add definition. Copy and paste these in different sizes as well to add to that difference. I used several colours of cards to mix it up as well.
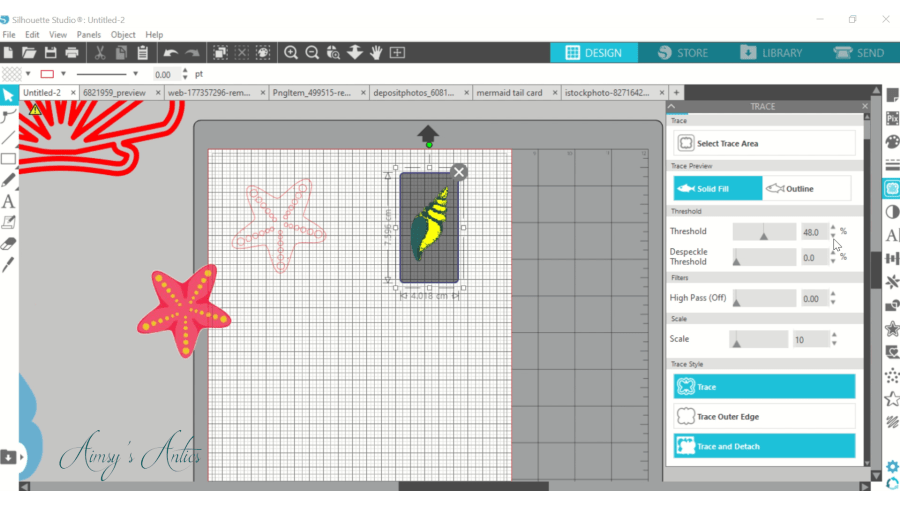
Step 4 – Created Mermaid Number (optional)
This next step is optional, but I thought it would be good to include it here. We are going to create a design similar to that of the mermaid tail. Find and use a small mermaid scale print. ‘Trace’ the image if required and colour it your desired colour.
Write the number of your choice and change the font. You want the font to be fairly thick, so script type fonts are not that ideal. Use the ‘internal offset’ option, making the number slightly smaller and hit ‘apply’. Remove the larger number to one side, and place the mermaid scale pattern over the top of the inner number. If it is difficult to see, then change the line colour of the number so it stands out. When happy with the placement of the scales to the number, head to the ‘modify’ panel and select ‘crop’. This should weld the two together, creating the scales as part of the number.


Then, bring in the larger number and line up the edges with the new mermaid scale number. Select the two and right-click, selecting ‘make compound path’, This will join them together so that you can cut them out better. Then use the ‘offset’ option to create a slightly larger number. Colour the line and fill a different colour for the scales to see the contrast.

Step 5 – Cut out Designs
Once everything is designed, it is time to cut these out with the machine. I have found that I get a better cut if I turn the cardstock right side facing the mat, with the back facing up. The only thing to remember is to mirror all of the designs so that they are cut out the correct way (backwards). Also, alter the speed of the cut slightly lower than what is set, as well as using the ‘overcut’ option.
This part is the longest part of the project, as you have to swap and change the cardstock to match. If possible, try to cut all the designs by colour, placing the designs you want using the same colours.
Now, my rachet blade is probably in need of changing, as I have also found that I have to increase the length of it to cut through the card. Experiment with what works best for you and your machine. I generally cut at a low speed of 2, selecting 2 cuts/passes, with the blade set at 6.

Step 6 – Connect cut out pieces together
The first thing to do is to glue all of the pieces needing sticking together. This includes the mermaid tail, starfish, seashells and the number.
Depending on the design, you may be able to use double-sided tape. I like this method as it is a little less messy and you don’t have to wait for it to dry. However, for the instances where you cannot use this tape, PVA glue does the trick. Use a bottle with a fine applicator tip for more precision.
Set these aside and allow them to dry.


Step 7 – Complete the Shell shaker
Using the double-sided tape, place this along the backside lines of the outer part of the shell. Remove the backing and attach this to the acetate sheet cut out.
Then, using the foam tape, place this along the lines again of the shell/acetate combination. Fold the tape in half lengthways for added thickness. This will help the acetate stand away from the backing to allow the sequins and glitter to move about in the shaker part.
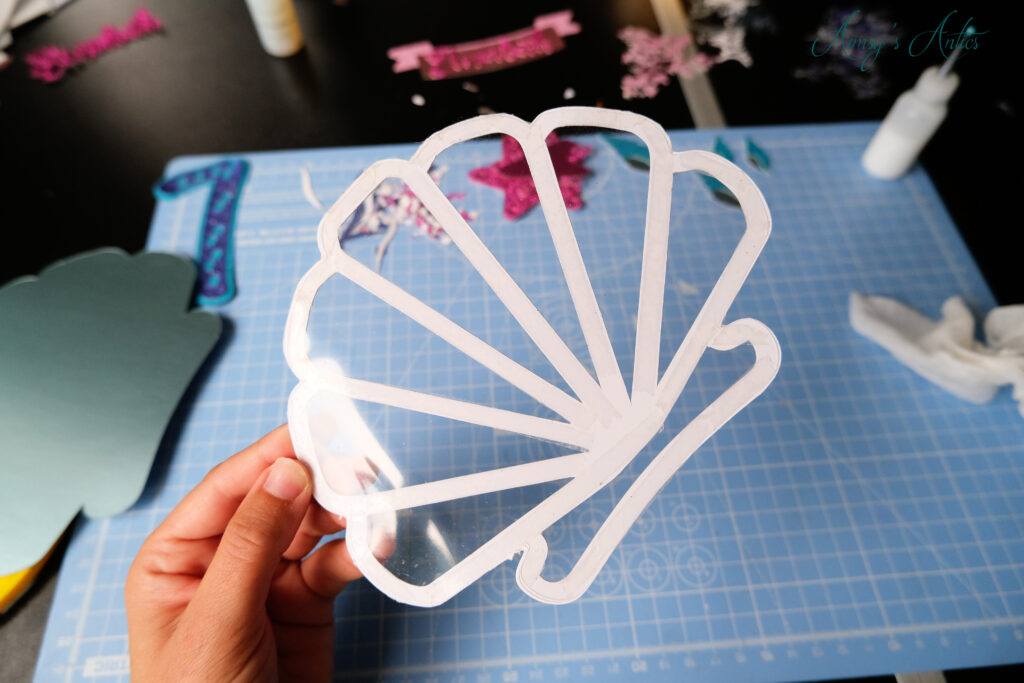

Then, using an anti-static powder, place this on the acetate sections as well as the backing card. Shake away any excess powder. Select glitter and sequins of your choice and colour scheme, and place these into the individual sections. Make sure not to overcrowd as the sequins will not be able to move about as freely. When happy with the amount, remove the backing tape from the foam and line up the back card, placing this down onto the foam. Remember to do it on the pretty side of the acetate.

The base of the DIY mermaid cake topper is now complete and ready for the elements to be added.
Step 8 – Add on Designs
Now it is time to add on the designs. Decide where you want each piece to be and play about with the layout before committing to securing it in place. When happy, use foam pads to place and secure them onto the base. Using foam pads will allow for them to sit further from the backing, to give it the 3D definition.
Place the coral parts around the tail and shells, this will look at them coming out of the coral pieces. I like to use double-sided tape for this part, but use whichever glue format you like. You can play about with this part and add items however you like. I decided to personalise mine by adding a banner piece and my niece’s name to it, but you can add whatever you like to this part of the topper.
I also used adhesive gems to add some extra sparkle (like it needs any more) to the cake topper. I placed round blue gems in various sizes near to the tail and other seashells, to mimic water bubbles under the sea.


Step 9 – Complete the DIY Mermaid Cake Topper
To complete the cake topper, we need to add the bamboo skewer so that it can be placed into the cake.
Determine how long you want the stick to be, I place about ¼ of it onto the cake topper usually. You can always cut it down from the bottom if it is too long, but you also need enough of it onto the cake topper for stability. As this mermaid topper has various layers, there is a bit more weight to it, and therefore it is beneficial to have a stick on either side of it to balance it out.
Use the hot glue gun and place a line of glue on it. Place in the skewer to the glue and cover with another line of glue. Allow this to harden and set and then the DIY mermaid cake topper is complete and ready to be placed onto a cake.


What do you think of this DIY mermaid cake topper? Will you be having a go at making one? Also, how beautiful is the cake that my friend made too? Let me know in the comments below!
Looking for more digital cutting projects? Why not check out Acrylic Baby Shower Sign and Layering Heat Transfer Vinyl.
DIY Mermaid Cake Topper – Video
Here is the video version of making this beautiful cake topper. Sometimes it is easier to see it in action than through pictures, isn’t it? If you enjoy the video, then don’t forget to give it a thumbs up and subscribe to my channel to keep up with my creative antics over there too!
DIY Mermaid Cake Topper – Save it
If you have enjoyed this post, then why not share the love by sharing it or pinning it? You can also check out my Pinterest for more creative inspiration!


Have a creative project in mind, but don’t know how to plan it? I have you covered with a FREE creative project planner when you sign up to my email list. Grab yours now!

Oh wow!!!!!! This is a lovely DIY. I’m going to try this. My best friend will surely love this. She’s a big fan of mermaids. Thank you for sharing.
Aww, thank you. I hope your friend likes hers if you do make it. It does take a bit of time to put together, but so worth it for the outcome!
Thanks for commenting 🙂
Aimsy xoxo
What a lucky niece you have! This is such a beautiful cake and cake topper – I absolutely love it! I don’t have that type of machine, but kudos to both of you on this amazing job! Thanks for sharing.
Oh, she is a little spoilt haha! I love that you can make so many things with the machine. Worth investing in if you like crafting!
Thanks for commenting 🙂
Aimsy xoxo
Oh my goodness, this is the cake topper of dreams, definitely next level, Aimsy! Super professional, and yes, your friend’s cake is absolutely gorgeous too 🙂 x
Oh, isn’t it just! Definitely my best to date haha! She is such a talented baker, isn’t she?
Glad you liked them both and thanks for commenting!
Aimsy xoxo
Wow, this cake topper takes cake toppers to the next level and I love that it is so easily handmade! From the mermaid tail to the shell backdrop to the very decoration the cake, the colors and textures are beautiful.
Thanks for sharing!
Oh, isn’t it just fabulous! It took ages to do, but has to be the best one I have created to date! My friend and I worked together to try and match the colours as best we could. How amazing is the cake she made?!
Glad you liked it Jaya and thanks for commenting 🙂
Aimsy xoxo
Wow, this is an incredible DIY!! Perfect for a magical birthday 😉 Thanks for sharing, always looking forward to your creativity and fun ideas!
xoxo Olivia | http://www.oliviaandbeauty.com
Aww thank you, I am glad you like it! The birthday girl loved it!
Thanks for commenting 🙂
Aimsy xoxo
The mermaid cake topper is gorgeous! Loving the colors and the cake looks amazing too!
xoxo
Lovely
http://www.mynameislovely.com
Aww, thank you. It turned out so good, didn’t it? Oh, my friend smashed it out of the park with this one!
Thanks for commenting 🙂
Aimsy xoxo
My goodness! Aimsy, this turned out so cute! xx
Thank you! It turned out fab, didn’t it?
Thanks for commenting 🙂
Aimsy xoxo
I love this sheer creativity. And the bright hues are so cheerful and fun. I hope you’re having a great week. Love this post it is so colourful.
http://www.bauchlefashion.com/2021/09/6-looks-thatll-make-you-convert-to-high.html
http://www.instagram.com/heathernoire89
Aww, the colours are just magical, aren’t they? Glad you like it!
Thanks for commenting 🙂
Aimsy xoxo
This is so lovely DIY. I love the cake and specially the decor. Thank you so much for sharing. Love
Aww thank you, and I am glad you like it. The colours just pop, don’t they?
Aimsy xoxo
You did an amazing job. Love it!
Bernie,
The Style Fanatic
Thank you! Glad you like it 🙂
Aimsy xoxo
This is so cute!
Danielle | thereluctantblogger.co.uk
Thanks! Glad you like it 🙂
Aimsy xoxo
Love these ideas!
Glad you like it!
Aimsy xoxo