

Looking for a perfect dress to transition the seasons? Well, in today’s post I am going to show you how to sew a tie front maxi dress using the ‘Dusky Rose’ sewing pattern by Made Label.
This past summer I was busy sewing for my summer break away and managed to create this beautiful tie front maxi dress. It is perfect for the transitional periods of Spring to Summer and Summer to Autumn because of the maxi length and semi-covered shoulders.
The dress is super flattering and although time-consuming is a pretty straightforward make. There is no fitting and adjusting required, apart from adding in the elastic waist, which makes it straightforward to sew. That’s right no pesky darts to add or zips!

Dusky Rose Dress Pattern
The makers of this dress are the wonderful Made Label. These are an Australian based independent patter company who have the most beautiful patterns, perfect for the warmer months. I have previously made the free ‘Frankie’ Wrap Skirt, which introduces you to the Made Label style of clothing and sewing techniques.
The Dusky Rose dress is a tie front maxi dress, complete with a ruffle hem to give it the added length of a maxi dress. The hem is asymmetrical, which means the front is slightly higher than the back, although not fully noticeable. I am 5ft 3, and this dress reached the floor on me, so if you are taller, then it may come up shorter on the leg.
The front of the neck calls for hook and eye closures to keep it fastened, so it gives the dress a risqué but modest front. Below this is a tie front, which has a little peek-a-boo opening that is again slightly risqué but modest. It is also slightly more modest than the Tie Front Crop Top, I made also.
For a professional finish to your make, this dusky rose dress allows you to practice French seams and adding in bias binding. These are great ways to add finishes and a professional look to the dress, as well as learning new skills.

So, if you would like to see how to sew a tie front maxi dress using the dusky rose dress pattern, then let’s get sewing!
How to Sew a Tie Front Maxi Dress – Fabric Choice
For this make, I am heading back to using one of my favourite fabrics… viscose! You can see the Cropped Wide-Leg Trousers that were made from viscose, as well as the Frankie wrap skirt.
For the fabric, I am using a beautiful blue and white ditsy flower pattern viscose from Pound Fabrics.
This came in at a few pounds (£) per metre and I bought around 4 metres for this make. The making of the dress using approximately 3 metres, if you are making in a size 10 like me. Obviously, the amount will change depending on the size you make.
This fabric has a fabulous drape, which makes it perfect for a dress like this. The blue and white colours are also great colours for most seasons and those transitional periods too. The pattern calls for viscose type fabric, however, you could use any other lightweight fabric that has great drape.

What You Need:
To make the tie front maxi dress, you will need the following items. Some items on this list are affiliate links and will be marked with an asterisk (*).
- Dusky Rose Dress Pattern
- Sewing Machine
- Fabric of choice
- Sewing scissors
- Rotary cutter*
- Sewing pins*
- Cutting mat*
- Matching thread
- 10mm wide elastic*
- Hook and eye closures*
- Bias Binding maker*
- Hand sewing needle
Step 1 – Cut out the Tie Front Maxi Dress Pattern
The first thing to do is download the pattern and print it off in your chosen size. Check Made Labels sizing chart and compare your measurements to which size is best for you. Most sewing patterns have a range of sizes, however, these differ from your shop-bought clothing sizes. Therefore always make to your measurements rather than your clothing size. If you are unsure or your measurements fall between two sizes, it is always best to make it up in the larger size and grade it down to fit. You can always take away material but not add it on!
Once this is printed, stick it together then cut out the pattern pieces. Place onto your chosen material according to the instructions, always following the grainline. 9 pattern pieces make up this dress pattern. The skirt ruffle is made of several pieces sewn together, so you will find there are a few skirt frill pattern pieces. Pin in place and cut out the fabric.

Step 2 – Create Bias Binding
After the pattern is cut out of the material, you will be able to judge how much fabric you have left. For the finishing of the front and tie front, you are going to need bias binding. Now, you can buy bias binding, however, it is always good to make your own to match the project. Luckily, it is pretty straightforward, once you know-how!
First, measure out a square of your fabric, in line with the selvedge at 35cmx35cm. Fold this square into a triangle, making sure that the edges are of the same length. You can cut away any excess if needed. Then, cut this triangle in half at the fold point to create two smaller triangles.
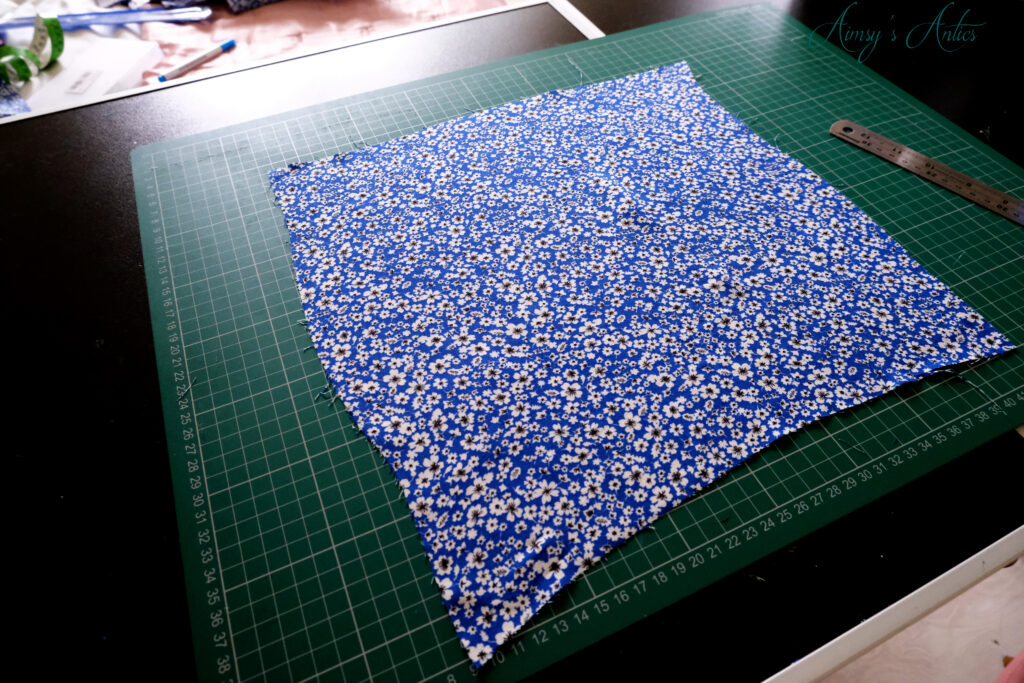
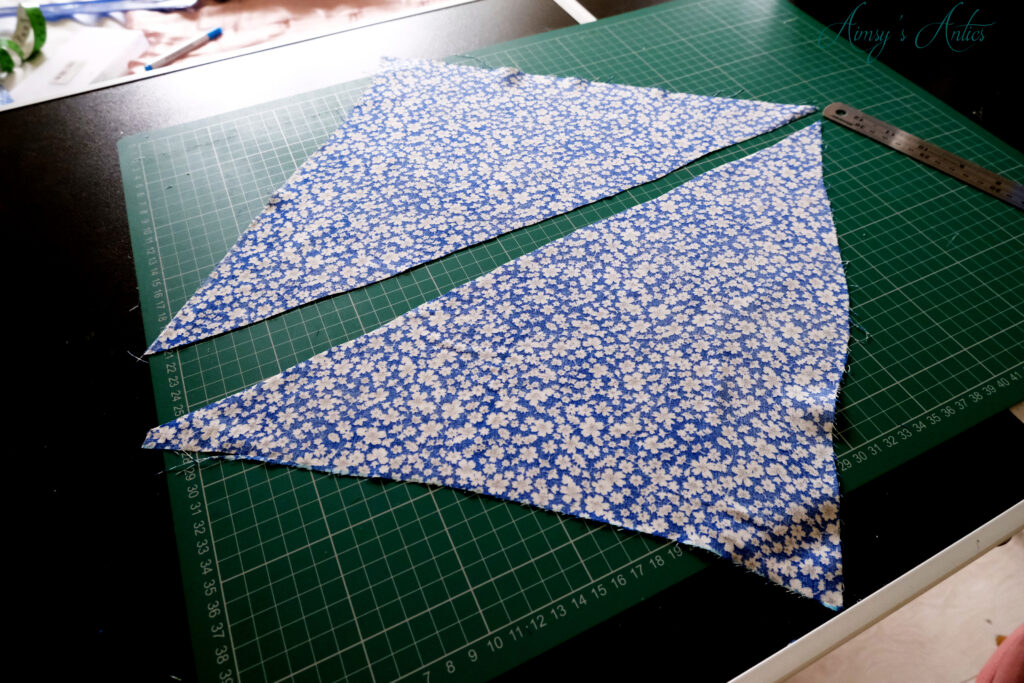
Measure at the longest edge a 3.5cm width strip using a tailor’s chalk or washable fabric marker and a measuring tape. I like to use a metal ruler as well to mark the line across. Cut this strip out, it is easier to use a rotary cutter for a straighter line. Then, use this strip to mark out another 3.5cm strip, moving down the triangle until you have several strips. Repeat on the other triangle half.

Connect Baias Binding
Once you have all the strips, it is time to create one long strip of bias binding. Place one strip facing right side up, and place another strip with the right side down. Flip this strip 90° so that the two diagonal ends line up.
Use a 1/2cm seam allowance and sew along this diagonal edge to join the strips together (corner to corner). Trim the edges and press the seam allowance. It should create a long strip when the attached strip is flipped up (if that makes sense). Keep going in this manner until all the strips are sewn together to create one very long piece of bias.

Bias Binding Maker
To make the process of turning the strip into bias binding, I am using a bias binding maker. You can do this by hand though if you do not have one of these. To do it this way, fold one raw edge towards the middle of the fabric, pressing it into place. Repeat on the opposite edge, meeting the two pieces in the middle.
The bias binding maker does this folding for you. Choose the correct size bias binding maker for the strip. I used the yellow colour one, which is 12mm for these strips. Place the strip into the binder, allowing the two raw edges to go up slightly at each side. Then, begin pulling this through and pressing with an iron to create the folds. Keep going until all of the strips is turned into bias binding. Easy peasy!


Now we have everything prepared to begin sewing the dress together. I prefer to create the bias binding before starting the project so that it doesn’t stop the flow of making the dress.
Step 2 – Making the Tie Front Top
The first thing to do is create the top part of the dress. You should have one back piece and two front pieces with a tie part to them. We are going to use French seams to connect them, which gives a nice finish inside the garment. The only problem with this is it can be a bit more time consuming, but I think it is well worth it.
Place the back of the top wrong side facing up, and place the corresponding front pieces with the wrong sides facing down. Pin at the shoulder and side seams ready for sewing the French seams.
French Seams
To sew the French seams, it is going to feel a little bit backwards at first. This is because you are initially sewing the garment together the wrong way around. You usually sew the right sides together rather than the wrong sides, but trust the process!
Start by sewing the seam with a 1cm seam allowance, remembering to backstitch at the start and end of the seam. Then, trim this seam allowance to less than 1/2cm, being careful not to snip into the seam itself. Press these seams flat.
Next, flip the fabric to the right sides connecting and finger press the seams, so that the stitching of the seam is at the very edge. Then, sew another 1cm seam, backstitching at the start and end. This should have captured all of the raw edges in the seam, giving you that professional look. Give the seam a final press to set in the stitches.


I would advise sewing in batches when doing this, so sew all of the initial seams at the same time, trim and at the same time and then sew the final seams at the same time. This makes the time-consuming process just a little less time-consuming. It also stops you from getting confused about which seam you are completing too!
Step 3 – Sew the Tie of the Tie Front Maxi Dress
Then it is time to begin sewing the tie part of the front. This part has the piece with the front part of the pattern and a separate back part to the tie.
Take the back tie piece and at the straight end, and double-fold by 1/2cm, pressing into place. Then sew a seam, backstitching at the start and end to secure it all into place.


Place this part over the pattern piece, marking 2.5cm in from where this back tie ends. Remove the back piece and keep it to one side. Then it is time to use the bias binding that was made earlier. This might get a little confusing, so bear with me!
Open one edge of the bias binding, and place it 1cm overhanging the mark just created, right sides of the bias and tie front together. Pin the bias all the way around the neckline from the marked point until the marked point on the opposite side. You also want to pin on the bias on the wave of the tie piece until it reaches the mark, cutting 1cm past the mark.

Then open the four ends of the bias binding, and fold in the end by 1/2cm, refolding the edges in and pressing. This should close off the ends of the bias.
Sew 1/2cm seam connecting the bias binding along the neckline, backstitching at the start and end. The fold of the bias will act as a guide to the seam allowance.


Complete the Tie Front
After the bias is connected, it is time to complete the tie part of the front. Place the back tie piece, right sides connecting to the tie front of the top. Pin into place. Continue sewing the seam from the bias point, all along the edge of the tie. Remember to backstitch at the start and end, as well as pivoting at the tie point, to continue sewing the opposite side.
Snip the corner of the tie and turn it right side out. Press the tie part. Where the tie part is added, you may need to trim down the bias (that is connected). Then you want to fold the open edge of the bias the raw edge is inside and then fold again to capture the raw edges. Pin in place and then sew along the edge of the bias to connect. Finish by giving it a quick press. The tie front is then complete!

Step 5 – Add in the Frill Sleeves of the Tie Front Maxi Dress
Along the bottom edge of the frill sleeve, fold a double hem. Use an iron to press the first fold (1/2cm) into place initially and then again to the second fold (1/2cm). I find that spraying with water/dampening the viscose helps keep it in place once pressed. Then sew along the folded edge of the hem, finishing by setting the stitches.

Then, it is time to line the front of the top with the front of the frill sleeve. The notch in the sleeve should line up with the shoulder seam. You will find that there is a small gap at the bottom of the sleeve, which is meant to be there. Make sure the space of the gap is even. Pin with wrong sides together and sew 1cm all the way around. Trim the seam to less than 1/2cm, including the gap.
Add Bias
Take a piece of bias, leaving 1/2cm over at the start of the frill. Repeat the process of folding in the ends and refolding the bias as before, pressing to keep the shape. Pin this one edge of the bias in the gap, right side touching and sew 1/2cm along. Again, the fold line will be an indicator of where to sew.
Finish the French seam of the sleeve. Then, double fold the remaining bias tape ensuring the raw edges are tucked in. Pin and continue the 1/2cm seam. It is best to start halfway and sew to each edge, then you can run the stitching off each end. Finish off with a press of the sleeve and the top.


Then the top part of the tie front maxi dress is complete!
Step 6 – Complete the Skirt of the Tie Front Maxi Dress
Using French seams again, connect the front and back pieces of the skirt. The pattern pieces provide name tabs for each part of the dress, I would advise using these on this part of the project so that you can identify the front and back pieces easily.
Mark the halfway and quarter waypoints of the back panel of the skirt, as well as the back panel of the top. Change the stitch length on your sewing machine to the longest possible, and sew two rows of gathering stitches along the top of the back skirt. Ensure that you leave long tails of the thread on both sides of the gathering stitching, and don’t backstitch. Then take the two top thread tails and gently pull these to begin gathering the skirt.
Next, align the halfway mark of the back of the top panel with the halfway mark of the back skirt panel. Even out the gathering stitches, ensuring that the quarter waymarks match that of the side seams. Pin into place.

Attach the Skirt
Before sewing, lay the front of the top onto the front of the skirt, pinning into place right sides together. There will be a gap, but this is supposed to be there. Then sew 1/2cm seam along the top edge of the skirt. This next bit can get a little confusing, so I will try my best to explain it clearly.

Next, take the top and place it inside the skirt with the wrong sides facing out. Trim the seam allowance carefully, then fold over 1/2cm and press. Fold over again to create a casing for the elastic, ensuring that it is wide enough for the elastic to pass through. Mark this width, and continue to press and pin all the way around.
Leave a gap to mark for an opening to add the elastic. At the start of the mark, backstitch and sew all the way around until you reach the other mark of the opening. Backstitch at the start and end of this, as well as sewing as close to the edge of the fold as possible.

Add in elastic
Then it is time to thread the elastic through the casing. First measure around your waist with the elastic, ensuring that it isn’t too tight or loose on your waist. Add a little extra to the end of the elastic to compensate for where it will be attached. I always go by my waist measurement as a starting point and adjust accordingly.
Then, use a safety pin at each end of the elastic. Attach one safety pin/elastic to the opening of the gap, threading the other end through the casing. Take this steady and be careful not to squeeze the safety pin too hard as it may come undone. Don’t ask me how I know this! When the elastic has come all the way around, pin the two ends together. Try on the dress and adjust where the elastic will attach to the suit.
Connect the two ends with several rows of zig-zag stitching to secure in place. When happy, place the elastic fully into the casing and close the gap.
Then, press the casing towards the skirt. Sew a seam along the bottom edge of the casing, stretching the elastic as you sew. This will secure it all into place and all the raw edges will be neatly inside, as well as having a finishing where the gap is. Finish with a final press.


Step 7 – Sew the Skirt Frill
The frill on this pattern is comprised of several pieces. If you are making the sizes smaller than a 10, you will have fewer pieces to the frill.
Start by connecting the three panels of the front frill. As I mentioned previously, I would advise adding the label tags on, so that you know which bit is which, as it does get confusing. Use French seams to connect.
Then, connect the front and back frill. You have to make sure that you connect the correct sides as this will impact the way the frill flows. Made Label have a video tutorial too, which has a good diagram of which parts attach. Again, using French seams to connect.

Finish off the frill by sewing a rolled hem, using the same method as the frill sleeve. Don’t forget to give it all a press too.
Step 8 – Attaching the Frill
We are nearing the completion of the dress. Of course, you can leave out the frill, hemming the skirt for a shorter version of the dress, but this frill is too pretty to miss off!
Start by marking the halfway points of the front and back of the bottom of the skirt, as well as the top of the frill. Then, mark the quarter waymarks too.
On the top of the frill, sew two rows of gathering stitches (the longest stitch possible on your machine). Sew the gathering stitches separately on the front and back of the frill, stopping at each side seam. Also, remember to leave long tails of threads on each gathering stitch.
Gather the frill slightly and pin the frill to the skirt at the halfway mark. Also, pin at the quarter marks, and gather the frill to fit the bottom of the skirt. Match the side seams as well, so that everything remains in line.


Attach with French seams, then press the seam towards the bottom of the skirt.
Step 9 – Add Hook and Eye Closure
The final step in finishing the tie front maxi dress is adding the hook and eye closures of the top of the dress. You want to mark where you want the hook and eye closures to be. It is a good idea to try the dress on to see where it sits so that you can get a rough guide of where the hook and eyes will sit.
I used three hooks and eye closures, however, you could use more if you wanted more coverage. Mark these at an even distance from each other, on either side of the inside part of the bias binding on the neckline. Also, ensure that the hook and eye closure marks are exactly opposite each other. You don’t want the closures sitting wonky from each other.
Hand tack these into place, making sure that you do not go through all of the bias. You want the stitching to remain on the inside of the dress and not show on the outside. Also make sure the hook is facing upwards towards the inside of the top, and the eye towards the outside edge. This will ensure that it doesn’t gap when fastened.

When wearing the dress, make sure that you squeeze the hook and eye so that it is firmly closed. If you don’t do this then there is a very high chance that the closures will keep coming undone when wearing. Again, don’t ask me how I know this!
Then the tie front maxi dress is complete and ready to wear!


What do you think of this dress? Will you be making one of your own, or do you have other sewing plans? Let me know in the comments below!
How to Sew a Tie Front Maxi Dress – Video
Here is the video version of the making of this dress. Sometimes a mixture of video as well as the blog really helps to understand the process of making it. Don’t forget to like the video if you have enjoyed it, and subscribe to my channel! It would be lovely for you to be part of the YouTube family as well!
How to Sew a Tife Front Maxi Dress – Save it!
If you have enjoyed this post, then why not share the love by sharing it or pinning it? You can also check out my Pinterest for more creative inspiration!


Have a creative project in mind, but don’t know how to plan it? I have you covered with a FREE creative project planner when you sign up to my email list. Grab yours now!

This dress is gorgeous! Thank you for creating and showing such a thorough step by step guide, the result is amazing! <3
http://www.couture-case.com/
Aww thank you, I am glad you like it! I am so happy with how it turned out, would highly recommend the pattern if you are into sewing!
Thanks for reading and commenting 🙂
Aimsy xoxo
Wow this is such a gorgeous cut and you’ve picked a beautiful print!
Gemma
http://www.atouchoftaste.co.uk
Aww thank you, it is such a great style isn’t it? I love the fabric too!
Thanks for commenting 🙂
Aimsy xoxo
This is such a cute dress! I love the fabric you choose and your finished product looks amazing on you! How nice it must be to sew as well as you do! Thanks for sharing.
I am glad you like it! The fabric is just beautiful, isn’t it? This is just a snapshot of the project really, there is a lot of huffing and puffing that goes on when sewing anything! haha!
Thanks for commenting 🙂
Aimsy xoxo
Oh wow!!!!!! This dress is absolutely stunning. It’s great that you made your own dresses and share your DIY with readers. I really like your blog. Keep up the good work. You’re awesome!
I am so glad that you like it! There is something about turning a piece of fabric into something wearable…pure magic!
Thank you, and I hope you like the upcoming DIYs!
Aimsy xoxo
oh wow – this turned out beautifully! x
Aww, thank you! I love how it turned out, especially the neat finishes of the seams!
Thanks for commenting 🙂
Aimsy xoxo
The fabric you’ve chosen is lovely and the button detailing is just beautiful, Aimsy. I think a whole dress, especially with a tie front, is a step too far for me, but thank you for sharing your step by step and making it look so easy! 🙂
Oh, isn’t it just a fab print and colour combo? I am sure with practice you would boss the make…practice makes perfect!
Thanks for commenting and I am glad you like it!
Aimsy xoxo
This dress is beautiful! Love the print and the tie front detail is so cute!
xoxo
Lovely
http://www.mynameislovely.com
Aww, thank you…the print and tie front just make it, don’t they?
I am glad you like it and thank you for commenting 🙂
Aimsy xoxo
I can not believe you made this! Wow. I am always so impressed with people who can sew. I could not sew my way out of a paper bag lol. I can bake, I can cook, sewing not so much. I stick to computers. And indeed you chose a great pattern
Allie of
http://www.allienyc.com
I am sure you would pick it up with a bit of practice! The dress turned out so good though, didn’t it?
I am glad you like it too!
Thanks for commenting 🙂
Aimsy xoxo
Such a lovely dress. Love the floral print. Love the pictures. Thank you so much for sharing.
Aww thank you, I am glad you like it. The print is just fab, isn’t it?
Thank you so much for commenting 🙂
Aimsy xoxo
Wow, this is such a gorgeous dress. I wouldn’t have ever guessed that you had made it yourself! It looks really sweet and would be perfect for summer or a BBQ. I love how flowy it is and that it’s quite long. Thank you for sharing this tutorial, you look stunning! Em x
Aww, thank you. I love that it doesn’t look ‘handmade’ because that means it has been sewn correctly haha! It would be perfect for a BBQ or picnic. The good thing about viscose is that it is flowy, so will keep you cool in the warmer months.
I am so glad you like it and thank you for commenting!
Aimsy xoxo
That is such a stunning dress!
Aww thank you so much, I am glad you like it!
Aimsy xoxo
Absolutely in love with this dress! I never seem to find a nice tie front dress I like and this would be such a great solution to it! Really love the fabric and long back side, it looks so summery! x
Aww thank you, I am so glad that you like it! The tie front is a nice twist on it, isn’t it? Deffo is not something you can find in the shops every day either.
Thanks so much for commenting 🙂
Aimsy xoxo
This is such a lovely shape on you! Tie front maxi dresses are something that I don’t see a lot of but I absolutely love this design 🙂
https://www.femaleoriginal.com
Aww, thank you so much. I love that it is slightly fitted but loose. The tie front adds to the design, doesn’t it?
Glad you like it and thank you so much for commenting 🙂
Aimsy xoxo
I LOVE a maxi dress, they are my absolute favourite to wear. My gran has been teaching me about sewing more so I really want to make more dresses and this is perfect! Thank you for sharing, I love the material you’ve chosen and the tie bit is a lovely detail.
I love a maxi dress too, but struggle with being only 5ft 3, so making my own is deffo the way to go haha! Hope you are having fun learning to sew!
Aimsy xoxo