

I have another Mean Girls inspired project for you today, making your own DIY stickers. All you need is some mean girls quotes and a digital cutting machine.
Cast your mind back to my previous post Mean Girls Inspired Wax Melts, and you will see that I created a few stickers to go with them. Lovely little stickers to state exactly which wax melt was by name or by Mean Girls quote.
Well, in today’s post I thought I would show you how to make your own DIY stickers that are Mean Girls inspired. This project can be adapted to make whatever DIY stickers you like, using the Silhouette Cameo 4, or any other digital cutting machine. They are really simple to make and require just a little bit of work to get them just right.
You can create so many crafty things with a digital cutting machine, such as vinyl designs and DIY Cake Toppers. This means you can create unique designs that nobody else has and is a great way to unleash your creativity. What’s better is you can potentially start your own handmade business from the crafty bits that you make!

So, if you would like to see how to make your own DIY stickers, with the influence of Mean Girls and using the Silhouette Cameo 4, then… Let’s get crafting!
DIY Stickers – What You Need
You only need a few items to make your own DIY stickers, here is what I used to make mine. Please note some items on this list are affiliate links. This means I earn a small amount of commission should you make a purchase through the link. This is at absolutely no cost to you. All links are marked with an asterisk (*).
- Silhouette Cameo 4 / digital cutting machine – I bought mine from Creative Printers of London and got a great deal with some freebies (no affiliate and better deal than Amazon!)
- Design Software
- Laptop/PC
- Colour ink printer – I use an older Epson SX430, not always the best print quality but does the job!
- A4 Sticker paper* – This is the one I used
Step 1 – Create Design
For the design of these DIY stickers, I am taking inspiration from various Mean Girls quotes. These are the same quotes as the previous post. As well as including the actual quote, I added a few pictures to go with them. For the “I want my pink shirt back”, I found a clip art image of a pink shirt; “It’s October 3rd) has a clip art blank calendar image. Finally for the “She doesn’t even go here” I wanted a picture of Damien in the hoodie.
Search on the internet for an image that you like. Be mindful if you are thinking of selling these as a lot of images are copyright, and you require the correct permissions to use them. You can also use clip art to find pictures also, and these may already be included on your PC.
I like the drawn /cartoon look to images for stickers so I aimed to find this style. Unfortunately, I couldn’t find that type of style for the “she doesn’t even go here” image. Therefore I used an image still of the scene from the film and made this into the style I like.
Using editing software I changed the effect to a cartoon style as well as adding in more blur. I can’t tell you the exact amount of the effects I used, but I kept altering them until they became the style I wanted for the sticker.
Step 2 – Use Design software
Once you have your chosen pictures, it is time to open up the design software for the Silhouette Cameo 4. I like to have a working tab for my designs, with the other tabs the various images.
Use the ‘Trace and detach’ feature to cut out the picture from any backgrounds, if the image has it, and copy/paste this into the working tab.
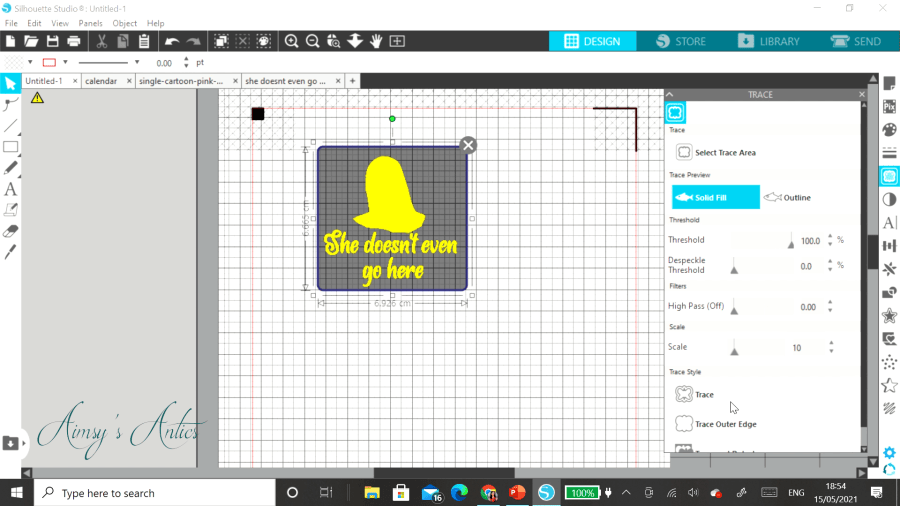
Then, use the ‘text’ feature to create your chosen quotes. Alter the font, size and colour of these to match the image you are using. From the “She doesn’t even go here”, I used the colour selector and selected the blue/purple shade to match the text. I did the same with “I want my pink shirt back”. For “It’s October 3rd, I used plain black font to go with the calendar theme.
Align the text and images how you would like, selecting both and grouping them into one image. Then use the ‘Trace’ feature again. This will create an outline for the image/text combination, however, it will then create cut lines. I want an outline around the stickers so that it peels off as one (if that makes sense). Now, that the image has been traced, we can use ‘offset’ to create this outline. Drag the slider to the desired outline amount and click apply. You can then go back into the design and delete the traced image, as this is no longer needed. I found trying to create the offset without the trace first, didn’t result in the outline offset that I wanted. This was the only way I could do it.

Repeat the same process for all the DIY stickers with image/text.
Stickers without images
For the two remaining quotes, I just used plain text with a background. To do this, create your quote in text. Then use the ‘offset’ to create an outline, make this larger to create a bigger shape. Then, change the background colour of this to contrast with the text. Place the text onto this, and select the placement to the front. Group together again, and follow the same process as before.

For the ‘You go Glen Coco’, I actually used a design that I got free from the Silhouette design studio. This is a simple banner/flag type design. I simply ungrouped all the items of the image and deleted the bits that I didn’t need. Then created the text and placed it in the middle, follow the same routine as before.

If you are looking for free font, then Font Bundles offers loads of great fonts to use. Just make sure you check the license, as some are only for personal use.
Step 3 – Print
Before sending the designs to the printer, make sure to set up the page correctly. Make sure the page is the size of the sticker paper you are using. In this case, it is A4. You also want to make sure that you have selected the ‘registration marks’ option as well. This bit is really important, as this feature allows you to print and cut the design.
Move the designs, so they are within the parameters of the registration marks and the edge cut marks. You want them inside these marks, as again you won’t be able to successfully print and cut them.
Once you are happy with the designs, select the print option. This will open up the design print preview. Make sure to change the printer settings to colour, unless you want black and white images and click print. Follow the instructions on your sticker paper for which way around to place the sicker paper. I always like to do a test print.
Fingers crossed and your DIY sticker designs should now be printed out and ready to cut.

Step 4 – Cut stickers
Now we are getting towards the end of making the stickers, but I guess it is the most crucial part…cutting them out.
Load the stickers on, right side up onto your cutting mat and place them into the cutting machine. Head to the ‘send’ panel and change the project media to ‘sticker…’ depending on what your sticker paper is. My sticker paper is white and matte, and therefore I selected ‘sticker paper white’ for mine. There are lots of options, so chose whichever is best suited to your sticker paper.
I used the rachet /kraft blade which came with my machine, but you can also use the auto blade. Selecting the sticker paper should alter the settings of the blade to match. Also select the over cut option, as this will help cut the design out fully and neatly.
You want to select the cut edge option to cut out the stickers. This should just cut out the edges of the designs that we want. However, sometimes the software doesn’t play ball with this (or maybe it is just my way of doing things), therefore we have to try something else. Head back into the ‘design’ tab, and change all the outlines to one single colour. Then, head back into ‘send’ and go under the tab ‘by line’. Select the colour of all the lines, deselecting any other colour. This should tell the machine to only cut this colour line.
Then hit the send button and the DIY stickers should start cutting out. The registration marks will be read and then the cutting will commence. Make sure there is enough light, as this can impact the machine successfully registering.

Step 5 – Peel and Stick
With this technique, the designs will be fully cut out, so that you have individual stickers. I haven’t quite worked out how to only cut around the sticker, leaving the background just yet. That’s another project!
Check that everything has cut out as planned. Sometimes the registration marks don’t always work correctly, leading to misaligned cutting. Fingers crossed yours have cut out just as planned. If not repeat the process of printing and lining up the sticker paper onto the mat correctly, as well as ensuring there is enough light for the marks to be detected.

All you then have to do is remove the stickers from the backing and stick them down onto whatever you like. In this case, it was onto some biodegradable packaging for the Mean Girls wax melts.
What do you think of these DIY stickers? Do you have a favourite design? Let me know in the comments below!


DIY Stickers – Video
Here is the video version of this post. Sometimes it is easier to follow the steps by watching rather than reading, don’t you think? Don’t forget to give the video a big thumbs up if you have enjoyed it, and subscribe to my channel to keep up with all my crafty antics over on YouTube!
DIY Stickers – Share the Love
If you have enjoyed this post, then why not share the love. Hit any of the share buttons, or pin it for later! I am over on Pinterest too if you fancy some more creative inspiration.


Also, if you have a craft project in mind, then why not try out the FREE craft project planner you can get when you sign up to my email list!

Another great project Aimsy! I love the creativity and fun in these stickers. Thanks for sharing!
Aww thank you ad glad you enjoyed it! I love that you could make anything into a sticker.
Thanks for commenting 🙂
Aimsy xoxo
These are so cool! I wish I was creative and could make something like this. Digital art is not my strong point!
Corinne x
I wish I was better at digital art as it isn’t my strong point either! I love that you can create anything you want with it though!
Glad you liked and thanks for commenting 🙂
These are so cute!
Aww thanks. Glad you like them!
Aimsy xoxo
What a cute idea!!
Thanks, glad you like them!
Aimsy xoxo
Okay, this is an A+ post haha. I love this idea so much! The plastics would definitely approve! 😀
xoxo,
Sydney
http://www.thelotuslist.blogspot.com
Ahh glad you liked it! Maybe they will let us sit with them?!
Thanks so much for commenting 🙂
Aimsy xoxo
These stickers are so cool!
xoxo
Lovely
http://www.mynameislovely.com
Glad you like them!
Aimsy xoxo
Very interesting post! Thanks for sharing.
Infinitely Posh
Glad you liked it!
Aimsy xoxo
Wow pretty unusual idea, very creative..
Yeah, they are a bit niche, but perfect for those who love the film! Glad you liked them 🙂
Aimsy xoxo
Aw, I love these stickers so much! They look so good. I just watched your YouTube tutorial on them and it was so good and easy to follow! x
Lynn | https://www.lynnmumbingmejia.com
Aww, glad you like them, Lynn! Glad that you found the video easy to follow. Sometimes I worry that it isn’t as easy to follow as I think, so it’s great to hear that it is!
Thanks for commenting 🙂
Aimsy xoxo
Thanks for sharing such a great idea, looking forward for the next post!
Cheers,
Alexandra,
Curtain Bang Hairstyles Ideas
Curtain Bang Hairstyles Ideas
Glad you liked them. Hope you enjoy the next project!
Aimsy xoxo
These look so amazing!
Danielle | thereluctantblogger.co.uk
Aww thank you, glad you like them!
Aimsy xoxo
I love the look of all of these stickers! Really helpful post too, you’re so talented x
Glad you like them! I loved making them I trying to fit a picture with the various quotes.
Thanks for commenting 🙂
Aimsy xoxo